
18 Creative And Useful Popular DIY Ideas - DIY & Crafts If you have some free time and want to use it for producing something creative, then you will definitely love the following ideas.

We have prepared 18 Creative and Useful Popular DIY Ideas, that you should try to do. There are so easy to be done and won’t take much of your precious time. Another good side about these ideas is that they won’t cost you much, because most of the materials used can be found at your home, some of them that you even thought were for trash.
Take a look at the pictures below and choose which one you will try. Rope Bowl Suitcases Shelf Orange Holders Oreo and Peanut Butter Brownie Cakes Photo Via: Casa Photo VIa: 2crafty4myskirt Photo Via: Etsy Photo Via: How to Make a Cake with Zebra Stripes on the Inside Photo Via: Recycled Wine Bottle Tiki Torch What Did You Think? Next Post. This DIY Glowing Shelves Are So Easy To Make That Anyone Can Do This. - Creative people never stop making something or other to decorate their house.

But to keep all that creative stuff you should have similar unique shelves too. Mat Brown, an industrial designer, blogger and jeweler, has crafted his own unique set of stunning shelves using chestnut wood and unearthly blue glowing resin. The first thing that you will notice is the immense visual appeal of these shelves. For as stunning as these things look, they’re actually not that hard to make.
Take a look at how it’s done! First, be ready with a piece of wood with some surface imperfections: cracks, knots, and holes. Shinium Now it’s time to make the mix the resin. Remember not to forget the pigmented resin that will give your shelves the glow you’re looking for It should look like this when it’s all mixed together. Tape the bottom of any holes or cracks so what you’ll be pouring into it stays put. Before you pour anything in, check to confirm the surface is level.
Now start pouring! Painted Rock Garden Markers. These rock garden markers are easy to make and look so beautiful in the garden!
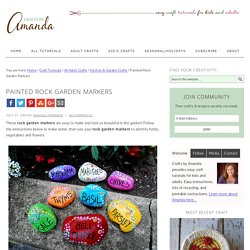
Follow the instructions below to make some, then use your rock garden markers to identify herbs, vegetables and flowers. I have made several garden crafts over the years and I’m especially fond of making garden markers. Several years ago I made these garden markers from smooth stones for my Chicago Tribune column. I’m really happy with how they came out and love all the different colors, and as you can see further down in the post, they last! It’s kind of like planting forever flowers to add a splash of color to an all green herb garden. This is a bit picture heavy as I wanted to show you each marker in its environment… there is a picture-free printable version at the very end of this post. Just in case you are wondering, I didn’t paint the bottom of the rocks. I can’t wait to see how they do over the winter too..
Many have asked how these survived outside in the rain and snow and ice. Supplies Directions. Blog Archive The Rocky Bucket. A few weeks ago I was asked by Home Depot to shop their store and come up with a few new ideas for planters (you’ve seen the other two here and here).
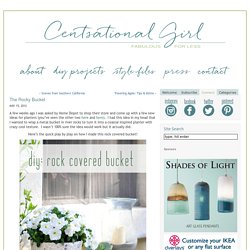
I had this idea in my head that I wanted to wrap a metal bucket in river rocks to turn it into a coastal inspired planter with crazy cool texture. I wasn’t 100% sure the idea would work but it actually did. Here’s the quick play by play on how I made this rock covered bucket! Basic ingredients for a rock covered bucket: strong (not flimsy!) Metal can or bucket that holds its shape when moved (I chose this trash can); 2 sheets 12” x 12” river rock mesh tile; thin set mortar; grout (sanded or nonsanded); putty knife, large sponge.
If you want to make it a planter, punch a few holes in the bottom with a hammer and a thick nail first for drainage. I found it helped to turn the bucket upside down using the top rim as the base to hold the mesh tile to the bucket and allow the thin set mortar to dry. Untitled.