
Slow Sync Flash Explained. Slow Sync Flash: The Ultimate Guide. Slow sync flash is a simple but powerful technique to enhance your flash photography.

Learn what it is, when it's helpful and how to use it. Slow sync flash is one of those terms that sounds very technical and daunting. The sort of thing that we amateur photographers tend to shy away from, telling ourselves, "I'll never need that, I'll leave it to the pros. " But underneath the jargon, slow sync is actually very simple and can be extremely useful in certain situations. Slow Sync Flash: The Ultimate Guide. Understanding Slow Speed Sync Flash and Shutter Curtains. Understanding Slow Speed Sync Flash and Shutter Curtains In order to discuss slow synch flash, we need to elaborate on the subject a bit.

The purpose of using a flash is when you're in low-light or other challenging lighting situations and want a proper exposure. In many cases when the light isn't adequate, you lower your shutter speed. However, at a certain point (below 1/30s if you can really get your body still, otherwise 1/60s) you'll get camera shake, and motion blur can ruin the photo. Understanding Slow Speed Sync Flash and Shutter Curtains. Slow Sync Flash. 21 Outstanding Examples of Rear Curtain Flash. Combine rear curtain flash with a slow shutter speed to capture a surreal image.
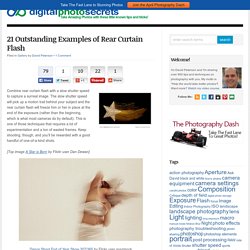
The slow shutter speed will pick up a motion trail behind your subject and the rear curtain flash will freeze him or her in place at the end of the exposure (rather than the beginning, which is what most cameras do by default). This is one of those techniques that requires a lot of experimentation and a ton of wasted frames. Slow Sync Flash: 1st Curtain Or 2nd Curtain? Have you tried out slow sync flash yet?

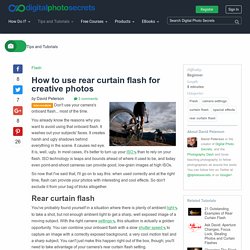
Well you should. How to use rear curtain flash for creative photos. Intermediate Don't use your camera's onboard flash... most of the time.
You already know the reasons why you want to avoid using that onboard flash. It washes out your subjects' faces. It creates harsh and ugly shadows behind everything in the scene. It causes red eye. It is, well, ugly. So now that I've said that, I'll go on to say this: when used correctly and at the right time, flash can provide your photos with interesting and cool effects. Slow Sync Flash. One of the biggest photography pitfalls for beginners is what to do after the sun goes down.

When we were kids, Mom would just turn on that flash, and I think a lot of us kind of inherited that idea. Dark places need flash. But I also know how aware you are of just how ugly flash can sometimes be, especially that on-board flash, which causes red eye, hard shadows and washed out faces. So you may just turn up your ISO instead—though that solution has its own set of problems (noise, anyone?). A final solution is a slower shutter speed, but that just causes motion blur and camera shake. Free lensing: dismount your lens for the ultimate creative effect. It’s a little-known fact, but if you remove the lens from your SLR and hold it a few centimetres away from your camera you can still take a picture.
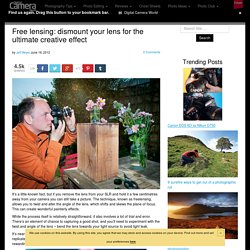
The technique, known as freelensing, allows you to twist and alter the angle of the lens, which shifts and skews the plane of focus. This can create wonderful painterly effects. While the process itself is relatively straightforward, it also involves a lot of trial and error. There’s an element of chance to capturing a good shot, and you’ll need to experiment with the twist and angle of the lens – bend the lens towards your light source to avoid light leak. It’s nearly impossible to get the lens into the same position twice, so it’s equally tricky to replicate a successful shot. Obviously, removing the lens exposes your camera’s sensor to the elements, so take care and clean the sensor as soon as you’re finished (check out this perfectly safe guide to sensor cleaning).
Step 3: Edit your shot Shoot in raw for maximum quality. DO or Di? Freelensing Photography: The Risks & Results of this Strange Technique. Freelensing, if you’re not familiar with the term, can be described as a photographic free-style technique, for its rather risky and venturous purpose.

It is nothing but taking a picture with a camera and a lens, but without mounting the lens on the camera. Freelensing is all about holding the lens in front of the camera to create extraordinary bokehs and sickening light effects. Free-Lensing Photography Tutorial. Recently, I visited my dear friend Sarah of Arrow and Apple Photography for a few days.

We had a few photo adventures together and she shared a super fun technique with me that I invited her to share with you on the blog too! Freelensing! Turn any Lens into a Tilt-Shift or Macro. A great philosopher once told us, “first, you must first learn to focus without focusing.”

Or maybe it was our optometrist. Whatever. It’s deep. How-to: Freelensing. The era of digital sensors has created a pervading fear of dust among photographers. Many shooters try not to change lenses except when they have to, and they pale at the thought of a gaping-open lens mount. But sometimes it's worth throwing caution to the wind. Often times I find the wrong way to use my equipment is the best way. Let me introduce you to the world of freelensing. A Photographer's Guide to Freelensing, The Poor Man's Tilt-Shift Lens. Freelensing is a relatively inexpensive way of getting the similarly unique effect of an expensive tilt-shift lens, where the focus plane is thrown out of whack with the added bonus of natural light leaks.
No, this isnt anything new, and the look that an expensive tilt-shift lens gives has been around for a while, but I wanted to share with you my experience with it and how I did it. Yes, I did purchase a brand new Nikkor 50mm f/1.8 D lens from B&H only to break it and take it apart the minute I took it out of the box… but that was the reason I purchased it. I had tossed around the idea of spending the money on a tilt-shift lens that would easily cost me over $1000, but after reading about the freelensing technique from Sam Hurd, I figured I would give it a try. At the end of the day, it’s the unique look that I’m going for, so if I could get that by breaking a $150 lens, I’m down to do it. Perfect! WOW, that did it; getting the rear element closer to the sensor was the trick. It’s cool. The art of Freelensing. As photographers and in turn artists, we are constantly searching for new ways to invigorate our art and revitalize our passion for it.
Sometimes this need to create something new and different causes us to try out unconventional and potentially ill-advised methods. Freelensing is one of these sometimes applauded, sometimes frowned upon practices which provides visually interesting photographs that are hard to recreate in any other fashion. But it also has its risks…. [Top image soft by Flickr user gioiadeantoniis] The Basics Freelensing, sometimes referred to as the poor man’s tilt shift lens, isn’t actually a lens. Freelensing. Alright, this one isn’t for the faint of heart. You probably guessed that based on the title, which is scarily similar to words like “free-falling,” “free-running” and “free-diving,” or other insane things that people do for an adrenaline rush.
A Beginner's Notes on DSLR Photography. 6 steps to easy zoom-burst photography - ilex.photography. An impressive zoom-burst shot like this doesn’t require any complicated set-ups or lengthy image-editing – and you can achieve it with the standard zoom lens that comes with virtually any SLR, so you don’t need to spend a penny! Zoom-bursts can be used to enhance an action shot. © Steve Corey. www.flickr.com/photos/stevecorey.
Create a zoom burst - What Digital Camera. Add motion to your photographs in an instant with this simple but effective technique using your DSLR. Radial blur: fake a zoom burst effect from your fixed focal length lens. Digital-photography-school. In-Camera Effects: The Zoom Effect and Multiple Exposures. One of the complaints a lot of people have about the digital era is the need for post-processing software. In the olden days, we took our film down to the local drugstore, had it processed and that was that. But today you almost can’t get away without that additional post-processing step—or at least that’s what you’ve been told. Zoom Blur Effect In Camera. Tired of the same old shots?