
DIYing it. Cut it out!! ......canvas tutorial. I love a wall I can read!
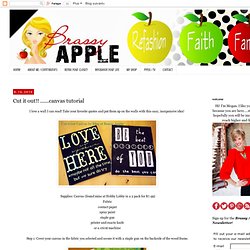
Take your favorite quotes and put them up on the walls with this easy, inexpensive idea! Supplies: Canvas (found mine at Hobby Lobby in a 2 pack for $7.99) Fabric contact paper spray paint staple gun printer and exacto knife or a cricut machine Step 1: Cover your canvas in the fabric you selected and secure it with a staple gun on the backside of the wood frame. Step 2: Using contact paper cut out the letters of your saying on a circut machine.
Position the letters on the canvas. Step 3: When all the letters have been placed, spray a thick layer of spray paint over the entire canvas. Step 4: When it is dry, peel the letters off. Hang it on your wall and enjoy! Another design option: Instead of covering the canvas with fabric, just place your letters onto the canvas, spray and peel. **edited to add: I get several emails asking about how to get the letters to stick better and prevent the paint from bleeding underneath. Pinwheel Whimsy. Yesterday I was determined to have pinwheels, so I made them right quick.

I knew that once you saw them you would feel the same way, so I made a little tutorial to show you how. :) First tear the pages out of your beloved, falling-apart copy of the Decline and Fall of the Roman Empire Part II. And lament the loss of all the useful things you might have learned had you ever read it. Gilding the Lily. I like the collected-over-time look of my bookcases, but I've always been drawn to the uniform look of the Restoration Hardware bookshelves with the books covered in a solid color.

Here's one of the shelves I like. I decided I'd like to give it a try and found some large books at a sale. Book Birdhouses. By now everyone has seen a book wreath.
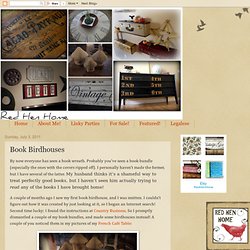
Probably you’ve seen a book bundle (especially the ones with the covers ripped off). Scrappy Sparrows. I love finding inspiration...

A BIG thank you to Sugar & Spice in the Land of Balls & Sticks for inspiring this project and post! While visiting her lovely blog, a little bird told me that Spring is here! Want to welcome Spring into your own home? These little guys are made out of paperclips and scrapbook paper. Here's the how to...Gather the Gear. Book Page Spring Banner. I decided I needed a spring banner (ha I told you I love them!)
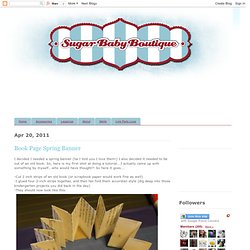
I also decided it needed to be out of an old book. So, here is my first shot at doing a tutorial...I actually came up with something by myself...who would have thought?! So here it goes... -Cut 2 inch strips of an old book (or scrapbook paper would work fine as well) -I glued four 2-inch strips together, and then fan fold them accordian style (dig deep into those kindergarten projects you did back in the day) -They should now look like this: -Cut 2-inch circles out of a cereal box (if you're cheapo like me) or 2-inch circles out of chipboard -I cut 6 for the letters SPRING (try to keep little chubbo fingers from stealing them :)): -Cut 2-inch circles out of scrapbook paper in your color choice. -Print your letters out on cardstock and cut them slightly smaller than the scrapbook letters. -Glue the letter circle to the scrapbook circle.
-Hot glue your letters to the front and you will have a stack of cute letters. How to: instant recycled paper flowers. I'd like to introduce you to my new favorite helper: Shredder!
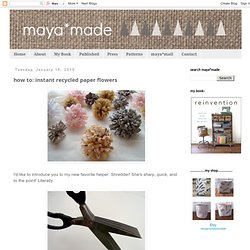
She's sharp, quick, and to the point! Literally. I discovered this crazy Edward Scissorhand tool in one of my favorite tiny shops in San Francisco, Bell'occhio. They use it for their signature gift wrapping. I was so taken with its ability to instantly transform simple paper into something extraordinary, that I had to get a pair. Paper Flower Key Holder / Mark Montano. Difficulty Rating: Beginner Tags If you need a quick 'just because' gift for someone, this is it!
It’s simple to make, couldn’t be less expensive and we can all use one. I for one am always losing my keys and this, by far, is the easiest way for me to keep track of them. Here’s how: 1. 2. 3. 4. 5. 6. 7. 8. 9. 10. Supply List Wire hanger Needle nose pliers with built in wire cutter (most are made like this) Hot glue gun and glue sticks Stapler Book pages Fiskars Scissors and Pinking Shears Krylon Clear CoatSmall piece of cardboard. Paper Flowers – Anyone Can Do That. Japanese Kusudama, this tutorial is featured on Craftuts Anyone can do that, I assure you.

The proof: I can, just take a quick look at my result below. And, believe me, I am neither meticulous nor particularly patient. You could even say I’m the opposite. Funky Junk Inspired. I'm reposting this from the Christmas season, since it is the most Funky Junkiest inspired post I can think of.
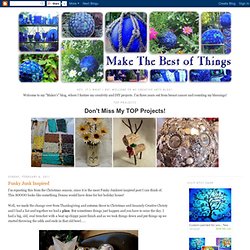
This SOOOO looks like something Donna would have done for her holiday house! Well, we made the change over from Thanksgiving and autumn decor to Christmas and Insanely Creative Christy and I had a list and together we had a plan. But sometimes things just happen and you have to seize the day. Tutorials. Skip to navigation DIY Project & Tutorials I love making things! Below is a catalog of all the tutorials that can be found on the blog.
Click the links below to view full tutorials.