
How to Create a Beaded Leather Wrap Bracelet. How to:DIY Crobra Braid Bracelet! Easy Woven Wrap Bracelet. DIY Chainmail Necklace. You’ll need: Start by separating the jump rings into two halves: 175 open and 175 closed.
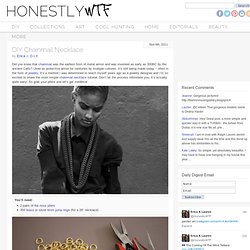
Thread three closed jump rings onto an open jump ring. Close the ring. Spread the three rings apart, with the rings looking exactly as shown below. The bottom ring will be the end of the necklace and the top two rings, which are spread open over the middle ring, will be where the chain mail begins. Keeping the rings in place with your forefinger and thumb, take an open jump ring and hook it through the front side of the two rings. Add 2 closed rings to the open ring and close. Spread the two rings apart in the same way as the first set of rings. Add 2 closed rings and close. To add an optional fourth row, lay the necklace flat and hook an open ring through first and second closed rings on the right side.
I stopped at 4 rows but you can continue adding rows for a more bib-like necklace. Connect the two ends with a single jump ring or clasp. Fini! (top image from here, rest of images by HonestlyWTF) Tuto - Un collier tressé en perles de rocaille. Pondu par Flo le 24 avril 2012 Voici un tuto photos pour réaliser très simplement un collier tressé avec de petites perles de rocaille.
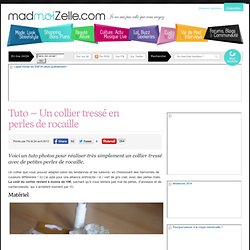
Un collier que vous pouvez adapter selon les tendances et les saisons, en choisissant des harmonies de couleurs différentes ! Ici j’ai opté pour une alliance anthracite / or / vert de gris clair, avec des perles mats. Le coût du collier revient à moins de 10€, sachant qu’il vous restera pas mal de perles, d’anneaux et de cache-noeuds, qui s’achètent souvent par 10.
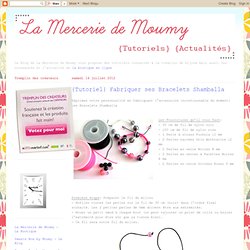
Matériel Trois couleurs de perles de rocailleDu fil à coutureDes cache-noeudsDes anneauxDe la chaîne avec un fermoirDes ciseauxUne aiguilleUne pince (facultatif, souvent les cache-noeuds sont souples et se ferment à la main) Étapes Préparez deux rangs de perles de chaque couleur, sur un fil double, histoire d’assurer la longévité de votre collier. Vous allez ensuite assembler les deux rangs de même couleur avec un cache-noeud. Voici le résultat. Pour terminer, fixez votre chaîne à chaque anneau. Paracord bracelet with a side release buckle. D.I.Y TUTO BRACELET SHAMBALLA NOUVELLE VERSION RAPIDE ET FACILE ! Noeud Chinois serpent. {Tutoriel} Fabriquer ses Bracelets Shamballa. Exprimez votre personnalité en fabriquant l’accessoire incontournable du moment: Les Bracelets Shamballa.
Tuto - Des bracelets porte-bonheur par milliers. Pondu par Flo le 17 août 2012 Les bracelets porte-bonheur en coton et perles sont très en vogue en été.
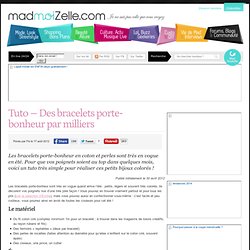
Pour que vos poignets soient au top dans quelques mois, voici un tuto très simple pour réaliser ces petits bijoux colorés ! Publié initialement le 30 avril 2012 Les bracelets porte-bonheur sont très en vogue quand arrive l’été : petits, légers et souvent très colorés, ils décorent vos poignets nus d’une très jolie façon ! Vous pouvez en trouver vraiment partout et pour tous les prix (voir la sélection d’Émilie), mais vous pouvez aussi en confectionner vous-même : c’est facile et peu coûteux, vous pourrez ainsi en avoir de toutes les couleurs pour cet été !
Le matériel Du fil coton ciré (comptez minimum 1m pour un bracelet ; à trouver dans les magasins de loisirs créatifs, au rayon rubans et fils)Des fermoirs « repliables » (deux par bracelet)Des perles de rocailles (faites attention au diamètre pour qu’elles s’enfilent sur le coton ciré, souvent épais)Des ciseaux, une pince, un cutter. Wednes-diy. A few of you have asked about the amazing rope swirl tapestries in our new store displays and you’re in luck because one of our display artists put together a tutorial on how to make them!
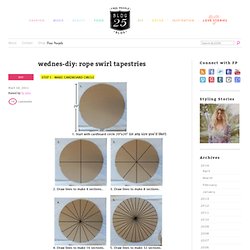
It looks like such a fun rainy day project. what you need: a large piece of cardboard, black marker, scissors, rope in various sizes and colors, neon twine, pompoms. use a variety of different colors and textures to create a fun swirl – these purple and orange tassels are just another piece of string woven in with the others! Once you’ve got it down, you can make a whole bunch in different sizes and colors, to create a whole wall tapestry just like the ones in our stores :) i can’t wait to try this! Be sure to check out our new DIY Projects category for more DIY Inspiration!
Trending on FP.com: Floral dresses, high waisted bikinis, bralettes, off the shoulder tops, party dresses, gladiator sandals, lace dresses. DIY. DIY Steel & Ombre Ring Hey everyone!
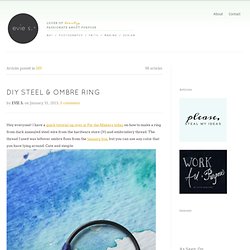
I have a quick tutorial up over at For the Makers today on how to make a ring from dark annealed steel wire from the hardware store (3!) And embroidery thread. The thread I used was leftover ombre floss from the January box, but you can use any color that you have lying around.