
Over 50 Wood Pallet Projects. Crafty Dafty / DIY Fabric Covered Flower Pots. Real Weddings. Stencil with freezer paper (harry potter tee) Yes, I am a nerd.

I came up with a brilliant idea for a Harry Potter t-shirt and I couldn't resist. "Expecto Patronum! " However, you can make whatever kind of design you want with a freezer paper stencil. It doesn't have to be Harry Potter related. (Although it would be awesome if it was.) I learned about the joys of freezer paper back in my early college days. Basically, freezer paper is backed with a plastic coating that will stick to soft surfaces when ironed, but it peels off cleanly and easily. To make a sweet t-shirt you will need: paper & pencil a t-shirt an iron a piece of cardboard or poster board fabric paint & brush Start by drawing your design on some regular old paper.
My design kept getting bigger, so I taped two sheets together. Next, place your design underneath a sheet of freezer paper and trace it neatly with a sharpie. The marker gives your lines greater width making it easier to cut them out and paint them in later. Important: Set these shapes aside. Custom Chalk Lettering by Dana Tanamachi. Dana Tanamachi is one of our all time favorite custom lettering artists and could quite easily be yours.
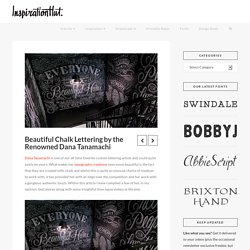
What makes her typography creations even more beautiful is the fact that they are created with chalk and whilst this is quite an unusual choice of medium to work with, it has provided her with an edge over the competition and her work with a gorgeous authentic touch. Within this article I have compiled a few of her, in my opinion, best pieces along with some insightful time-lapse videos at the end. Dana Tanamachi-Williams is a Texas-bred, Brooklyn-based graphic designer and letterer who enjoys living a quiet life and working with her hands. After designing Broadway show posters at SpotCo and working under Louise Fili, Dana opened her own design & lettering boutique, Tanamachi Studio.
She has been commissioned by clients such as Google, Yahoo! Re-Visited: Beautiful Chalk Lettering by Dana Tanamachi August 13, 2013 In "Inspiration" Dilly-Dali Art: Abstract Art. All 3 of us decided to work on one together!

The girls started off by dripping and brushing rubber cement all over a canvas When the rubber cement was dry I placed a few coffee filters on the canvas we dripped food coloring onto the filters then sprayed them with water until the edges began to fall (It doesn't take much water for that to happen) When the coffee filters are dry their edges will be pulled off the canvas and they should be easily removed. If not, then they're probably still a little damp. Start the process all over again layering more coffee filters over the canvas Repeat until you have an amazing design that you love! We did it 3 times This was such a fun process, with beautiful results! I was thinking that maybe we didn't really need the rubber cement resist but when we rubbed it all off we found lovely brush strokes where a bit of the coloring bled through The layering of the coffee filters really added nice depth to the picture as well as creating neat little lines of mixed colors. Watercolour Texture Techniques by *hatefueled on deviantART.
*The Graphics Fairy LLC* Our Dining Room Table – Guest Blogger! » Apartment Living Blog » ForRent.com : Apartment Living. Brought to you from our friend Tommy Sibiga: This dining room table has been a labor of love…so to speak.

It’s been fun to try out new tools and new techniques, and I’ve learned a ton for the next time around. This has really felt like the first time building something this substantial from the ground up. Here’s how it all started. I recently came across the blog Ana-White.com. The big problem with wanting to use 4×4’s for the legs is that nobody really sells 4×4’s unless they are pressure treated. The first thing that I did was cut the 2×12’s, 2×8’s (for the breadboards), and 4×4’s to length.
Once I dry-fit it together, I went back and tweaked it some more to make it more subtle. To complete the base, I needed to cut, distress, stain, and use the Kreg jig to drill holes, for the side aprons and end aprons. I then attached the bread boards using all my clamps. After a test strip with Briwax, Special Walnut, and American Classic, I decided to go with the original Dark Walnut stain. Starburst Twig Wreath. Bookbinding Tutorial by ~JamesDarrow.