
How to tuck non-skinny jeans into boots. How to rock jeans and boots Don’t own any skinny jeans or just not a straight leg kind of girl? No worries! If you have the know-how, it’s fairly simple to tuck those bulky, wide leg pants into a pair of cute boots. We’ll show you not one, but two chic ways to rock the look. Get ready girls! What's needed: First, you’ll want to find a pair of boots that hit right below your knees or a bit higher. As far as jeans go, opt for a pair that has some flare. Last but not least, grab some thin, high socks (or trouser socks) to slide over your pants to hold that fold in place. How to tuck it: Put on your slimmest pair of non-skinny jeans. Roll up the leg of your jean, as shown in the photo below, to create a nice, clean cuff. Once you’ve created your cuff, transform your wide leg jeans into skinny jeans by pulling the extra material at the back of your leg out. Velvet bow tie.
Ihr Lieben, vor ein paar Tagen hat bei uns ein neuer Scotch&Soda Laden seine Pforten geöffnet und heute war ich zum ersten Mal zu Besuch.

Besonders gefallen hat mir ein Hemd mit samtener Fliege als abnehmbarer Anstecker. Da das ganze leider seinen stolzen Preis hat, habe ich mir nun den Fliegenclip nachgebastelt und an eins meiner Hemden angebracht. Dank der Haarclip-Vorrichtung kann die Fliege an jedes beliebige Kleidungsstück an gebracht und wieder abgenommen werden. Das braucht ihr und So geht's Samtband (3,5 cm Breite), Haarclip (am besten eine "Krokodilspange"), Heißkleber, Schere und LinealTrennt euch ein ca. 21 cm langes Stück Band ab. Modular origami: rings by Mette Pederson « paper unlimited. I’ve wanted to make some rings, modular rings.
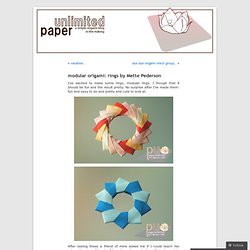
I though that it should be fun and the result pretty. No surprise after I’ve made them: fun and easy to do and pretty and cute to look at. After seeing these a friend of mine asked me if I could teach her origami because it’s cute. Skinny Jean Knee Patch DIY. I’ve been spying pretty elbow and knee patches around the internet and I wanted to get in on the fun.

Here’s a DIY if you’d like to make some too! You will need: A pair of skinny jeans. How to “Unshrink” Your Clothes. Res Old Air Mail Envelope Images 1. More cool vintage stuff!

After the postcards, I knew I had to do some old airmail envelopes. Emails of the past ;). So here are 11 high resolution air mail envelopes – the zip file contains 22 images, front and back for each one. The images are big, around (6000-3500px) and they have nice details – various 30′s postmarked stamps, airmail red and blue patterns, stains, etc. Paper Ephemera Feathers #aleenesrocks @ilovetocreate ~ * THE COUNTRY CHIC COTTAGE (DIY, Home Decor, Crafts, Farmhouse) I really love to craft with paper.
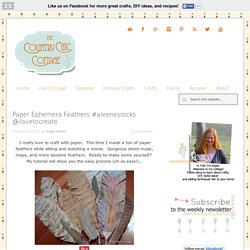
This time I made a ton of paper feathers while sitting and watching a movie. Gorgeous sheet music, maps, and more became feathers. Ready to make some yourself? My tutorial will show you the easy process (oh so easy!) … [Make Your Mark DIY] Union Jack Pillow DIY, London Calling! It thought this might be fun since the Olympics are just around the corner.
![[Make Your Mark DIY] Union Jack Pillow DIY, London Calling!](http://cdn.pearltrees.com/s/pic/th/pillow-london-calling-montano-37595410)
I dig the Union Jack flag because it makes me want to shout “GOD SAVE THE QUEEN!” Or just plain rock out to a Sex Pistols song. Either way, this will give your décor a distinctively hip flavor and have your friends talking about how cool you are. Rock out! 2 pieces of 15” x 20” pieces of blue plaid1/4 yard of red plaid fabric1/4 yard of white cotton fabricRed and white threadSewing machine with zigzag capabilityStraight pinsPillow stuffingSewing needle and matching threadIn white fabric, cut out a strip that is 20” x 3 1/2” another strip that is 15” x 3 1/2” and two strips that are 25” x 2 1/2”In your red plaid fabric, cut out a strip that is 20”x 2 1/2, another strip that is 15”x 2 1/2” and two strips that are 25” x 1 1/2” Working on a flat surface, lay your 25” long white fabric strips in a big X on the pillow. Doctor Who TARDIS Phone Charging Station for Craftzine.com. Today is my birthday!

(Hurrah!) And, in honor of turning the big two-nine, I’m sharing a gift with all of you! (For those of you who’ve seen me in person, my age may come as a shock. Camera Strap Project. Leather Travelog-making workshop for my dear friend! DIY Strap Cover. My musician friend Erin (of Mix Tape) celebrated the big 3-0 this weekend.

I made her a little gift so she can coordinate outfit to instrument on stage. I like the fact that it’s functional (a guitar strap for her fancy-schmancy guitar) but also homemade (a cover made with a teensy bit of a gorgeous fabric she actually gave me for my birthday). This simple DIY works for camera straps, guitar straps, or any sort of strap. I think it would even work for a BELT!
Think of it, you could have ONE belt with a bunch of covers to match all your cute outfits. Get the full Guitar / Camera Strap Cover DIY after the jump…DIY Strap / Belt Cover Tutorial You’ll need 1 strap and some fabric ( I used Heather Ross Far Far Away Unicorns in Blush). 1. If you’re using fusible fleece, cut pieces the same size and fuse it on now. 2.
Project Alicia: DIY: How to Fake Polaroids. I have a recent infatuation with polaroids.

Only I don't own a polaroid camera. This may come as a shock to some of you, as it seems to be a popular question these days at Project Alicia. Somewhere in the webs of my mind I seem to recall owning one at some point. Perhaps it got donated with some other unwanted items. Funny how things go in cycles. Travel Photo Checklist. We've been chatting about all things travel on the blog the last while as I countdown the days until I leave for Queensland, Australia!

Only 5 more days until I board a plane at the Calgary international airport and make my way from LAX to Brisbane to Queensland. I'm busy packing and getting things arranged for the kids while I'm gone. I am such a mixture of excited and nervous, but I'm mostly just excited to get there and see all the wonderful things that Queensland has to offer! I can't wait to share this trip with all of you! You can check out my previous travel posts on purchasing travel insurance, amateur wildlife photography tips, creating a DIY travel notebook and some quick travel photography tips. Repurpose: Playful Postage ... My dad collected stamps as a kid and I loved paging through his carefully arranged (and stored) stamp albums. But now that I think about it, why were all those beautiful stamps hidden away in heavy volumes? I know that my dad's answer would be "because they're valuable! " I wonder ... is that still true? I mean, I'm sure there are some rare, valuable old stamps out there.
But for the most part, wouldn't it be better to just show them off? I saw this great project a long time ago and it's stuck with me - perfectly whimsical. DIY: Map Letter Decor. So, I have a horrible addiction to that front part of Target with the dollar items (I know you know exactly what I’m talking about!). I never need anything there, but I always manage to buy something. Well, on one trip, the gentleman showed me this adorable letter “A” that I’ve seen at craft stores, and I knew I had to do something with it (plus, it was only $1)!
Anyway, I have an addiction to attempting to make things that look like they would be sold in Anthropologie. I adore that store, but I don’t always adore the prices. So, for about $1.25, I made a cute little decor item that could easily be sold for $12+! Make your own mini polaroid prints. I’ve been wanting to buy some of those mini Instagram photo’s that I’ve been seeing everywhere. I searched and searched, and while I found few great sites that were pretty cheap, I just couldn’t press “BUY”. Good thing, because I got over 200 mini prints for $12! The thing I love about Instagram, is it’s REAL LIFE. A sneak peak inside what is going on at that exact moment… whether it’s how someone is feelings, what they are seeing or doing… you are able to be right there following a long. Pretty penpal letter. During our last visit, my cousin, Jade, and I decided we were going to start writing letters to each other, kind of being each other's "penpal".
I hate how writing real letters is going out of style and being replaced by email and text messaging. There's something special about getting a handwritten letter that someone took the time to send you. So Jade and I are going to work on reviving this "ancient" practice of writing letters. Handmade Vintage Button Ring Tutorial with Step by Step Photos - buttonsgaloreandmore.net. Good Morning! Today I thought it would be fun to bring you a tutorial on how to create a wire wrapped ring using a button from the Genuine Vintage Button Tin as the focal piece. In addition to the button you will also need: Ring MandrelNylon Hammer (or rawhide – non marring hammer)Wire SnipsChain Nose Pliers18 Gauge Artistic Wire® By Beadalon in Gun Metal Bronze Supplies needed for an assortment of rings Begin by cutting a 20" length of wire.
Place the center of the button onto the ring mandrel one full size larger than you need for the finished ring size. Wrap the wire around the top and bottom of the button the mandrel so that you have four wraps around the mandrel. Pull the ends of the wire perpendicular to the mandrel and pull tightly to draw the wrapped sections to the center of the button. Begin to wrap the wires clockwise around the shank of the button. Again holding the wires perpendicular to the mandrel, remove the ring from the mandrel.
London Calling: Nail Design. Ok, here it is. In honor of London Fashion week, I have made an original nail design tutorial that's easy enough for any budding artist. This tutorial doesn't use any materials you don't already have in your house. Cool enough for pretty fashion icons, rock 'n rollers, or even plain Janes; the Union Jack pattern is totally eye-catching on your nails! Miss Make: Star Wars Dress + Sewing with Sheets. If you're me and you have tickets to a Dodger game on a stadium-endorsed Star Wars night, well then, you seize and abuse that opportunity to make a themed dress. Even if you don't really know what Star Wars night is.
Even if there are only approximately two other people dressed up. Even if, clearly, they should have made the players use bats that looked like lightsabers, but didn't. DIY Feather Hair Extensions. Inspired by the Creatively Made E-Course. Hello!!! T-Shirt Shopping Bag. DIY Globe Garland. I create map and nautical chart pillows here at salt labs in Detroit, MI. 25 Brilliant & Unexpected Ways to Use Mod Podge. By Jaime Morrison Curtis | DIY camera purse/bag. Hi friends! DIY: Mason Jar Vases.
DIY Wedding Chalkboard. Bring the ocean home...to your bathroom. DIY Fri: Map Card and Envelope. "52 Reasons I Love You" Cards Tutorial. Project 365. DIY Anthropologie-Inspired Photo Transfer Polaroid Shirt with Mod Podge. Decorating Frames « In the Wabe. DIY: Hair Comb Steps. DIY Wreath Ideas - Holiday Wreath Making Ideas. The Braidy Bunch. The DIY: FISHTAIL FRIENDSHIP (BRACELET) Longstitch Bookbinding Tutorial for a Leather Journal. Handmade Zipper Pouch Tutorial. DIY: Mason Jar Soap Dispenser. Lace shorts. Brave-Style Merida Wig & Accessory How-To.