
Little Pony Heaven - Restore your pony. How to Make a Dapper Pet Collar. The Hipster Home Blog Archive How to Make a Tiny Terrarium in a Light Bulb. Ahoy there Hipster Homers!

I’m Julie and I’m the very first guest blogger on this fine site. Today’s project involves breaking stuff, plants, found objects, and miniatures. Fun, right? Let’s get started! We’re going to go through the steps to create your very own little terrarium. Dos and Don’ts: Do use sand or small pebbles; these are good because water drains through them easily. How To: You’ll need a few tools to make a tiny terrarium but nothing complicated to get started. Needle-nose pliersScissorsLong tweezers or chopsticksFlathead screwdriverGlasses or goggles Let’s start with the light bulb.
We will be removing the inside parts of the lightbulb. First, remove the metal tip from the bottom of the bulb. Then, when enough of the sides are raised to get a good grip on them, hold one of the sides with your pliers and yank out the metal tip. Next remove the black glass. Duct Tape No-Sew Tote. Crafty Quickies How To Videos From The Impatient Crafter. KnittingHelp.com. How to Make a Duct Tape Corsage and Flowers. Blog : CRAFT Project: Mason Jar Terrarium.
The crafting world seems to have come down with a major case of terrarium fever, and I’m no exception.
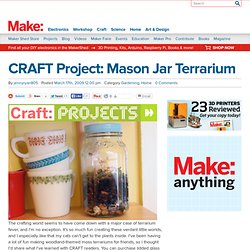
It’s so much fun creating these verdant little worlds, and I especially like that my cats can’t get to the plants inside. I’ve been having a lot of fun making woodland-themed moss terrariums for friends, so I thought I’d share what I’ve learned with CRAFT readers. You can purchase lidded glass containers at craft stores, but this project relies on reusing mason jars you may already have on hand. The rest of the materials needed can easily be found at home and garden stores. Read on to find out more! Start by adding a 1" layer of pebbles to the bottom of the jar, followed by a thin layer of charcoal. If you want to create some interest with height, you could mound up the soil in one area to create a mini-mountain to cover in moss. If you want to get super crazy, use a teeny jam jar to make a mini-terrarium! Related. Recycling Sweaters for Yarn. Shortly after I learned how to knit I read about how one could recycle a sweater for the yarn.
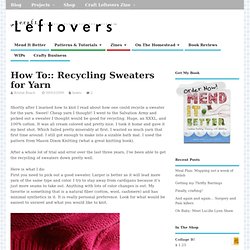
Sweet! Cheap yarn I thought! I went to the Salvation Army and picked out a sweater I thought would be good for recycling. Huge, an XXXL, and 100% cotton. It was all cream colored and pretty nice. After a whole lot of trial and error over the last three years, I’ve been able to get the recycling of sweaters down pretty well. Here is what I do: First you need to pick out a good sweater. I’m just going to assume you are going to take my advice and go with a pull over, so you will start with the collar. From there, take out the seams in the following order: You will then have these pieces: The arms are pretty straight forward, same as the collar, find the bind off edge, unweave the woven in end and wind it off. If you have a ball winder, this is a great time to use it. Look at all this great yarn I salvaged from this one sweater: Another great use of sweaters from the thrift store is to felt them.
Multi Strand Finger Loop Braiding. In this Instructable, I'm going to teach you how to make Finger Loop Braids.
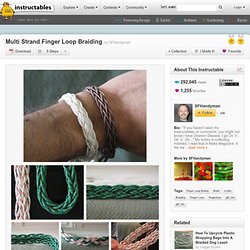
With this technique you can make braids with just your hands that have 10 or more strands each. They can be used for anything. Bracelets, chokers, belts, hat bands, as trim on clothing, or furniture... If you need a strong lacing, a finger loop braid will multiply the strength of your string/rope by 10. To make the videos easy to follow, I made the braids out of rope. Finger Loop Braids were popular from the 15th to the 17th Centuries in Europe, There are still some forms of similar braids made in isolated areas of South America, Asia and the Middle East.
This is the style of braiding that was done in Medieval Europe and all the patterns are translated from Medieval manuscripts by the great folks at Fingerloop.org. Supplies: some kind of rope, string, yarn,...Tools: HandsTime: Depends on the length and pattern of the braid but the ones I'm making only take a few minutes to complete an entire braid. Lets go.