
Easy Origami Box Instructions - How to make a Simple Origami Box. The origami box is simple to make, and can be used to hold other origami pieces.
Or important stuff, like candies. This origami box is also called Masu, which is Japanese for a square wooden box. Follow the step by step photos to make the origami box. If you prefer, we also have origami box video instructions. Made this origami? If you like this, you may also like the origami star box and origami pleated box. If you want a box with a cover, check out the origami box with cover page.
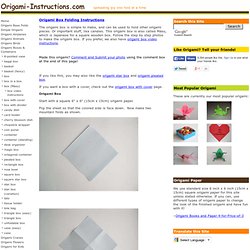
Origami Box Start with a square 6" x 6" (15cm x 15cm) origami paper. Flip the sheet so that the colored side is face down. Using the mountain fold lines as guides, fold the four corners of the paper into its center. Then fold the right edge and the left edge into the centerline. Now fold the top edge down and the bottom edge up, as shown below. Then I'm going to ask you to undo the last two-and-a-half steps! The unfolded paper should like the one below.
One side of the box will be formed as you do this. Do-it-Yourself DIY String Wedding Lanterns Yarn Chandeliers. Jessica of Wednesday Inc shows us how to make those gorgeous twine chandeliers from the inspiration shoot she shared with us this morning.

Using balloons, glue and twine, you can also make these lanterns for your wedding – and then bring it home and use it as your very own mid century lampshade. What you will need are: balloons, glue, yarn, tray for glue, corn starch 1/2 cup of Corn starch, 1/4 cup of Warm water, clear fast drying spray paint, hanging lamp cord or fishing line (depending on your desired final product), and a lighting kit if you’re looking for a fully functional lantern. Jessica recommends using a sharpie to mark on the inflated balloon how much room you need to leave for the lighting cord. She also recommends coating the balloon with vaseline prior to wrapping the yarn coated with glue so it doesn’t stick on the balloon once it’s dry. You can see all the details on Jessica’s blog. Are you getting excited to try to do this at home as much I am?
Instructions: Sweet origami hearts. To be honest, I was never keen on origami hearts (or roses for that matter) for a fairly long time because it was hard to accept the way they look — I find them too edgy and not very loving.

Well that’s all in the past. My perception has changed (and I’m so glad). I have embraced their looks and I will admire them as they are. I’ve been on a folding spree over the new year break, particularly enjoying making heart after heart, starting with: 1. The ring design is by Hiroshi Kumasaka [熊坂浩氏]. Make bigger rings to use as napkin ring, bangle, scroll tie, bottle tag, etc. 1. 8. My preference is to hide those 2 flappy peaks (from step 12) inwards. 2. 2-sided heart Totally in love with this heart by Matthew Gardiner which looks identical both front and back. Notes: Crease well. 3. Followed this tutorial which uses a piece of triangle paper (i.e. the diagonal half of a square). 4.
Designed by Kathleen Weller for a dollar bill. 1. 11. 17-18. Plus. Most favorited all-time.