background preloader

Social Tools

Facebook Twitter

Tweet Button. The Tweet Button provides an easy way for your readers to share links to your post on their Twitter stream. 
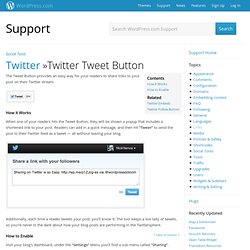
How it Works When one of your readers hits the Tweet Button, they will be shown a popup that includes a shortened link to your post. Readers can add in a quick message, and then hit “Tweet” to send the post to their Twitter feed as a tweet — all without leaving your blog.

Additionally, each time a reader tweets your post, you’ll know it: The tool keeps a live tally of tweets, so you’re never in the dark about how your blog posts are performing in the Twittersphere. ↑ Table of Contents ↑ How to Enable Visit your blog’s dashboard, under the “Settings” Menu you’ll find a sub menu called “Sharing”. On the sharing page, you enable the Twitter share service by dragging the button from the Available Services to the Enabled Services.

For more information on managing sharing services please see this support doc. Help us improve: We're always looking to improve our documentation. Polls. Polls are another great way to enhance your blog with an interactive element or feature. 
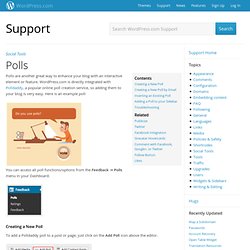
WordPress.com is directly integrated with Polldaddy, a popular online poll creation service, so adding them to your blog is very easy. Here is an example poll: <a href=" Our Poll</a> You can access all poll functions/options from the Feedback → Polls menu in your Dashboard. Creating a New Poll To add a Polldaddy poll to a post or page, just click on the Add Poll icon above the editor. If you are using polls for the first time on WordPress.com you will be prompted to create or import an account. After your account has been set up, you can create a new poll. Configure the poll options to suit your needs. A message will appear at the top letting you know the poll has been created.

After publishing the post, the poll will appear on your blog. ↑ Table of Contents ↑ Creating a New Poll by Email Inserting an Existing Poll Then, you will see a list of your polls. Troubleshooting. Gravatars. WordPress.com associates an Avatar with your email address. Once you configure your avatar, you’ll see it when you post to the forums, when you comment on blogs, and with any post displayed in WordPress.com’s community features. Here are some examples of how we display avatars on WordPress.com: Forums Comments on a Blog Post Comments Administration Screen Gravatar powers the user avatars on WordPress.com.

Gravatar Hovercards Gravatar information also appears in Hovercards, which show when people mouse over the avatar image shown in comments and other places. ↑ Table of Contents ↑ Upload an Avatar Visit Your Public Profile and click on the link to Change your Gravatar. A popup will appear. Follow the on-screen instructions to set a new avatar for your account. Remove an Avatar Visit your public profile and click on the link to Change your Gravatar. A pop-up will appear. A list of each email address associated with your account will appear. Additional Information Help us improve: Twitter Widget. Gravatar Widget. The Gravatar Widget allows you to display a Gravatar image along with some custom text. This is ideal for displaying a brief About Me section on your blog sidebar. Here’s an example of what it looks like: Once you add the widget to your sidebar from Appearance -> Widgets, you’ll see that the widget settings look like this: Title – The title of your Gravatar image.

Select a user – Select a registered user of your blog, or pick custom and enter an email address in the box below. Size – Select a size for the Gravatar image (small, medium, large, extra large). Alignment – Select an alignment for the Gravatar. Gravatar link – If you want your Gravatar image to link to another page (i.e. your About Me page) then enter a URL here. Text – Enter the text (HTML allowed) that you want to display with your Gravatar. Note that this widget is available for WordPress.org blogs as a plugin: Gravatar Widget ↑ Table of Contents ↑ Troubleshooting My Gravatar is not showing up! WordPress.tv Video The Gravatar Widget. Wufoo. Wufoo is an Internet application that helps anybody build amazing online forms. When you design a form with Wufoo, it automatically builds the database, backend and scripts needed to make collecting and understanding your data easy, fast and fun.

Embedding with a Shortcode Wufoo forms are embedded using a handy little shortcode. To get the shortcode you first need to find the form you want to embed. Then click the code button which will take you to the Wufoo Code Manager. Once there click on the Embed Form Code tab and copy the WordPress shortcode. The shortcode will look something like this:[wufoo username="exampleuser" formhash="x7w3w3" autoresize="true" height="458" header="show"] Paste the shortcode into the WordPress editor for a post, page or text widget. Finally publish your post, page or widget to see your Wufoo form in action. Help us improve: We're always looking to improve our documentation. Who Can Comment. Comments are enabled on WordPress.com blogs by default. You can enable and disable comments. Each blog owner has full control to approve, delete, or edit comments left on their blog.

You can allow only registered WordPress.com users to comment, or you can allow anyone to comment. If you allow anyone to comment, you can choose whether the name and email fields are required or not. Your readers can also post comments using their Facebook, Google+, or Twitter accounts. Check out our support page Comment with Facebook, Google+, or Twitter for more information. These options are available on the Settings → Discussion page under Other comment settings: Comment author must fill out name and e-mail Makes the name and email address fields required fields.

There are also settings that control whether a comment is approved automatically or if it must be reviewed before it is published on a blog. . ↑ Table of Contents ↑ Help us improve: We're always looking to improve our documentation. Using WordPress.com through the Twitter API. If you’re a software developer interested in talking to WordPress.com using the Twitter protocol–you’ve found the right page. If you’re a user, visit our Twitter API page to learn how to get real-time access to your blog subscriptions using a Twitter client that supports WordPress.com. Twitter is a communication protocol where one can send a message without specifying a recipient. There are a lot of possibilities for Twitter as a protocol and we’re exploring this at WordPress.com. Through the Twitter API, WordPress.com users can: Read and receive new post notifications from blogs they’re subscribed to using the Blog Surfer featurePost a “status update” to one of their WordPress.com blogs On this page you’ll learn which Twitter APIs WordPress.com supports, the WordPress.com Twitter API conventions, and other resources to look at.

API Basics The WordPress.com Twitter API supports Basic AUTH. Our end-point for the Twitter API is API Methods Timeline Methods. Twitter Blackbird Pie. Embedding a tweet is as easy as pasting a Tweet URL on its own line. Unlike the Twitter Timeline Widget, which displays a Twitter feed in your sidebar, Twitter embeds allows you to display any individual tweet in a blog post or post comment, complete with: The tweet’s textAction links allowing readers to reply, retweet, and favorite tweets without leaving your siteInline links, links to hashtag pages, linked usernames, and a follow button in the tweetA border around the tweet showing part of the background image from the Twitter profile Embedding with a URL First locate the tweet you want to post.

Then click the timestamp. You’ll be taken to the page for that individual tweet. Copy the URL in the address bar. Next, in your blog’s post editor, paste the URL on a line by itself (no HTML necessary). That’s it! ↑ Table of Contents ↑ Embedding with a shortcode If you want more control over the display and layout of the Tweet you are embedding, you can also use a special shortcode. Display a Tweet: Twitter. Technorati. Technorati is an Internet search engine for searching blogs. Claiming your blog through Technorati allows you to use Technorati services to increase your blog’s visibility. To begin claiming your blog, you will first need to go to Technorati.com and sign up for an account. After activating and confirming your account, go to the My Profile page on Technorati. Once there scroll down to the My claimed blogs section near the bottom of the page. Then type in the URL of your blog and click the Claim button. On the next screen fill in the details of your blog and click the Proceed to the next step button at the bottom of the page.

A screen will load with some additional information. Then you will want to go back to the My Profile page. Here you will find your claim token. Once you’ve claimed your blog, the claim screen should show a notice like the following if it worked properly. Note: Technorati will still need to validate your site, and the claim will not be immediate. Help us improve: Publicize. This guide provides instructions for how to connect your WordPress.com blog to various social networking services. 
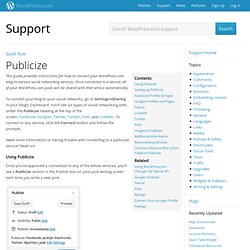
Once connected to a service, all of your WordPress.com posts will be shared with that service automatically. To connect your blog to your social networks, go to Settings→Sharing in your blog’s Dashboard. You’ll see six types of social networking sites under the Publicize heading at the top of the screen: Facebook, Google+, Twitter, Tumblr, Path, and LinkedIn.

To connect to any service, click the Connect button and follow the prompts. Need more information or having trouble with connecting to a particular service? Read on! Using Publicize Once you’ve approved a connection to any of the below services, you’ll see a Publicize section in the Publish box on your post writing screen each time you write a new post. When you publish your post as usual, you’ll see it show up on the services you’ve enabled. You can then uncheck whichever services you don’t want your post to appear on.

Geotagging « Support — WordPress.com. WordPress.com allows you to geotag your user profile and posts. That means you can assign an earthly location to your account and to each of your posts. Turn Geotagging On To start geotagging, you must first activate the feature in your profile. Go to your blog’s admin and click Users → Personal Settings from the admin menu. Under My Location, click the checkbox to Enable Geotagging. ↑ Table of Contents ↑ Enter your location Once you see the map, there are several ways of inputing your location. Type an address in the Enter address box, then click the Find Address button.Click the map at the location you want.Click the Auto Detect button. The Auto Detect feature attempts to figure out where your computer is automatically.

Depending on your browser, you may be asked to confirm that you want to send WordPress.com your location when you click the Auto Detect button. Type an address Adjust the auto detected location Auto detect your location Note: The red circle does not show up in some browsers. Facebook Integration. Publicize to Facebook Publicizing your blog posts to Facebook is an excellent way to get more traffic on your blog and to keep your friends and family involved in your site. ↑ Table of Contents ↑ Facebook Like Button You can add a Facebook Like button (and other sharing options such as Twitter, Google or Pocket) through Settings → Sharing in your dashboard.

To add it to your blog, enable the sharing options you want and drag the Facebook button from Available Services to Enabled Services. Read more about this on the Sharing support page. Facebook Like Box If you have a Facebook Page (not just a profile), you can add a Facebook Like Box to your sidebar or other widget area simply by adding the Facebook Like Box widget from Appearance → Widgets in your blog’s Dashboard.

The page needs to be public and shouldn’t have any age or geographic restrictions if you want it to be visible to everyone, like in this screenshot below: Getting More Views and Traffic. Want more traffic? Here are some tips for attracting more visitors to your site: Tell people in your social networks about your new post. You can do this using WordPress.com’s Publicize feature, which will automatically tell your Twitter followers and Facebook friends as soon as you publish a new post. You can find more ideas in our Social Tools support pages. ↑ Table of Contents ↑ Make your content visible to search engines If you want your post to be indexed by search engines such as Google and Bing, you should set your blog privacy settings to make your blog visible to all search engines.

Pay for traffic to your site Web applications like StumbleUpon can bring visitors to your posts with rates starting at $.10 per visit. Bug your real-life friends Encourage friends and family to read your blog: send them reminder emails when you update and talk to them about it when you meet in person. Attach appropriate categories and tags to your entries and people may find your blog through those. Gravatar Hovercards. Press This. Press This provides a lightning-fast way to grab text, images, or video from any website and post it to your blog without ever visiting WordPress.com.

You can also use Press This to quickly share a link on your blog. It only takes a second to get the Press This mini-application going. Simply go to Tools → Available Tools in your dashboard and find the link to the bookmarklet: Next, drag the Press This link to the bookmarks/favorites area of your web browser. (It may look different than what’s pictured below, depending on your browser.) That’s it – you’ve installed Press This! Using Press This Let’s say you come across a cool photography post, and you want to share part of it on your own blog.

Simply highlight the text you want to grab with your cursor, then click the Press This bookmarklet in your browser. To add images, click the picture frame icon below the title of the post and select the photos you want. Help us improve: We're always looking to improve our documentation. Likes. The Like button: how to like others’ posts, how to review what you’ve liked, and how to control how Likes appear on your site. The Like button is an easy way to show appreciation for a post: Simply click it, and your Gravatar will appear next to it. Click it again to unlike. Every WordPress.com blog includes the Like system, although you can control whether Likes display on your site. How to Like a Post Let’s say you’ve found a particularly awesome post on WordPress.com. Note: You must be logged into WordPress.com in order to use the Like button. Click it, and the button changes to show that you’ve liked the post, and your Gravatar appears as a visual indicator of your appreciation: Your Gravatar is clickable and linked to your Gravatar Profile.

Over time, as the post grows in popularity, the number of Likes will increase. To see the rest of the Likes, click on the total count, and the rest of the Likes will display in a scrollable pop-up: ↑ Table of Contents ↑ How to Unlike a Post. Facebook and Twitter Comments.