
Videolog. Viddler. Viddler is an interactive online video platform for uploading, sharing, enhancing, tagging, commenting on, and forming groups around videos.
Viddler no longer provides a free service for non-commercial users and now requires all users to choose one of the three paid plan options. Embedding with a Shortcode To embed a video hosted by Viddler you will need to use a shortcode. To get the shortcode, first find the Viddler hosted video you want to use. DailyMotion. Embedding with a URL To quickly embed a Dailymotion video, simply copy the video’s URL from your web browser’s address bar while viewing the video: Paste it on a line by itself in your post/page editor: We take care of the rest!
The video will look something like this: ↑ Table of Contents ↑ TED Talks. On TED.com, the best talks and performances from TED and partners are available to the world, for free.
More than 900 TEDTalks are now available, with more added each week. All of the talks are subtitled in English, and many are subtitled in various languages. These videos are released under a Creative Commons BY-NC-ND license, so they can be freely shared and reposted. Embedding with a Shortcode Visit TED.com and locate the talk you would like to embed in your blog. Flickr Video. Blip.tv. Blip.tv is the place to discover the best in original web series, from professional and up-and-coming producers.
Embedding with a URL To quickly embed a Blip.tv video, simply copy the video’s URL from your web browser’s address bar while viewing the video: Paste it on a line by itself in your post/page editor: Vimeo. Embedding with a URL To quickly embed a Vimeo video, simply copy the video’s URL from your web browser’s address bar while viewing the video: And paste it on a line by itself in your post/page editor:

YouTube. Embedding with a URL To quickly embed a YouTube video, simply copy the video’s URL from your web browser’s address bar while viewing the video: Paste it on a line by itself in your post/page Visual editor (make sure that it is not hyperlinked).
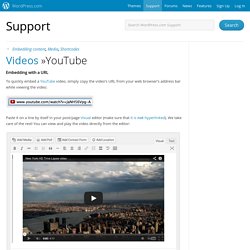
We take care of the rest! You can view and play the video directly from the editor: Troubleshooting Images. If you are having problems uploading images then the most likely causes are: The file size of the image is too large.Your connection is slow.There is a problem between your computer and the WordPress.com server.
(You do not have a direct line here. Your connection will go through any number of hubs before it gets here and one problem along that line could cause a problem.)Your storage space is full. You are provided 3GB of free space with your free WordPress.com account, but once full, additional media cannot be added. You can purchase the Space Upgrade in order to gain more space for your site. Image Settings. You can customize a variety of settings for each and every image uploaded to your WordPress.com blog’s media library.
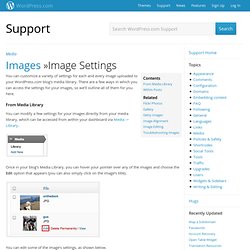
There are a few ways in which you can access the settings for your images, so we’ll outline all of them for you here. You can modify a few settings for your images directly from your media library, which can be accessed from within your dashboard via Media -> Library. Once in your blog’s Media Library, you can hover your pointer over any of the images and choose the Edit option that appears (you can also simply click on the image’s title).
You can edit some of the image’s settings, as shown below. FAQ for MLB.com Bloggers. Howdy, MLB.com bloggers!
Welcome to your new home at WordPress.com. We’re excited to have you blogging with us! We have prepared a short FAQ to answer any questions you might have about the transition from Movable Type to WordPress.com. If you have general questions about how to get started using all of WordPress.com’s great features, please read our Introduction to WordPress.com guide.
Image Alignment. When inserting images into your posts and pages, you can have your text wrap around them to promote a more attractive flow of content.
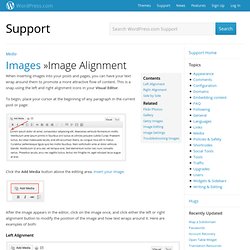
This is a snap using the left and right alignment icons in your Visual Editor. To begin, place your cursor at the beginning of any paragraph in the current post or page: Gallery. Image galleries on WordPress.com are a great way to share your pictures with your friends, family, and your followers. An image gallery will display a set of small images attached to a particular post or page. Readers can click on any image to launch a full-size carousel that allows them to scroll through the entire gallery one image at a time. With the slideshow option, images will automatically move from one to the next after a few seconds.
Gallery Styles You have three choices for how a gallery will be displayed in your post: a thumbnail grid layout, a tiled mosaic-style layout, or in a slideshow. Image Editing. For each image uploaded to your WordPress.com blog’s Media Library, you have some basic editing options (crop, rotate, flip, and resize) available. Opening To access these options, first go to Media -> Library in your blog’s dashboard. Once there click on the name of any image you wish to edit. Flickr Photos. Flickr is a web-based photo management application which allows users to upload, organize, and share their favorite photos. It takes care of your image resizing, allows you to tag your photos, and even enables visitors to submit notes and comments on each photo. What’s more, with just a few clicks, you can post a photo from your Flickr account onto your WordPress.com blog.
Flickr Embeds You can also embed your Flickr images in your WordPress.com blog. To do this, select one of your Flickr images, click the “More ways to share” icon, select “Grab the link” and copy the link: Unattached Files. When viewing your blog’s Media Library (Media → Library), there is a filter that shows your Unattached files. If you click on the Unattached link, all of the media files not associated with a post or page (i.e. you did not upload them from within a post or page) will be displayed. Attaching files (images, specifically) to a post allows you to use them as part of a Slideshow for that post or page. Reattaching Files Clicking the Attach link will start the process of attaching the file to a post or page.
You can also attach multiple files at once: check the box next to each file name that you would like to attach, then select the Attach to a post option in the Bulk Actions drop down menu, and finally click the Apply button. When attaching items, this screen will pop-up: First, type some text into the search box, select either Posts or Pages, and click the Search button. Then, click the radio button next to the post or page you would like to attach the files to, and then click the Select button. Media – Add New. Uploading and Inserting Media. SoundCloud Audio Player. WordPress.com and SoundCloud provide an easy-to-use embed tool that makes it simple to share music from SoundCloud to your blog. Users can upload their own music/demos (or any shareable track) to SoundCloud, and then embed a SoundCloud music player on their sites. SoundCloud supports the uploading of AIFF, WAVE, FLAC, OGG, MP2, MP3, AAC, AMR, and WMA files.
Once you have located a song to embed (via search or Explore), look for the “Share” button. NOTE: If a track doesn’t have this button, you will not be able to play it outside of the SoundCloud web site. After clicking on the “Share” button, click on the tab that says “Embed.” Once you select “More Options,” you’ll see tools that allow you to change the color of your player as well as add an “autoplay” function. Accepted Filetypes. Deleting Files. Zemanta for Recommended Links, Photos, Articles.
What do we mean by ‘free media’? While much content on the internet is subject to copyright laws, there are increasing numbers of websites that provide copyright-free content you can use on your blogs at no cost. Audio. Slideshows. Scribd. Images. Shortcodes. Google Docs. Google Maps. LaTeX. Google Calendar. Uploading Documents. Videos. Media Library. Image Optimization. Flash vs. Browser Uploader. Excel Web App. SlideShare Slideshows.