
Writing Settings. Reading Settings. The Reading Settings control how your blog is displayed to visitors.

You can access it via your Settings -> Reading page. Privacy Settings. The Privacy Settings control who can and cannot view your blog.
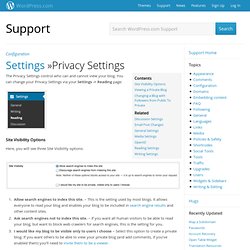
You can change your Privacy Settings via your Settings -> Reading page: Site Visibility Options Here, you will see three Site Visibility options: Allow search engines to index this site. – This is the setting used by most blogs. It allows everyone to read your blog and enables your blog to be included in search engine results and other content sites.Ask search engines not to index this site. – If you want all human visitors to be able to read your blog, but want to block web crawlers for search engines, this is the setting for you.I would like my blog to be visible only to users I choose – Select this option to create a private blog. Note: WordPress.com employees can access blogs for support and development purposes regardless of Privacy setting. ↑ Table of Contents ↑ Viewing a Private Blog. OpenID. The OpenID Settings page is a place to configure the trusted sites that can use your WordPress.com blog as an OpenID login.

OpenID is an open standard that lets you sign in to other sites on the Web using your WordPress.com account. This means less usernames and passwords to remember and less time spent signing up for new sites. How do I get an OpenID? Media Settings. The Media Settings allows you to control how your media is displayed.

These settings can be found on the Settings -> Media page. Image Sizes Image sizes allows you to change the maximum dimensions of images that are displayed on posts and pages. When setting a thumbnail size, the image will be cropped and resized to the setting. Medium and large images will keep the dimension proportions, taking the maximum width and height into account. Some of the previous settings for defaults have been removed. . ↑ Table of Contents ↑ Limit Width. General Settings. The General Settings let you change many of the items that control how your blog is displayed, such as the title, tagline, timezone, and date/time formats.

Click Settings from the left hand menu in your Dashboard to access these settings. Changing your Site Title and Tagline The first setting you will see is Site Title. The Site Title is displayed in the title bar of a web browser and is displayed in the header for most themes. Domains Settings. Discussion Settings. The Discussion Settings are used to control how visitors and other blogs interact with your site.
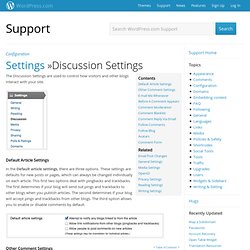
Default Article Settings In the Default article settings, there are three options. These settings are defaults for new posts or pages, which can always be changed individually on each article. This first two options deal with pingbacks and trackbacks. Delete Site. Deleting a site permanently removes it and you’ll never be able to reuse its WordPress.com address (such as yourgroovysite.wordpress.com).

If that’s not what you want to do, you can instead: Change your site’s address and keep your contentDelete old posts and continue using the same addressEmpty your site of all its content for a fresh start and continue using the same addressTransfer your site to someone elseMake your site private so only people you invite can see it Permanently deleting your site If you’re sure you want to permanently delete your site, here’s how to do it: In your site’s dashboard, go to Tools → Delete SiteClick the dropdown menu and choose the option: Permanently delete my site’s address and all content. After clicking the link in the email, your site will be permanently deleted. At this point, anyone who attempts to visit your site will see a message like the one below. ↑ Table of Contents ↑ Troubleshooting I didn’t receive the confirmation email.
Rate this: Settings. Screen Options. The Screen Options pull down tab is located in the upper right corner of your Dashboard.

It can be used to show/hide dashboard modules on some screens and show/hide columns on other screens. When you click on Screen Options, it will drop down an area with a list of the different things in the dashboard you can show or hide. Plugins. Plugins on WordPress.com On WordPress.com, we include the most popular plugin functionality within our sites automatically.

Built-in plugin functionality includes (but is not limited to) the following: Premium Plan Upgrades: Business Plan Upgrades: ↑ Table of Contents ↑ Plugin Requests Uploading custom plugins is not supported on our service, but if there is one whose features that you feel would benefit users on WordPress.com, then please let us know in the ideas forum! Help us improve: Modules.
Modules are boxes that can be moved around on the screen, closed to save space, or hidden completely.

See Screen Options for instructions on hiding or showing modules. Open/Close Modules We can close modules until they are needed and to save space in the interface. HTTPS. Why use HTTPS If you sign in to WordPress.com via a non-secure Internet connection, like a public Wi-Fi connection at your local coffee shop, your account may be more vulnerable to hijacking.
To keep the bad guys out, we recommend using HTTPS. ↑ Table of Contents ↑ Enabling HTTPS To enable HTTPS you need to head on over to the Users –> Personal Settings screen. Once there you want to check the box that says “Always use HTTPS when visiting administration pages” and then press the Save Changes button at the bottom of the page. Frequently Asked Questions Does it slow down WordPress.com ? How do I get those annoying security warnings to go away? These warnings are actually quite normal. Email Post Changes. Sites with multiple authors can take advantage of collaboration and team work. Our Email Post Changes feature makes it easy to keep track of changes being made to your site’s content. To enable it, head to Settings -> Email Post Changes in your Dashboard. Click the check box for Enable to turn on the feature. Select the users that should be notified whenever a post changes.
The user’s display name, username, and email address are all shown. If you want to notify someone, or maybe a a group of people via an email list, you can type in additional email addresses in the text field. Not only can you be notified of changes to your posts, but also pages, media, menus, Custom DNS, Custom CSS, and Feedbacks. Dashboard Menu. If you have a theme that supports the Custom Menus feature, you can create and arrange a group of navigation links for your visitors to find the important parts of your site faster. Most Custom Menus will show in the header area at the top of your site (the main navigation area), though this location can vary from theme to theme. With some themes, you may have the option to create and display multiple custom menus in different places on your site, such as the footer or special sidebar areas. Creating a custom menu allows you to do the following things: Change the order of pages in your menu, or delete them!
Create nested sub-menus of links, sometimes referred to as “drop-down” menusCreate links to category pages allowing you to collect together posts based on that categoryAdd custom links to other sites, such as a link to your Twitter or Instagram profile. Custom Post Screen Example. You may have read our documentation on Screen Options, Modules, and the Menu, but let’s go through an example to show you the real power and flexibility of the possibilities. Default Layout. Changing a Blog Address.