Tutorials – Sharpness. Sharpness describes the clarity of detail in a photo, and can be a valuable creative tool for emphasizing texture.
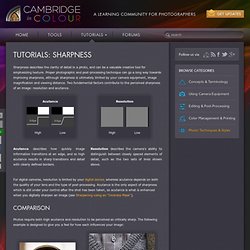
Proper photographic and post-processing technique can go a long way towards improving sharpness, although sharpness is ultimately limited by your camera equipment, image magnification and viewing distance. Two fundamental factors contribute to the perceived sharpness of an image: resolution and acutance. Acutance High Low Resolution For digital cameras, resolution is limited by your digital sensor, whereas acutance depends on both the quality of your lens and the type of post-processing. Photos require both high acutance and resolution to be perceived as critically sharp. Acutance: High, Resolution: Low Acutance: Low, Resolution: High Acutance: High, Resolution: High Sharpness also depends on other factors which influence our perception of resolution and acutance. Low Noise, Soft High Noise, Sharp. Using the Photoshop Curves Tool. The Photoshop curves tool is perhaps the most powerful and flexible image transformation, yet it may also be one of the most intimidating.
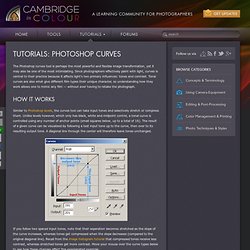
Since photographers effectively paint with light, curves is central to their practice because it affects light's two primary influences: tones and contrast. Tonal curves are also what give different film types their unique character, so understanding how they work allows one to mimic any film — without ever having to retake the photograph. Similar to Photoshop levels, the curves tool can take input tones and selectively stretch or compress them. Unlike levels however, which only has black, white and midpoint control, a tonal curve is controlled using any number of anchor points (small squares below, up to a total of 16). The result of a given curve can be visualized by following a test input tone up to the curve, then over to its resulting output tone. Note: curves and histograms shown above are applied to and shown for luminosity (not RGB) S-Curve. Image Posterization. Posterization occurs when an image's apparent bit depth has been decreased so much that it has a visual impact.
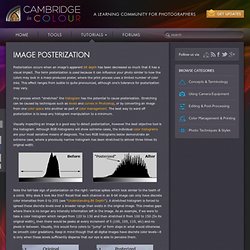
The term posterization is used because it can influence your photo similar to how the colors may look in a mass-produced poster, where the print process uses a limited number of color inks. This effect ranges from subtle to quite pronounced, although one's tolerance for posterization may vary. Any process which "stretches" the histogram has the potential to cause posterization.
Stretching can be caused by techniques such as levels and curves in Photoshop, or by converting an image from one color space into another as part of color management. The best way to ward off posterization is to keep any histogram manipulation to a minimum. Using the Photoshop Levels Tool. Levels is a tool in Photoshop and other image editing programs which can move and stretch the brightness levels of an image histogram.
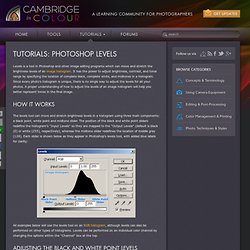
It has the power to adjust brightness, contrast, and tonal range by specifying the location of complete black, complete white, and midtones in a histogram. Since every photo's histogram is unique, there is no single way to adjust the levels for all your photos. A proper understanding of how to adjust the levels of an image histogram will help you better represent tones in the final image. The levels tool can move and stretch brightness levels in a histogram using three main components: a black point, white point and midtone slider. The position of the black and white point sliders redefine the histogram's "Input Levels" so they are mapped to the "Output Levels" (default is black (0) or white (255), respectively), whereas the midtone slider redefines the location of middle gray (128).
When else should one use the midtone slider? Understanding Digital Camera Histograms: Tones and Contrast. Understanding image histograms is probably the single most important concept to become familiar with when working with pictures from a digital camera.
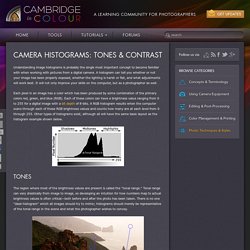
A histogram can tell you whether or not your image has been properly exposed, whether the lighting is harsh or flat, and what adjustments will work best. It will not only improve your skills on the computer, but as a photographer as well. Each pixel in an image has a color which has been produced by some combination of the primary colors red, green, and blue (RGB). Each of these colors can have a brightness value ranging from 0 to 255 for a digital image with a bit depth of 8-bits.
A RGB histogram results when the computer scans through each of these RGB brightness values and counts how many are at each level from 0 through 255. The region where most of the brightness values are present is called the "tonal range. " Lighting is often not as extreme as the last example.