
Recycled Wine Bottle Torch. 08.09.09 | by Erik Anderson Whether it’s product branding, package design or projects for ourselves, we’re pleased when we find a solution that’s very effective and creative, while keeping resources to a minimum.

This idea is very inexpensive idea and it’s a great way to recycle a wine bottle. See how this simple idea inspired this brand and wine bottle design. Space Saving Tiny Apartment, New York. This tiny but highly sophisticated studio apartment in the East Village of NYC has made us very proud, thanks to JPDA.
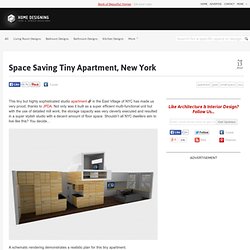
Not only was it built as a super efficient multi-functional unit but with the use of detailed mill work, the storage capacity was very cleverly executed and resulted in a super stylish studio with a decent amount of floor space. Shouldn’t all NYC dwellers aim to live like this? You decide… A schematic rendering demonstrates a realistic plan for this tiny apartment. Although we’re not too sure how realistic that cubbyhole at the crown of the loft is in a NYC apartment building, the rest of the space makes perfect sense. This tiny living/work space is beautifully masked with natural light and looks so inviting! This mezzanine bedroom is constructed with beautiful teak wood that houses hidden storage compartments… What great use of typically neglected storage space…. Well lit and highly efficient modern kitchen has beautiful appliances and plenty of counter space. Brenna’s secret storage books. It seems i am always in need of extra storage space. i have an abundance of art materials and supplies that just keeps growing. i am already storing boxes of paints, paintbrushes, paper, pens and scissors, and a multitude of glues behind a linen curtain beneath our built-in desk. it is a great storage place for the things i don’t necessarily use all of the time, but what about the things I use constantly, like my watercolors and rulers, exacto knives and bulldog clips?

As much as i would like to, i can’t exactly leave them out on the dining room table within reach of my almost two-year old. the solution: sightly boxes to store my wares. since we have a lovely built-in bookcase, i thought it would be great to have a storage box disguised as a book, adding charm instead of just utility. so here it is, a bit of unexpected storage. secret storage books…not a secret anymore. Fascinating Lamps by Calabarte. Calabarte is the pseudonym of a Polish artist named Przemek Krawczynski, whose art takes on a peculiar but incredibly beautiful form: cool lamps.
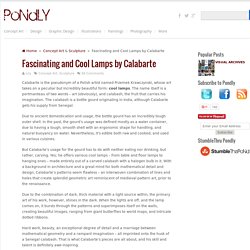
The name itself is a portmanteau of two words – art (obviously), and calabash, the fruit that carries his imagination. Upcycled Doily Lamp « Do-it-Yourself DIY String Wedding Lanterns Yarn Chandeliers. Jessica of Wednesday Inc shows us how to make those gorgeous twine chandeliers from the inspiration shoot she shared with us this morning.

Using balloons, glue and twine, you can also make these lanterns for your wedding – and then bring it home and use it as your very own mid century lampshade. What you will need are: balloons, glue, yarn, tray for glue, corn starch 1/2 cup of Corn starch, 1/4 cup of Warm water, clear fast drying spray paint, hanging lamp cord or fishing line (depending on your desired final product), and a lighting kit if you’re looking for a fully functional lantern. Plastic Cup Lamp.
Decorative Paper Lanterns. 52 Totally Feasible Ways To Organize Your Entire Home. Upcycled apple crates · Sheepy Me. Natural Pools or Swimming Ponds. Natural Pools or Natural Swimming Ponds (NSPs) Let nature clean the water...

Chemical-free water garden and swimming pool. The plant portion, or regeneration zone, is separated from the swimming area by the wall seen a few inches below the water’s surface. www.naturalswimmingpools.com The pools have skimmers and pumps that circulate the water through the regeneration zone and back into the swimming area. The aquatic plants filter out contaminants and use nutrients from the water as food which helps prevent algae. Then rocks, such as granite river rock or haydite, to which friendly bacteria attach, act as biological filters. There are many options as to design. A gradual slope contains the plants, gravel and loamy sand, a wall keeps them separate from the swimming area. Vacuum but twice a year and tend to the plants as needed. The regeneration zone can be along the perimeter of a natural pool or a pond unto itself but connected to the swimming area. www.gartenart.co.uk.
10 World Map Decorating Ideas - @JetpacApp. Chalkboard Wall Calendar - Martha Stewart Home & Garden. Thanks to paint that dries into a chalkboard finish, your board can be whatever size you desire and placed wherever you like.
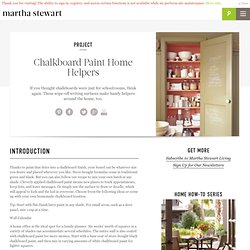
Store-bought formulas come in traditional green and black. But you can also follow our recipe to mix your own batch in any shade. Cleverly applied chalkboard paint means new places to track appointments, keep lists, and leave messages. Or simply use the surface to draw or doodle, which will appeal to kids and the kid in everyone. Choose from the following ideas or come up with your own homemade chalkboard location. Tip: Start with flat-finish latex paint in any shade. Wall Calendar A home office is the ideal spot for a family planner.
Mudroom Mural The bottom half of a mudroom wall is just the right height for pint-size Picassos -- when coated with store-bought green chalkboard paint. Message Center. How To Mix Chalkboard Paint in Any Color.