
Les explications des housses pour ordinateur portable du N°80. Voici toutes les explications, motifs et schémas des pages 142 et 143 du N°80 de Marie Claire Idées.
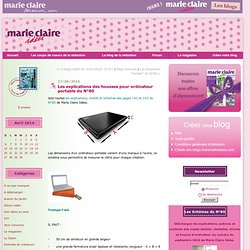
Les dimensions d'un ordinateur portable variant d'une marque à l'autre, ce schéma vous permettra de mesurer le vôtre pour chaque création. 50+ iPad & Kindle Covers, Cases To Make: {Free Patterns. My laptop bag tutorial on Sew Mama Sew! I was so excited when Beth from Sew Mama Sew!
Invited me to contribute to their Back to School month of projects. I thought it would be the perfect time to actually make the laptop bag I wanted for quite some time. Right after I received the colorful-and-oh-so-awesome fabrics from designer Jessica Jones, I knew I had to use them for this project, her fabrics are one of my top favorites, so you should check them out! Made By Marzipan. First we’ll cut the inner fabric pieces.
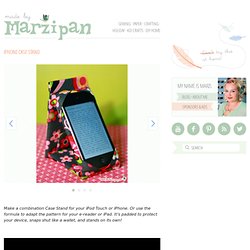
This is what will show when your case is opened. All pieces will be cut to the same width: measure the Width of your device and add 1 inch. We’re going to cut three pieces.The first piece should be the Length of your device, + the Thickness of your device, + another 1/2 inch for seams.The second piece should measure the Length of your device, + a 1/2 inch for seams.The final piece should measure half the Length of your device, plus the Thickness of your device, + another 1/2 inch for seams.
For an iPod Touch or newer iPhone, cut the pieces to 3.25 W x 5.75 L3.25 W x 5.25 L3.25 W x 4.0 L Now we’ll make the corner pockets. Fold the squares in half to create triangles and press. Now we’ll sew together our inner fabric pieces. Next we’ll make our tab closure. Now we can cut the rectangle of outer fabric. With the sewn inner fabric face up, place the tab along the center edge of the shortest rectangle.
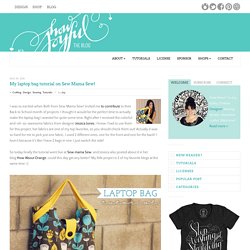
Trim the edge of the tab if necessary. iPad Case Tutorial (with Handle Variations!) Jen Carlton Bailly is back today with a fun, new tutorial (remember the His + Hers Pillows?!).
Jen’s iPad Case Tutorial gives you two handle options and a fresh, new look for spring! Learn more about Jen in her introduction and let us know if you make the case! Every spring– okay every season– I want a change… Something new. This usually comes in the form of a new bag. They are quick and easy and give me a little lift. Since spring is around the corner (even though it snowed today in Portland, Oregon!) Supplies Needed: Step One: Making the Pocket Line the top raw edges-right sides together of the pocket fabric.Stitch ¼ seam.Press open the seam.Top stitch 1/8th inch on either side of the seam (see photo above).Fold the fabric with right sides together matching raw edges.Stitch the side and bottom using ¼ inch seam.
Step Two: Attaching the pocket Step Three: Applying the Interfacing Step Four: Attach the D-Ring Step Five: Attach the Lining. Couture Stuff - Mes tutos & trucs machins choses de couture. (Kindle, Ipad, Nook, tablette…) e Cet article est pour vous ! En attendant que la housse de mes rêves soit en vente, j’ai décidé de lui confectionner une petite pochette pour le protéger. Créer le patron d’une housse soi-même n’est pas très compliqué (quoique ça dépend de la housse… et de « soi ») mais si comme moi vous êtes dans une phase « pas envie de se compliquer la vie », d’autres ont déjà fait le travail pour vous ! Pin It Birdiful Stitches propose un patron « » (= pochette, celle utilisée ici) et un « » (voir images ci-dessous). Les 2 patrons sont en format .pdf, en anglais, et ne nécessitent pas d’agrandissement. De plus chaque fichier décline le patron pour les tailles du , du et de l’ . Pour protéger le , du molleton (ou de la polaire) est utilisé en sandwich entre les différentes épaisseurs de coton (on peut, pourquoi pas, rajouter du carton si on a peur que ce ne soit pas suffisant). puisque la housse s’ouvre sur le dessus.
Last minute gift idea: Phone Cozy Tutorial. Are you in need of some last minute quick, easy and fun Christmas gifts?

Something you can make from your scrap basket with a minimum of fuss? Something useful, as well as pretty? Here's your answer - my phone/gadget cozy tutorial! These little cozies are perfect for a phone or a camera - I'm sure there's lots of other uses you could think of for them too! The featured cozy fits an iPhone perfectly, including a protective cover/skin.
Requirements: Scraps of fabric in solid colour, feature fabric prints and lining fabric. 2 batting scraps (approx 5 x 7" each). Cutting List: (The measurements given are for the featured cozy.