
Fashion Friday - DIY - Adorable Buttons - Mashia Crafts. {macramé: square knot} string & hexnut bracelet. By Kate on September 13, 2011 This bracelet has been inspired by this really wonderful “Braided Hex-nut Bracelet” tutorial which I pinned on Pinterest a while back.

Two things I absolutely love about this project are: 1) It’s cheap as chips: I already had string in the cupboard and the brass hexnuts were 3p each from the hardware shop. 2) It’s my kind of jewellery: I’m not really a girly girl IYKWIM! Shrinky Bracelet. If you grew up in the 80's, like I did, you're probably already familiar with the awesomeness that is Shrinky Dinks...but did you know that you can still buy Shrinky Dinks?
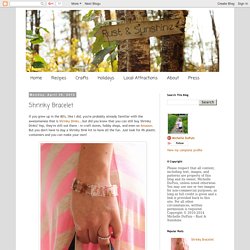
Yep, they're still out there - in craft stores, hobby shops, and even on Amazon. But you don't have to buy a Shrinky Dink kit to have all the fun. Just look for #6 plastic containers and you can make your own! There is a great tutorial on Instructables (courtesy of Dabbled) with all the instructions for making your own shrinky projects from #6 plastic containers, so I won't go into too much detail here.
Most of this post is actually about turning these awesome little pieces of plastic into a sweet bracelet (and bonus pendant) to give to mom for Mother's Day. 1. 2. 3. Les techniques de création de bijoux. Mes bracelets Funny ! Aujourd’hui, je vous propose de réaliser des bracelets sympa et punchy car à vrai dire je commence à avoir envie d’un peu de couleur et de gaîté pas vous ?

Pour les réaliser il vous faut : (1) Pages. Rangement bijou - AOUT 2011 - Photo de 2 - BriCoLeS en 2011. Perles et bijoux - Les loisirs de Choupy. Créer un collier au look rétro avec un vieux livre. TUTORIAL] Book Page Necklace. I introduced this necklace a while back and sold a couple at the facebook sale, but since my shop is going in a different direction, I've decided to share the tutorial for this necklace.
![TUTORIAL] Book Page Necklace](http://cdn.pearltrees.com/s/pic/th/mandipidy-tutorial-necklace-20547858)
MATERIALS NEEDED: 30" of chain 2 pages from an old book 1 piece of poster board Glue 1 quarter Scissors Varnish Matches Pearls Jump rings Lobster Claps [1] Cut two pieces of chain, 15 1/2, and 18 inches long. [2] Attach the two chains at both ends with small jump rings: Collier de perles. This DIY project went through a few transformations before I finally settled on this particular design, and I have to say I love the way it came out.

My original intent was for it to just be a plain clustered necklace that was much shorter in length, lying closer to my collarbone. But the more I worked with it, the more it just felt a little too mature. I tried braiding it, and while it looked cool, it also looked too young, almost bordering on tweenish. FC_TRAINECOLLIER. Washer necklaces. We've been having a lot of fun this past year making these adorable washer necklaces.
They are pretty inexpensive to make and you can make them to match any wardrobe. Supplies:WashersScrapbook paperE6000Diamond Glaze or Crystal Effects or similar productHole punch or Exacto KnifeLeather necklaceNail File or Emory Board If you have a hole punch the same size as your washer you can punch out the paper.
If you do not, the glue the washer to the backside of the paper you want and then after it dries, use the Exacto knife to cut out the washer and the center holes. Be sure to use a brayer or something similar to get any air bubbles out. Next, take a nail file and gently file the edges to smooth it out and if you have a smaller file (these can be found at scrapbook stores or craft stores) carefully file out the center hole too. Your washers should now look like this. The next step is to apply the Diamond Glaze.
Créer un bracelet en cuir tendance bohème. Bracelet. Explore more. Web pages, photos, and videos. You should all know by now that we are all about stacking bracelets on our wrists.

The more, the better. In fact . . . the most, the best! With that being said, we’ll show you how to master a version of the ever so popular wrap bracelet. It’s so simple and addicting, you’ll soon be churning out these wristlets with your eyes closed. Clearly this arm party train isn’t stopping and it’s about time you get on board! You’ll need (for a double wrapped bracelet) :* Lengths will vary depending on the size of your wrist (see comments for suggestions).
Fold the length of leather cording in half to form a loop. Place the ball chain along the leather cording with the end of the chain meeting the end of the wrap. Continue wrapping while checking it for fit around the wrist. When you have reached the end of the ball chain wrap the linen cording around the leather strands 2-3 more times. Thread the hex nut through the strands and tie a second knot. Trim with scissors and your wrap bracelet is finished!! DIY Name Charms {and other Mother's Day ideas} May is nearly here!

What? Galerie de ToutEnCouleur. Cabochon en verre. Bijoux-en-pate-polymere.