
Arduino Perpetual Motion Machine (Pendulum)- aHT8pendu. HOME - - - - - - - - Table of contents, my Arduino "How To" articlesOther material for programmers Bookmark this on Delicious Recommend to StumbleUpon Basic Idea I wanted to set up a pendulum with a small magnet on its end, place an electromagnet beneath where the pendulum would swing, and then energize the electromagnet briefly from time to time to "nudge" the pendulum so that it would swing "forever".

(Note that the electromagnet works best if under the swing of the pendulum, not at the end of the swing, mounted so that it would be hit by the pendulum if it were to swing just a little "too far".) That's about all there is to it! I had an interesting note from a reader suggesting an alternative approach. Extension... A really neat idea came to me.... The perpetual pendulum presented here is of the traditional "back and forth" type. Details.... I would suggest putting the switches and the electromagnet near the point the pendulum would be over if it were hanging, still, not swinging.
So! Arduino-Python 4-Axis Servo Control. Arduino Platform - Differential Gap Control (Solar Tracker) Download schematic and source code - 19.66 KB Introduction This article gives a very simple introduction into writing a differential gap controller on the Arduino platform.
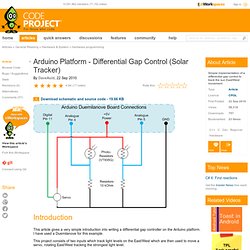
I have used a Duemilanove for this example. This project consists of two inputs which track light levels on the East/West which are then used to move a servo, rotating East/West tracking the strongest light level. The crude prototype in all its glory......the surplus MSDN discs have found a use at last: How It Works The two light sensors are basic photoresistors, these are mounted at 90' to each other, imagine these are your eyes, if you look straight ahead at a wall, the left eye would point 45' to the left, and the right eye 45' to the right. When tracking the sunlight, e.g. for a solar panel, you would want the maximum sunlight intensity, to achieve this, both sensors would therefore need to see the same intensity of light. I have also added a very basic 2 point average to help smooth out spikes in the input sensors. Razor IMU and Arduino - VoidBot.net. Labs / DC Motor Control Using an H-Bridge. Overview In this tutorial, you'll learn how to control a DC motor's direction using an H-bridge.

To reverse a DC motor, you need to be able to reverse the direction of the current in the motor. The easiest way to do this is using an H-bridge circuit. There are many different models and brands of H-Bridge. This tutorial uses one of the most basic, a Texas Instruments L293NE or a Texas Instruments SN754410. If you simply want to turn a motor on and off, and don't need to reverse it, for example if you're controlling a fan, try the tutorial on controlling high current loads with transistors. (:toc Table of Contents:) Parts For this lab you'll need: Solderless breadboard 22-AWG hookup wire Arduino Microcontroller module Light Emiting Diodes, LED 10Kohm resistors Switch L293NE or SN754410 H-bridge 12V DC power supply DC Motor Prepare the breadboard Connect power and ground on the breadboard to power and ground from the microcontroller.
(Diagram made with Fritzing) Add a Digital Input (a switch) Find a motor. Current Transformer.