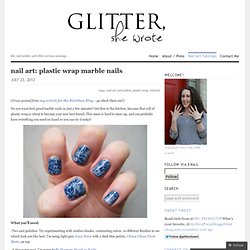

Nails / Spektor's Nails: Galaxy Splatter Nails Tutorial. Nail art: plastic wrap marble nails « glitter, she wrote. (Cross-posted from my article for the Birchbox Blog – go check them out!)

Do you want fool-proof marble nails in just a few minutes? Get thee to the kitchen, because that roll of plastic wrap is about to become your new best friend. This mani is hard to mess up, and you probably have everything you need on hand so you can try it today! What you’ll need: -Two nail polishes. -A glossy top coat. -Plastic wrap – the roll in your kitchen will be just fine! Step 1: Paint your nails with your base color (in my case, the light grey). Step 2: Working with one nail at a time, apply a coat of the second polish over one nail. Step 3: Immediately blot the top of your nail once or twice with a crumpled piece of plastic wrap. Step 4: If you ended up with some polish smudges outside the lines, dip a Q-tip or a small brush in nail polish remover to clean up around the edges. Like this: Like Loading...
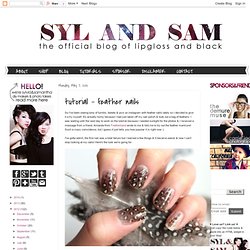
Style / Cool. By bero. Watercolor Nail Art: Step by Step for Pinterest. Style Lust. Tutorial - feather nails. So I've been seeing tons of tumbls, tweets & pics on instagram with feather nails lately so I decided to give it a try myself.

It's actually funny because I had just taken off my nail polish & took out a bag of feathers. I was waiting until the next day to work on the tutorial because I needed sunlight for the photos & I received a message from a friend. Amanda from Featherband wrote to me & told me to try out the feather manicure! Such a crazy coincidence, but I guess it just tells you how popular it is right now :) I've gotta admit, the first nail was a total failure but I learned a few things & it became easier & now I can't stop looking at my nails! What you'll need: - a neutral base colour - a top coat - feathers - scissors (I eventually switched to cuticle scissors) I started with a truly shitty coat of base colour. Top coat just ONE nail... then pick a feather and carefully place the tip of the feather onto your nail. After it's stuck on decently, trim off the excess. Blow Dryer Mani Tutorial! Photo 1- 4 Super-Sweet Nail DIYs & The Kit To Match!
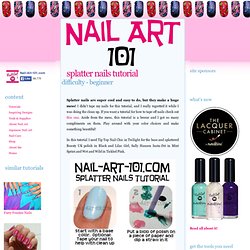
Splatter Nails Tutorial. Splatter nails are super cool and easy to do, but they make a huge mess!

I didn't tape my nails for this tutorial, and I really regretted it while I was doing the clean up. If you want a tutorial for how to tape off nails check out this one. Aside from the mess, this tutorial is a breeze and I got so many compliments on them. Play around with your color choices and make something beautiful! In this tutorial I used Tip Top Nail Chic in Twilight for the base and splattered Beauty UK polish in Black and Lilac Girl, Sally Hansen Insta-Dri in Mint Sprint and Wet and Wild in Tickled Pink. Lay out newspaper to work over. Back to Tutorials Still have some questions? Copyright 2012 Lisa Bailey © Nail-Art-101.comAll Rights Reserved. Directions: 1. White Base Color 2. Place small dots of colored polish in corner of nail. 3. Spread colored polish dots outward with a toothpick. 4. Apply topcoat. 5. Voila!
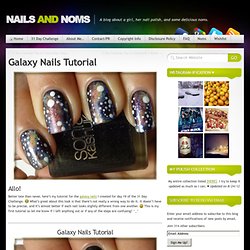
Paper Pages : Nail Design. Galaxy Nails Tutorial - Nails and Noms. Allo!

Better late than never, here’s my tutorial for the galaxy nails I created for day 19 of the 31 Day Challenge. What’s great about this look is that there’s not really a wrong way to do it. It doesn’t have to be precise, and it’s almost better if each nail looks slightly different from one another. This is my first tutorial so let me know if I left anything out or if any of the steps are confusing! ^_^ Tutorials. We get a lot of emails asking how to use brushes correctly so I hope this helps you out a little!

A brow brush is designed to be stiff and angled for a reason. And we use the slanted edge to shade and the tip of the edge to outline. Put those components together and a brow brush is quite frankly a thing of perfection! Here’s how to use it properly: READ MORE… Last week we explored four different ways to wear Spring’s biggest Cobalt blue trend.
This method has been around for centuries! A nod to the Uptown Girl, this look is very put together and polished. Highlighting Pencil — Try Too Faced Instant Attitude Highlighting Pencil.Taupe Pencil — I used Le Metier de Beaute Pencil in Champagne.