
Make-Origami.com. Wind-up paper butterflies are my fave (guest post from amelia) I had a baby so I’ve invited some fave guests to take over for me while I spend time with the little guy.
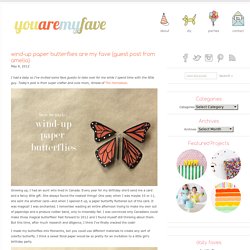
Today’s post is from super crafter and cute mom, Amelia of The Homebook. Growing up, I had an aunt who lived in Canada. Every year for my birthday she’d send me a card and a fancy little gift. She always found the neatest things! One year, when I was maybe 10 or 11, she sent me another card—and when I opened it up, a paper butterfly fluttered out of the card. I made my butterflies into Monarchs, but you could use different materials to create any sort of colorful butterfly. Materials: You’ll need heavy cardstock, 24 gauge wire, silicone rubber bands (I found mine in the hair aisle at Walgreens) needle-nose pliers, scissors, tape, a paintbrush, a black marker, and a white ink pen. Step 1: Measure and cut your wire. Step 2: Find the center of the longer wire. Step 5: Find the center of the shorter wire, and wrap it around the base of the paintbrush.
DIY Glass Magnets. Diagrammi. Nel progettare questo modello ho pensato ai bambini, quindi a qualcosa di semplice da piegare e nello stesso tempo versatile.
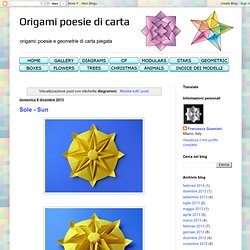
Inizialmente, ho realizzato queste due composizioni, e per questo l’ho chiamato Bialbero di Natale. Poi mi sono reso conto che i moduli possono essere assemblati alternando dimensioni diverse e anche colori diversi, avrei dovuto chiamarlo Multialbero di Natale. Sono molto contento di questo modello, che unisce semplicità, armonia, e versatilità, è come un gioco che può essere smontato e rimontato in modo personale. Ciascuna composizione è ottenuta da 6 ottagoni di carta per fotocopie, ricavati da sei quadrati coi lati di 11, 13, 15, 17, 19 e 21 cm, dall'alto verso il basso. Eccellente presentazione e sequenza fotografica di Maria Sinayskaya: goorigami.com Diagrammi per piegare i moduli del Bialbero di Natale Da dicembre 2012 è disponibile un bel video di di Mariela Recinos: Folding Trees.
Origami. Happy Folding. Les Origami de Senbazuru - L'origami facile. Toujours dans une thématique printanière, nous vous proposons ce très joli modèle de jonquille et sa tige créée par Ted Norminton.

Attention, ce n'est pas un modèle facile, il y a beaucoup de plis à faire, et les nombreuses épaisseurs de papier vous compliqueront la tâche. Par conséquent, utilisez de préférence un grand carré (d'au moins 20 cm de côté ) de papier pas trop épais. La tige et la fleur se plient avec un carré de même taille. La fleur est réalisée à partir d'un hexagone, suivez simplement les premières étapes qui expliquent comment réaliser un hexagone régulier à partir de votre carré (à l'aide de ciseaux ou d'un massicot). N'oubliez pas de vous entrainer d'abord sur un brouillon avant d'utiliser un papier de qualité.
Cet origami traditionnel est simple à faire. Cette fleur magique créée par Ilan Gabiri est un origami modulaire plié avec 8 carrés (de 7,5 cm sur la photo de départ). Le lys est un modèle traditionnel japonais qui peut aussi se trouver sous le nom d'iris. ). Origami Club. How to Make 6-Pointed Paper Snowflakes. This step by step guide will teach you how to make SIX pointed paper snowflakes.
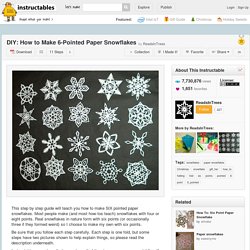
Most people make (and most how-tos teach) snowflakes with four or eight points. Real snowflakes in nature form with six points (or occasionally three if they formed weird) so I choose to make my own with six points. Be sure that you follow each step carefully. Each step is one fold, but some steps have two pictures shown to help explain things, so please read the description underneath. Instructables.com doesn't always show all of the steps on one page, so hit "next" to go on to the next step. All you will need for this is paper and scissors. If you want to view a gallery of my snowflakes, see me on Flickr: Paper Snowflake Gallery. Remember to rate this Instructable! Paper Models of Polyhedra.
Carambola Flowers by Carmen Sprung. If you’ve been following me on Flickr for a while, you’ve probably seen this picture of Carambola Flowers before – I folded them ages ago!

But since my Pro account is going to expire in a few days time (and I don’t feel like upgrading it again), a lot of my old photos won’t be displayed anymore. So I decided it would be a good idea to share the very best of them on my blog! These absolutely beautiful origami flowers were designed by Carmen Sprung and I just love them! Each flower is made from a single sheet of paper, not from a square though, but from a pentagon. I would recommend using fairly thick and strong paper (80-90 gsm) to fold them – Tant origami paper will be just the right choice! Description Video tutorial presented by Sara Adams of HappyFolding.com.