
Add a Fresh Splash to your Design. In this tutorial, I’ll show you several techniques for enhancing a basic banner design for a product or service.
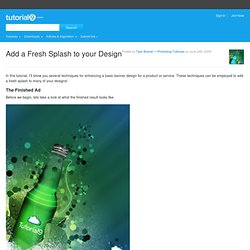
These techniques can be employed to add a fresh splash to many of your designs! The Finished Ad Before we begin, lets take a look at what the finished result looks like. Images We’re Using Before we can create the ad, we need to have the images for it. Or you can download them here. Step 1 – Creating the Background Create a new document, mine is 500x647px. Create a new layer, and grab the Reflected Gradient Tool. Once this is done, set the blending mode of the reflected gradient layer to Soft Light and lower the opacity till you get an effect that you like. Step 2 – Working on the Bottle Now that the background is complete, lets bring the bottle into the ad and re-size it. Use the Magic Wand Tool to select the white area and delete it. Create a Vibrant Drinks Ad. Final Image.

Create a Vibrant and Eye-Catching Drink Composition. One of the most popular tutorials we’ve published here at CreativeFan was our ‘Create a Vibrant Colorful Alcohol Product Ad‘, which covered some fun effects that you can create using liquids.
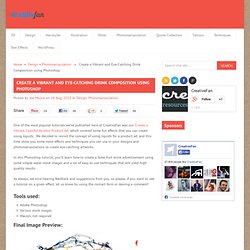
We decided to revisit the concept of using liquids for a product ad, and this time show you some more effects and techniques you can use in your designs and photomanipulations to create eye-catching artworks. In this Photoshop tutorial, you’ll learn how to create a Sobe fruit drink advertisement using some simple water stock images and a lot of easy to use techniques that will yield high quality results. As always, we love hearing feedback and suggestions from you, so please, if you want to see a tutorial on a given effect, let us know by using the contact form or leaving a comment! Tools used: Adobe PhotoshopVarious stock imagesWacom, not required Final Image Preview: Step 1: Water stock selection. To start off you will need a water stock. Step 2: Fruit manipulation Now we need to continue this process. Create a Vibrant Colorful Alcohol Product Ad in Photoshop.
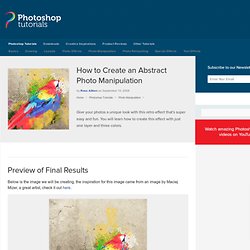
Alcohol is one of the most commonly advertised products on the planet.

During major sporting events such as the Superbowl, the World Cup and the Olympics, companies spend millions on TV advertisements, and also product advertisements in banner and billboard format at the sporting venue itself. However, because alcohol is a liquid, it can be very difficult to design around since liquid stock images require significant more attention during isolation and blending in order to appear realistic. In this tutorial, you’ll learn how to create a vibrant, colorful alcoholic product advertisement in Adobe Photoshop, using some easy techniques and quality stock images. How to Create an Abstract Photo Manipulation. How to Create an Abstract Photo ManipulationReviewed by Ross Aitken on Sep 10Rating: Preview of Final Results Below is the image we will be creating, the inspiration for this image came from an image by Maciej Mizer, a great artist, check it out here.
Abstract Photo Manipulation Photoshop Tutorial Step 1. How to Make a Vignette in Photoshop. Photoshop combining color with black and white. Quick and dirty vignettes in Photoshop. My favorite trick for adding drama to an ordinary photo is to give it a vignette effect.
If you’ve seen old black and white photos, you’ll sometimes notice the corners are darker than the rest of the image. It’s usually undesirable. But done purposefully and tastefully, vignetting can give an image added interest, depth, and focus. There’s a million techniques to make vignettes in Photoshop, but I’m most fond of the quick and dirty way. Here’s how to do it in three easy steps: 1. The key is to use the paintbush tool set with a large and soft brush. Set the brush size to at least half the width of the image.
Your brush settings should look something like this: 2. Create a Soft Fade Vignette Effect in Photoshop (5 and Up) A vignette, or soft fade, is a popular photo effect where the photo gradually fades into the background, usually in an oval shape.
This technique can also be used with a dark fill to simulate a camera vignette which is a darkening around the edges of a photo that was commonly produced by older cameras. By using Photoshop's layer masks you can create the vignette effect flexibly and non-destructively. Because we're using layer masks in this tutorial, you'll need at least Photoshop 5 or Photoshop Elements 9. Video Tutorial: How to Create a Vignette Effect in Photoshop Difficulty: Easy Time Required: 2 minutes Here's How: Using the Healing Tools in Photoshop CS3. A Post By: Darren Rowse The following article on using the healing tools in photoshop was submitted by Emma Cake from Big Bouquet Photography.
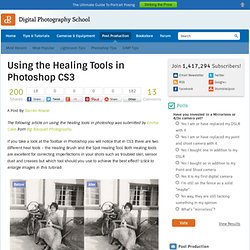
If you take a look at the Toolbar in Photoshop you will notice that in CS3 there are two different heal tools – the Healing Brush and the Spot Healing Tool. Both Healing tools are excellent for correcting imperfections in your shots such as troubled skin, sensor dust and creases but which tool should you use to achieve the best effect?