
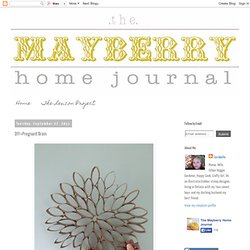
3-D Cardboard Star. DIY Faux Curled Rosewood Wreath {Made From Rolled Recycled Book Pages} I have seen various versions of Faux Rosewood Wreaths in just about every store and catalog for the upcoming season; most with a price tag running upwards of $40 or more.

Some are crafted of paper and other of real wood shavings. DIY Home Decorating - How to Make a Beanbag Chair at WomansDay. Whether it’s extra seating you need or a plush spot to put your feet up, this cozy circular beanbag pouf fits the bill.
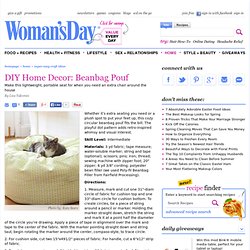
The playful dot pattern adds retro-inspired whimsy and visual interest. Skill Level: Intermediate Materials: 3 yd fabric; tape measure; water-soluble marker; string and tape (optional); scissors; pins; iron; thread; sewing machine with zipper foot; 20" zipper; 6 yd 3/8" cording; polyester bean filler (we used Poly-fil Beanbag Filler from Fairfield Processing). Directions: 1. 2. 3. How to Make Cherry Blossom Lights. m93pmeD84n1qhgvzjo1_500. m92sxqiKZ41qfyjoto1_500. m92t4oonBj1qfyjoto1_500. Quick Envelope Pillow Case.
In Need of Some Color. I'm desperate for a little color in my life.

It's gray outside, yesterday it rained ice, something needs to change here. One of these items should do it, or I could just go get a tan on a beach somewhere. I'm okay with either option. DIY+Pregnant Brain. Without getting into too many details-the baby is going to be a little longer than we thought.
We were afraid that she was going to be early, and now that she isn't, I sort of feel like I'm living life in limbo.I don't know if it's just me, or women in general, who find the strangest tasks to pass time until a baby arrives. Suddenly, the weirdest things pop on to our 'to do' lists, and become oddly important. And the tasks seem to grow weirder and weirder with each baby. Right before I had Reuben, for some reason, I decided that my living room futon needed a new cover. Not great timing, but not so strange. Pom%2Bflowers. 20 Ideas for Making Your Own Headboard. By craftyamy |

You knew i was going to make one. They are all over pinterest....
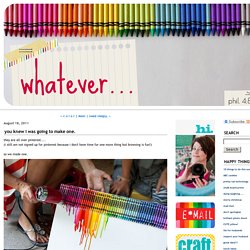
Rolled paper flowers {tutorial} Welcome to flower week – five days of simple and delightful flower projects.

I could probably do three weeks of flowers because there are so many different ways to create them, but I’ve limited it to five of my current favorites. Before we get started, let me make a few disclaimers: 1. I find inspiration for projects all over the place {online, in shops, in magazines}, then figure out how to re-create them on my own. Each of these projects are my adaptation of something I’ve seen elsewhere. 2. Christmas Lights in 8 Bedrooms - wave avenue. Posted by rd on Thursday, November 3, 2011 · Countdown begins before Christmas!
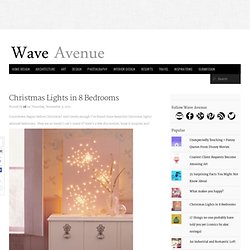
And timely enough I’ve found these beautiful Christmas lights adorned bedrooms. Do-it-Yourself DIY String Wedding Lanterns Yarn Chandeliers. Jessica of Wednesday Inc shows us how to make those gorgeous twine chandeliers from the inspiration shoot she shared with us this morning.

Using balloons, glue and twine, you can also make these lanterns for your wedding – and then bring it home and use it as your very own mid century lampshade. What you will need are: balloons, glue, yarn, tray for glue, corn starch 1/2 cup of Corn starch, 1/4 cup of Warm water, clear fast drying spray paint, hanging lamp cord or fishing line (depending on your desired final product), and a lighting kit if you’re looking for a fully functional lantern. Jessica recommends using a sharpie to mark on the inflated balloon how much room you need to leave for the lighting cord.
She also recommends coating the balloon with vaseline prior to wrapping the yarn coated with glue so it doesn’t stick on the balloon once it’s dry. You can see all the details on Jessica’s blog. How to Make a Simple No Sew Pillow. I was browsing the Christmas clearance at T.J.

Max the other day and came across this gorgeous table runner. Tornadoes and Tigers: Against the wall. One. two. three. four Hi readers, my name is Amanda and I write a blog called Here Comes the Sun. Dane has been a friend of mine for many years now- in fact he was a groomsman for my husband on our wedding day and his gorgeous wife was one of my bridesmaids! We also got the chance to be in their bridal party when their wedding day came around as well, so needless to say we know each other pretty well!
Anyway I am happy to be here today and share a few interior pictures that have been inspiring me. Pom love. 25 Cool Ideas To Display Family Photos On Your Walls. Family portrait by Lori Andrews (via designcrushblog) We all have family photos that we love. Most of them live well in photo albums but the best of them could and should be displayed throughout the house. It’s one of those things that add a personal touch of coziness to any interior decor. Besides, nowadays there are so many cool ways to display them that your family photos could even become a real design element.
Some time ago we’ve already shown you a bunch of cool ideas how you can hang your photos and art in creative ways. Displaying pictures could be challenging but we can and will make the process more easy for you. Mixed and matched family photos Family photo heart display Family photo ladder.