
♥ tuto chouettes au crochet ♥ - Tournicote...à cloche-pied. Points utilisés : ms = maille serrée 1 augmentation = 2ms = Pour augmenter d'une maille en milieu de rang, il suffit de piquer deux fois de suite le crochet dans la même maille.
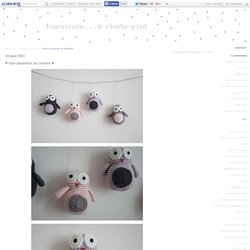
On a ainsi une maille serrée de plus au rang suivant = 2 mailles serrées dans la même maille 1 diminution = Pour diminuer une maille en milieu de rang, crocheter deux mailles serrées rabattues ensembles. Crochet n°3 , phil coton 3 phildar, coloris lotus, mercure, rosé, blanc et plomb (je crois) Now With Pattern! I made one of these totoro backpack clips for my daughter's anime club, and when the librarian saw them, she ordered 4 for her grand-daughters.
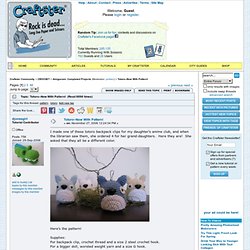
Here they are! She asked that they all be a different color. Here's the pattern! Supplies:For backpack clip, crochet thread and a size 2 steel crochet hook. For a bigger doll, worsted weight yarn and a size G hook.Two 8 mm safety eyes One 12 mm safety noseWhite feltMetal clipPolyester stuffing Make the belly first, so that you can position it before adding nose and eyes at step 17.Belly1.ch 2, 3 sc in 2nd ch from hook2.ch 1, turn, 2 sc in each sc3.ch 1, turn, sc in first sc, 2 sc in next sc across4.ch 1, turn, sc in next 2 sc, 2 sc in next sc across5.ch 1, turn, sc in next 3 sc, 2 sc in next sc across6.ch 1, turn, sc in next 4 sc, 2 sc in next sc across7.ch 1, turn, sc in next 5 sc, 2 sc in next sc across, finish off, leaving a long tail for sewing. Il ?tait une fois Anisbee. Tournicote...à cloche-pied. Tutorial conillet de pasqua.
Nibble nibble, hop hop Posted on Updated on If you are a regular follower you will immediately notice that these bunnies are very closely related to some particularly cute owls made recently.

You see a distant aunt on their mother’s side fell in love with a completely unsuitable (if you are an owl) rabbit… the rest, so they say, is history. Rabbits, as you well know, breed like, well, rabbits and before we knew it there were not one, but four new members to the family. If you are interested in meeting the owl family please be sure to check out the New Zealand branch here and the original English pattern here – over at Bunny Mummy no less!!!
Right, on with the tutorial. Various scraps of yarn and a corresponding hook – I used 8ply and a 4mm hook.2 x 9mm safety eyes (or beads or buttons)A very small amount of black crochet cotton or embroidery flossA needle to sew your creation together with. Easy Crochet Owl Tutorial. Hello Lovelies, Wooo Hooo , or should that be To-Whit to Wooo Hooo :0) It's a Happy Happy tutorial day!
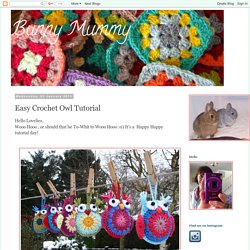
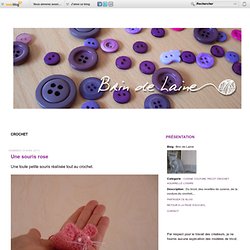
I simply LOVE these cute fellas and as you can see I've got rather carried away making them in lots of different colours.They are very easy to make and so jolly . I've seen a few similar cute crochet owls out there in blogland and on Etsy but they looked quite complicated to me. So for my version I've tried to keep things as simple as possible. Hopefully you lovelies will easily be able to enjoy making a colourful crochet Owl.......and who could resist :0) If you are proficient at crochet you will be able to make one of these sweet little owls in no time at all. This item is designed for decorative use and is not suitable for use as a toy for a small child. Petite fleur. Vendredi 19 avril 2013 5 19 /04 /Avr /2013 16:58 Une toute petite souris réalisée tout au crochet.
Tuto trouvé ici Par Brin de Laine - Publié dans : Crochet 5 Vendredi 18 janvier 2013 5 18 /01 /Jan /2013 14:50 Deux petites chouettes réalisées au crochet. Tuto trouvé ici Par Brin de Laine - Publié dans : Crochet 2 Mardi 19 juin 2012 2 19 /06 /Juin /2012 15:26 Avec un vieux tee-shirt enfant, j'ai fabriqué du fil qui est d'ailleurs tendance en ce moment ! C'est une idée de récup trouvée ici. Après quelques coups de ciseaux, des petites pelotes se sont formées. Un crochet n°8 et des rangs de mailles serrées... Me voilà avec un nouveau pot à crayons et à crochets. Très rapide et agréable à réaliser. Ce matin, j'étais en grande forme créatrice, je ne me suis pas arrêtée là. ... d'un rouleau de papier toilette. Par Brin de Laine - Publié dans : Crochet 11 Vendredi 15 avril 2011 5 15 /04 /Avr /2011 10:16 En ce moment, je suis dans ma période fleurs au crochet ! Le tuto de Lucy +++ Le tuto de Lucy +++ Un p’tit Tuto pour un p’tit zoziau … Avec l’aimable autorisation de Lucy (from Attic 24 !!)

, voici la traduction (j’espère correcte) du petit oiseau …. (allez, si il y a des fautes, Potiron pourra me corriger…) C’est parti ! On commence par le corps : faire un cercle de demi-brides, on connait toutes le principe chez les Granny manniacs. Voici celui de Lucy par exemple ... Ensuite, il faut faire un bec en triangle … Faire 5 mailles en l’air, commencer à travailler dans la 2ème maille de la chaine. Plier le corps en deux et coudre le bec sur un coté, dans la pliure, comme Lucy ici : Pour les ailes : Faire 9 mailles en l’air.
Faire une autre aile semblable et les coudre sur le corps. On choisit deux boutons pour les yeux de notre petit oiseau…. DIY : Tutoriel Hibou au crochet. Tutoriels Pattes vertes & co DIY : Tutoriel manchette noeud au tricot DIY : Tutoriel Hibou au crochet Ça y est je l’ai enfin fait !!

Le tutoriel du hibou doudou. Télécharger le tutoriel Pin It Articles similaires DIY : Tutoriel manchette noeud au tricot Deux maxi-hiboux adoptés ! Octobre rose 2013 - Concours Si vous aimez cet article, partagez-le ! Une Réponse pour DIY : Tutoriel Hibou au crochet lula dit : 26 juillet 2012 à 17 h 41 min couCou Et voici mon hibou! Ma boutique Dawanda Ma boutique Alittlemarket Catégories.