
Sunburst Granny Square (Free!) Presenting the Much Anticipated, Drooled Over, and Pined For *~*~*~Sunburst Granny Square Pattern~*~*~* The reader will note: This pattern is not truly my own.
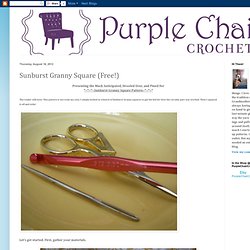
I simply looked at a bunch of Sunburst Granny squares to get the feel for how the circular part was worked. Then I squared it off and voila! Let's get started. I've selected a 5.5mm "I" crochet hook. Work as many Sunburst Grannies as you desire and join them in your preferred method (slip stitching, join as you go, etc). (Want some inspiration? Have a Lovely Day! Directory of Free, Online Crochet Patterns by Category. Free Crochet Pattern: Gumdrop Slouchy Hat. Merry Christmas everyone!
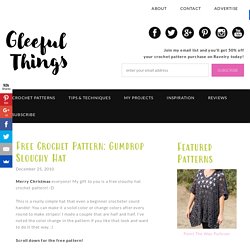
My gift to you is a free slouchy hat crochet pattern! :D This is a really simple hat that even a beginner crocheter could handle! You can make it a solid color or change colors after every round to make stripes! I made a couple that are half and half. Scroll down for the free pattern! ● Size J crochet hook or size needed to obtain gauge ● Yarn needle ● “Chunky Yarn” in 1 or 2 colors I recommend Paton’s Shetland Chunky. Cell Phone Cozy Tutorial #3. Tillie tulip - a handmade mishmosh. Photo tutorial of how to create the daisy. To beg - chain (ch) 5 and join to form a circle Round 1: ch 2, 11 double crochet (dc) into ring Round 2: change to new color with a slip st in any space between dc; ch2, * 3 treble (tc) in same space; remove crochet hook and insert it into the top of the first tc; hook and pull last tc through first loop - petal made - ch2 * and repeat * to *. make 11 more petals in this fashion Slip st into first petal and finish off.
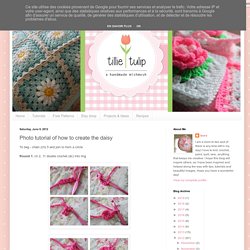
Sorry I didn't include the steps and photos side-by-side, but I thought by including some photos, you could at least have a gauge for how it should look! Good luck! You can see photos of my finished blanket here. To see how to add rounds go here. Adding rounds to the daisy. Several people have asked to explain how I added the border to the daisy square.
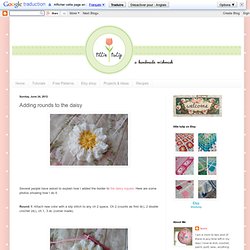
Here are some photos showing how I do it.Round 1: Attach new color with a slip stitch to any ch 2 space. Ch 2 (counts as first dc), 2 double crochet (dc), ch 1, 3 dc (corner made). Into next two spaces: 3 dc Into next space: 3 dc, ch 1, 3 dc (next corner made) Continue around: 3 dc in next two spaces, and 3 dc, ch 1, 3 dc (corner) until you get to the beg ch 2. If you would like to continue, Round 2: slip to corner space and beg with ch 2, 2 dc, ch1, 3 dc, then * 3 dc into next 3 spaces, 3dc, ch 1, 3 dc * repeat from * around and join with a slip stitch. So, there you have it!