
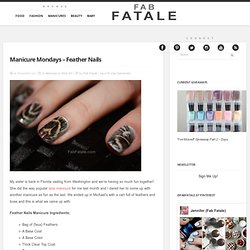
Feathers 101. I did this manicure once last summer, but it didn't turn out so well and I ended up peeling it off within 24 hours.

I decided to try it again, this time with more success. It's super simple and inexpensive. First paint your nails with a base color (I used Nicole by OPI "My Lifesaver"). After they dry, apply a thick top coat (I used OPI top coat). Take a feather (I got these in a pack at Michael's for around a dollar- the pack comes with tons of feathers too) and apply the top of it at the base of your nail. Press the feather into the top coat. Take manicure scissors and snip off the end of the feather. Apply the thick top coat over the nails (going from the tip of your nails to the base as to not disrupt how the feathers are facing). And you're done! Tips: You may discover that the feathers fray after a day or so, so just apply the top coat again to keep them put.
Using a thick top coat holds the feathers better than a thin one (usually quick-dry top coats are thinner). Thanks for viewing! Feathers 101b. My sister is back in Florida visiting from Washington and we’re having so much fun together!
She did the way popular lace manicure for me last month and I dared her to come up with another manicure as fun as the last. We ended up in Michael’s with a cart full of feathers and boas and this is what we came up with. Feather Nails Manicure Ingredients: Bag of {faux} FeathersA Base CoatA Base ColorThick Clear Top CoatTweezers To recreate my feather nails, first prep your nails with a base coat – I used Essie’s Protein Base Coat , followed by a base color. Next, top one nail with Seche Vite Dry Fast Top Coat and press a feather into the nail using tweezers quickly before it dries. Snakesheds. My buds, knowing the manicure addict that I am, love to share fun outrageous ideas with me. My good friend Kathy was watching The Today Show (video below) and they were doing an authentic snakeskin manicure that costs $300 in salons! How wild is that, literally?!? Kathy sent me the link and I was WAY way excited about the idea, but I really didn’t want to use real snakeskin and have PETA come after me lol.
I’m not sure if they used snakeskin on The Today Show; however, we were able to . Kathy was on the phone with her friend Heather, that works with animals, and had secured us some gray rat snake sluff within the hour lol. Real Snakeskin (Snake Sluff) A Base Coat A Base Color Thick Clear Top Coat Small Scissors Tweezers Kathy had the idea just in time for my sisters visit – my sister Lauren is the queen of the infamous lace manicure and feather manicure .
We started with a Seche Clear Crystal Clear Base Coat and two coats of Sally Hansen’s Petal Pusher pink (last seen here ). More fab. Lace. Hey Everyone, sorry I’ve been MIA for the past few days, but I was enjoying some much needed quality time with my mom and sister.

I was on a mission to keep the computer off for my four day weekend; however, my sis and I did do a lil somethin for a belated Manicure Mondays post. Here is a super fun real lace manicure that we worked on together – actually, I just sat there watching The Office marathon while sis did all the work :). This took more time than we expected and I’ll have to get back to ya on how long it lasts, but the end result was so worth it! Real Lace Manicure – DIY Ingredients: 1/2 Yard Lace From A Ribbon SpoolA Base CoatA Base ColorNon-Permanent GlueThick Clear Top CoatA ToothpickWax Paper To recreate this look, first prep your nails with a base coat and a base color because this DIY does involve glue and you do not want to glue lace directly to your nails.
And Color Club’s Who Are You Wearing? . Because it is super thick for finishing nail stamping designs.