
Inspirations & Creations. I may be a bit biased, but I think my bridesmaids scored some sweet SWAG for being a part of our big day :) One thing I knew I wanted to do for sure was to make them something… because everyone just loves handmade goodies right?!?
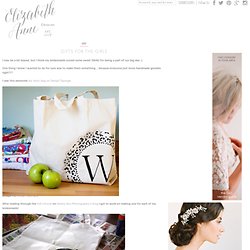
I saw this awesome diy doily bag on Design*Sponge. {image via Design*Sponge} After reading through the full tutorial on Ashley Ann Photography’s blog I got to work on making one for each of my bridesmaids! It took me a few trial/error bags but I eventually got the hang of it (the more spray adhesive the better!) For the initials I just printed off a letter in the size/font I wanted…carefully cut it out and then used the stencil that was left over to paint on each initial. The next thing I got for each of the girls was a pair of gray J Crew flip-flops (to match their J Crew BM dresses of course) to wear at the reception. {above 3 photos via author’s personal collection} Then I figured I should probably get them something pretty to wear and remember the day by.
Make It and Love It: Satin Flower Headbands. Satin Flower Headbands Remember this post about the pettiskirt?
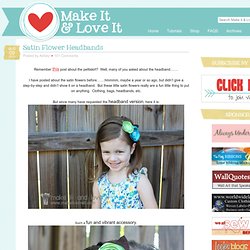
Well, many of you asked about the headband……. I have posted about the satin flowers before…….hmmmm, maybe a year or so ago, but didn’t give a step-by-step and didn’t show it on a headband. But these little satin flowers really are a fun little thing to put on anything. Clothing, bags, headbands, etc. But since many have requested the headband version, here it is: Such a fun and vibrant accessory. Many color combos are at your fingertips. The headbands work especially well to keep hair out of the face,while your little one peeps on the neighbors. And how can you resist all those layers of petals… Nice and full and perfectly sweet. Ready to make your own? First, begin by cutting about 6 circles of satin material for each flower. I made each circle gradually smaller, making sure they fit on top of the circle just larger than it, and didn’t worry one bit about making it a perfect circle. Then I dumped off the excess beads. Do-it-Yourself DIY String Wedding Lanterns Yarn Chandeliers.
Jessica of Wednesday Inc shows us how to make those gorgeous twine chandeliers from the inspiration shoot she shared with us this morning.

Using balloons, glue and twine, you can also make these lanterns for your wedding – and then bring it home and use it as your very own mid century lampshade. What you will need are: balloons, glue, yarn, tray for glue, corn starch 1/2 cup of Corn starch, 1/4 cup of Warm water, clear fast drying spray paint, hanging lamp cord or fishing line (depending on your desired final product), and a lighting kit if you’re looking for a fully functional lantern. Jessica recommends using a sharpie to mark on the inflated balloon how much room you need to leave for the lighting cord. She also recommends coating the balloon with vaseline prior to wrapping the yarn coated with glue so it doesn’t stick on the balloon once it’s dry.
You can see all the details on Jessica’s blog. Are you getting excited to try to do this at home as much I am? Instructions: 1. Embroidery + Metal? Here's something I've been noodling around with lately - embroidered metal discs!

Wait - what? I bought a bag of these perforated beading discs a while back, intending to make some beaded pieces a la Miriam Haskell. Only I never quite got around to those, and eventually a different light bulb went on over my head. I could use the holes as embroidery guides! The resulting discs are so cute and easy to make, and lend themselves beautifully to lots of crafts. Like this simple cuff bracelet! The stitchery part is dead simple. Just leave a few inches of thread hanging from the back when you start stitching. Then you just follow the holes, making stitches in different colors and patterns.
At the end of the strand, tie the ends of the floss into a double knot. The only thing to watch out for as you stitch is the fact that, for some reason, the outermost row of holes in the disc is not in a symmetrical pattern. Here, I glued a row of them to a paint-chip card. Cute, eh?