
PATTERNS 1960s MOD. Mood Fabrics : New York Fashion Designer Discount Fabric. Jan Andrea at home on the web. The URL for this page is: Fleece ring sling with sewn-in pleats the finished ring sling.

Cutting out the excess material allows the sling to be adjusted far more easily than if it is left in, and it doesn't compromise the security of the sling. You can make a fleece sling with regular overlapping pleats, but then a lot of material is going through the rings, and it's thicker and less comfortable. I recommend using this method for polar fleece and other thick fabrics. Materials needed: Fabric yardage : See chart below. What size to make? See my sling sizing page for more information, and add several inches to the numbers shown there, to account for hemming and sewing in the rings.
Polar fleece caveats: Polar fleece usually has some stretch going from cut edge to cut edge, and a lot of stretch going from selvage to selvage. Fabric widths: Most polar fleece comes in a 60" width. Sewing the sling: the finished ring sling. Link to me! Did you use this pattern and like it? Craftsy: Learn It. Make It. Discount Fabric for Apparel and Home Decorating. Fabric By The Yard. Fabrics at Wholesale Prices. Sewing Supplies & Alteration Supplies by Sew True.com. Megan nielsen design diary - DIY beaded scallop edge detachable collar (with pattern)
As promised a few weeks ago, I’ve put together a pattern and some instructions for how you can create your own beaded scallop edge detachable collar (phew that’s a mouthful!!)

I honestly love this collar sooo much, and have not stopped wearing it since I made it – but, that being said, it is definitely a project requiring some time and commitment. It took me almost 12 hours to do all the beading – so just keep that in mind before you start. Ready, set go! First things first, you’ll need: Some fabric for the collar. The pattern, which you can download below What do do: Print out the pattern on US letter paper (8.5″ x 11″).Cut 2 pieces on the fold. How to Make Spat-style Legwarmers - CraftStylish. Faux Fur Peter Pan Collar Tutorial (with free pattern!) Inspired by vintage accessories, we came up with this cute Peter Pan collar.

The pom poms are a favorite around here and add a fun touch. Not only is this a cute project, but it comes together quickly. You can easily use leftover fabric from the faux fur coat collar, as we did. In that tutorial, we drafted a custom collar to match a coat. In this one, we’re giving you a free pattern, making it a much faster project. Because this collar is tied on over a blouse, sweater, or jacket, it’s quite adjustable and would make an adorable gift. Download the pattern here or click the link at the bottom of this post. Items Needed: 1/4 yard faux fur1/4 yard lining2 20” lengths of velvet rope, ribbon, braid, piping, cord, etc.needlethreadtailor’s chalk or fabric marker Cut circles. 1. Sew gathering stitches. A knit and crochet community. Wayward Daughter: Peter Pan Collar Tutorial. Peter Pan collars are my absolute favourite.
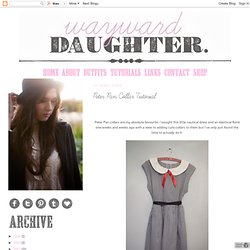
I bought this little nautical dress and an identical floral one weeks and weeks ago with a view to adding cute collars to them but I've only just found the time to actually do it. This is the finished article, I added a little red ribbon which I think gives it a slight Madeline look, I can wait to take it to Paris with me next week! Every seamstress has their own way of doing thing and mine is by no means flawless, I'm still learning after all but here is a quick tutorial on how I draft and attach a peter pan collar.
You will need :Fabric for the collar 0.25m is more than enough.A small piece of interfacing Pattern paper or similarPencilMeasuring TapePinsNeedle and Threadand most importantly a little patience 1. 2. 3.