
Linear workflow tutorial. Linear workflow and Gamma explanation.
Why use linear workflow? Many 3D artists finds this concept quite confusing. Therefore it’s easy to think that it doesn’t mean that much, but believe me, it does. With Linear Workflow, the calculation of light and color through the whole process from render setup to post, will be correct. And it needs to, if you’re aiming for a photo-realistic look in your renders. Linear Workflow is a term that tells something about how the gamma works. Here’s an example of an image rendered without any gamma correction. It is possible to adjust the gamma in post after the rendering, so that the light fills up right.
With the correct setup (linear workflow) both the colors and the light will end up correct. There’s also some other advantages with using a linear workflow, such as 32 bits per channel data. Now, before we go on to the term gamma, you need to know some facts about human perception of light. CG Education. Linear Workflow In Vray For 3dsmax CheatsheetBy Neil BlevinsCreated On: Aug 29th 2013Updated On: Apr 20th 2014There have been other good tutorials written on this subject by others, like for instance the one by Wouter Wynen which discusses the why's of a Linear Workflow, or this one by Alfa Smyrna, so I won't bother copying that here.
This is a cheatsheet, so if you need a page to quickly refer to to set up a scene for Linear Workflow in Vray, here it is. I'm using Vray 2.40 and 3dsmax 2014 for this tutorial, although much of it is the same in slightly older versions of max. Note: If you're starting a scene from scratch in max 2014 and vray, all of the settings below are correct by default. So you're already running a linear workflow without the need to change anything.
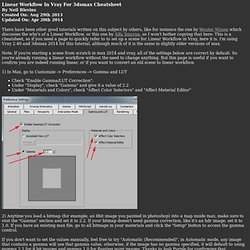
But this page is useful if you want to confirm you are indeed running linear, or if you want to convert an old scene to linear workflow. 1) In Max, go to Customize -> Preferences -> Gamma and LUT And that's it! Create a virtual photography studio in V-Ray. Rendu d’animation Vray – Fly through. Ce tuto marque la fin d’un époque, du moins je l’espère… En fait cela fait plusieurs fois que je réponds sur les forums 3d à la fameuse question: « Pourquoi ca flick ?
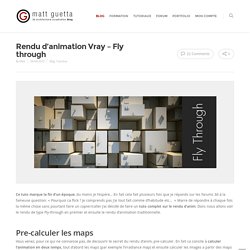
Je comprends pas j’ai tout fait comme d’habitude etc… » Marre de répondre à chaque fois la même chose sans pourtant faire un copier/coller j’ai décidé de faire un tuto complet sur le rendu d’anim. Donc nous allons voir le rendu de type Fly-through en premier et ensuite le rendu d’animation traditionnelle. Vous venez, pour ce qui ne connaisse pas, de decouvrir le secret du rendu d’anim, pre-calculer. En fait ca consite à calculer l’animation en deux temps, tout d’abord les maps (par exemple l’irradiance map) et ensuite calculer les images a partir des maps pre-calculer. Le rendu se divise donc en deux parties, le rendu de la Global Illumination puis celui de l’image. Avant de rentrer dans le détail un petit mot quand même sur les méthodes de calcul de la Global Illumination de Vray. Flicker free animation using Vray. Rendering an animation using indirect illumination (GI) methods that rely on caching samples are known for producing frames that flicker.
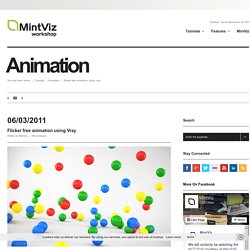
This is because the samples of each rendered frame are calculated differently, causing different lighting values per frame. To resolve this, an animation can be rendered using a pre-calculated solution where the same sample data is used for every frame. You would pre-calculate both GI methods, commonly the irradiance map and light cache, by choosing multiframe incremental mode for the irradiance map and fly-through mode for the light cache. The irradiance map and light cache combination is effective if you have no moving objects within your animation. So it is advised to be used only when creating fly-through animations. If you pre-calculate a rendering solution for an object that has a set position for x, y and z. To avoid flickering frames, Vray introduced time-interpolated irradiance maps as part of SP2. The use camera path parameter. 3ds Max V-Ray linear workflow.
Linear Workflow. Fig.05b - Output Gamma: 1.0.
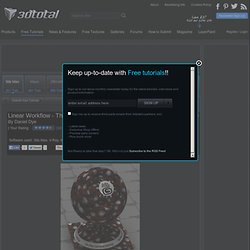
This is the render exactly as it is saved out, without any gamma correction. Although it looks strange, this is the result we want. It will be gamma corrected to 2.2 for final output. By completing the steps above, we have told 3ds Max to display everything with a gamma of 2.2, but saved the rendered output to disk as Linear. A quick note about Output Gamma: The steps I have outlined assume you are rendering out to a high bit format (explained later in this tutorial). Important: Because we have told 3ds Max that all textures have a gamma of 2.2, when importing Normal Bump, Displacement or Vector Displacement maps you must specify a gamma of 1.0.
Fig.06 Now 3ds Max knows exactly what to do with our images and renders. Part 2: Setting up your Render Engine Scanline and mental ray By default, there is nothing you will have to change for these render engine, unless you are using exposure controls.