background preloader

DIY

Facebook Twitter

20 Awesome Do It Yourself Projects. Thursday, June 14, 2012 4:30 am, Posted by Chris Groves | Internet 20 Awesome Do It Yourself Projects Topics: At Home Project Ideas , Creative DIY Home Projects , Do It Yourself Projects for 2012 , Fun How To Projects , What to Do with Extra Stuff Are you bored and have a bunch of extra little items hanging around here and there? Well we were in the same boat so we decided to round up 20 different awesome at home projects you can do. You honestly don’t know some of the creative things you can do with what could possible be junk.

If you know of any great at home Do It Yourself Projects please leave a comment to include your own and maybe we will add it to our list. And for the upcoming holiday season we want to give all you do-it-yourselfers a head start with these incredible Christmas DIY for 2012 1. More info: here | Buy: here 2. More info: here 3. 4. 5. 6. 7. 8. 9. 10. 11. 12. 13. 14. 15. 16. 17. 18. 19. 20. Incoming search terms: Little guiding stars. Since the new year has started I’ve been trying to think of ways to be more kind to my self. 
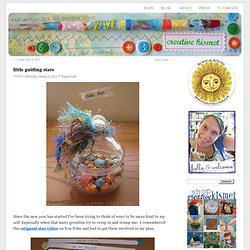
Especially when that nasty gremlins try to creep in and stump me. I remembered this origami star video on You Tube and had to get them involved in my plan. I thought it would be fun to make a whole bunch with kind words and “you are….” phrases inside.

I made 60 of them, enough to last me the whole year if I open one a week, plus a few extra just in case. I used 12 x 12 inch scrapbook paper and cut 1/2 x 12″ strips, then followed the video HERE*. I put them all in a little jar and prettied it up. *UPDATE! Be Sociable, Share! How to fold an origami star. Button Monogram. This is a really COLORFUL & creative way to display your child’s initial. Super easy for sewers & crafters who have lots of extra buttons laying around. Gosh I LOVE buttons… Supplies needed: - Printer (to print out your letter) or a large letter stencil - Scissors - Cardstock (large enough to fit your frame) - Pen or Pencil - Adhesive, Scotch Tape Runner allows you to reposition buttons - Paper Piercer - Buttons and Brads - Frame without glass or shadowbox (this one is from IKEA) Click here for step-by-step directions to the entire project.

How To Make An Easy Dress (For Cheap!) Two facts about me: I'm cheap. 
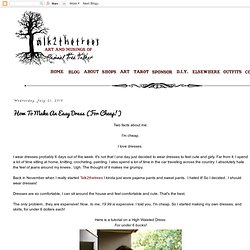
I love dresses. I wear dresses probably 6 days out of the week. It's not that I one day just decided to wear dresses to feel cute and girly. Back in November when I really started Talk2thetrees I kinda just wore pajama pants and sweat pants. Dresses are so comfortable, I can sit around the house and feel comfortable and cute. The only problem.. they are expensive! Here is a tutorial on a High Waisted Dress: For under 6 bucks! First you will need a ribbed tank top. I got mine from Walmart for 2.50 You could also use a t-shirt 3 yards of matching fabric. Clearance section is my favorite. Cut the tank top almost in half. (I cut mine a little too short.. oops!) For the bottom part of your dress take the fabric and wrap it around your waist about 1 and a half times, and cut in a straight line.

I never measure, I never use patterns... Next you fold your fabric in half. You have kind of a big blocky rectangle skirt. (You are sewing the raw edges, not the bubble hem) Step 1. How to Make junk mail newsprint art « Scrapbooking. Recycled Magazine Butterfly Collage. TIPPED OUT. All photos: Kristin Ess + thebeautydepartment.com post designed by kristin ess Lots of emails this week asking for a tutorial on Lauren’s temporary bright colors. Here I’ve replicated the process for you in 7 steps on an extension.

While I never recommend bleaching out the ends of your hair at home, if you want to do the fun colors yourself, maybe get the tips bleached out by a pro + then play with the temporary colors on your own. The best things about this color– you’re able to hide it in a bun for work if you need to, AND you’re only doing a couple of inches on the bottom so it won’t kill you to cut it off if you get over it quickly.

TOOLS: highlighting comb, clips, foils, color brush, hair bleach with the appropriate volume (always seek a professional when using bleach), light pink color, dark pink color, light blue, dark blue, clear gloss. Step 1 Highlight the tips of the hair using hair bleach with the correct volume. Step 3 Shampoo and lightly condition bleach out of the hair. Most favorited all-time. 31 Insanely Easy And Clever DIY Projects.

Rainbow Easter Eggs. Are you ready for Easter? I’ve working on those finishing touches the last few weeks while my six kiddos are off track. The baskets are almost finished, the fillers are all ready and the candy is safely tucked away until the big day. In the mean time, we’ve been having fun making some last minute Easter treats that are yummy, easy to make and great at keeping kids busy during an otherwise boring afternoon. These take awhile to full set, but the assembly is beyond easy and great for little hands. I used the rainbow Jello recipe and instructions from HERE. Spray the molds generously with cooking spray … … fill molds using a clean syringe … … making each layer 1/4” – 1/2” thick. Add layers according to the instructions and allow set up for at least four hours.

If you rush the process or don’t coat your molds heavily with cooking spray, you’ll end up with a plate full of these. Tasty but ugly. Happy Easter everyone! Featured on: Linking to: Easter Craft: Yarn Eggs (Easter Decorations) | Outdoor Crafts for Kids - Outdoor Craft Projects. This photo originally appeared in FamilyFun Magazine Total Time weekend projects Ages school-age These bright and funky eggs are a blast for kids to make -- and they're a great party decoration too. 
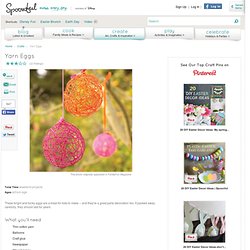
If packed away carefully, they should last for years. What you'll need Thin cotton yarn Balloons Craft glue Newspaper Waxed paper Clothespin Clothes hanger How to make it For each egg, cut twenty 3-foot-long strands of cotton yarn and blow up a balloon to a 6- to 8-inch diameter. {the lowdown on} How To Put Together A Fantastic, Affordable Gift Basket | CampClem.

It’s end of the school year time around here, and if you are like me, you find yourself trying to stretch a dollar to give a token of how deeply you appreciate how AMAZING your kids’ teachers are! I am a big fan of gift baskets. I feel like they look cute & are simple to assemble. There are two decisions to make when you are making a gift basket… Now you KNOW I love a theme, and my favorite go-to themes are spa, beach/summer, culinary, and gardening. Today, we delivered some “refreshing” gifts. My default color choice is pink and green.

Gather your supplies. I also grabbed a couple of these cello gift basket bags. First, line your basket with a couple of sheets of tissue paper. Tear off the label from the water and tie a ribbon around its neck. She who refreshes others will herself be refreshed (Proverbs 11:25). Next fill the basket. Finally, “wrap” the basket in a cello bag. Yay! I love to lay out all the “fillings” in my workroom on the dining room table, and go to work! Like this: A Pretty Life in the Suburbs: Backyard BBQ Birthday Bash. 239k Shares This past week was my daughter’s 10th birthday! (on a side note, I just can’t believe she’s 10. I mean I’m still 25 right?!) I swore I would never have another birthday party hosted at our home, but she really really wanted to have her friends here for her special day! I couldn’t resist…if she still wants to hang out at home, I’ve got to go with it! So what to do?! 10 is a tough age for parties…they’re not quite little kids anymore, but they’re not teens yet either.

This makes it kind of tough to plan activities – I didn’t want it to be too babyish, or too old for her either. So we decided on a Backyard BBQ Birthday Bash! Just simple food, simple fun, and a lot of relying on the girls being their own entertainment! Here’s a little recap on what we put together: warning: picture-laden post!! Here are the invites! Loot bags of bubbles, glow sticks, bubble gum, salt water taffy and chocolate covered pretzel sticks. I had the kids make their own sponge water bombs! Toooooo fun! Very festive! Bleach Pen. Ich habe im Internet einen Bleach Pen entdeckt und was man damit machen kann. 
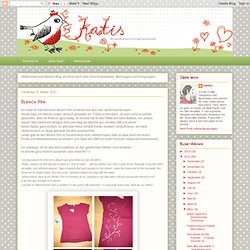
Heute habe ich meinen ersten Versuch gestartet, ein T Shirt zu bemalen...ist noch nicht so perfekt geworden, aber ich finde es ganz lustig. Im Grunde hat es den Effekt wie beim Batiken, nur anders herum. Man nimmt ein farbiges Shirt und trägt die Bleiche auf, mit dem Stift und seiner feinen Spitze ganz einfach. Es gibt aber keine scharfe Kante, sondern verläuft etwas. Ich habe vielleicht auch zu lange gewartet mit dem auswaschen.

Ich überlege, ob ich das Shirt zusätzlich an den gebleichten Stellen noch besticke, es könnte ganz hübsch aussehen, was meint Ihr? I've discovered the Internet a bleach pen and what you can do with it. 31 Insanely Easy And Clever DIY Projects. It's Beginning to Look a Lot Like...... Christmas! I love Christmas! I love all the decorations, both inside and outside, the yummy treats we get to indulge in, shopping for loved ones, even addressing Christmas cards! Part of the fun is trying to come up with creative ideas for gifts for different people. One thing I am doing this year is making the DIY Canvas Art that I blogged about last August. In addition to the picture of Grandpa, I am doing a picture of my Grandma as well. This picture is several years old, but is the last "good" picture I have of her.

On thing I am doing differently is I am painting the edges of the canvas. I haven't take a picture of the final results just yet. Teenagers are somewhat difficult to buy for. For my niece, who enjoys taking photographs, I made a shadow box bank in which she can put money to save up for a dSLR camera. For my nephew, I was also going to do a shadow box, but the store only had ONE.

How about you? As of today (12-20-11), I've had the shadow box pinned over 1,500 times! 7. Unclog a Sink | 47 Skills You Need to Survive Homeownership | Photos | Home & Real Estate. Wands - tutorial by *majann. SLIME. Don't you LOVE it when your little one is over the moon about an activity you shared together?!

I do!! This morning we made RAINBOW SLIME and Biscuit was beside herself with excitement. There are a few ways to make slime, however I found this recipe works best ~ 1 1/2 cups of CLEAR glue and 1 1/2 cups of liquid starch. The liquid starch we used was the brand STA-FLO, you can find it at your local grocery store with the laundry detergent or you can purchase on amazon. You mix it all together, separate the slime into a few small bowls and add food coloring to each bowl. You only need a few drops of food coloring!!! Making her slime All ready to go!

"Stretchy" "Eeeeeew. " "I squish it! " Deep in thought.... By the end there was just one big ball of slime. She played with this stuff for thirty minutes ~ uninterrupted. *High-fiving myself* Happy Playing & Exploring!! 10 Tooth Fairy Traditions and Ideas - Tuesday {ten} I would love to hear any traditions your tooth fairy has {or had if your kiddies are grown} – especially if you have any ideas for special needs children who don’t quite yet comprehend what is actually going on.

For us, we tend to go big and a bit over the top for events such as these so our little guy possibly gets a better idea of what is happening. Plus it makes the experience a little more fun and a lot less traumatic as seen though his eyes. {Tooth Fairy Traditions & Ideas} {one} The Official Tooth Fairy Kit is a package that can be purchased from the Office of the Tooth Fairy site. The Kit contains a Certificate of Record for filing with your local Tooth Fairy and a reusable cloth deposit bag for the first tooth and all subsequent transactions.

{two} Here is another kit found on Etsy from Paper and Twine. {three} Tooth Fairy Pillows Tooth Fairy Pillow with Record Chart from Loop Loft {four} Tooth Fairy Pouches Felt Tooth Fairy PocketsFull diy directions can be found on Heartmade. How-To: Make Your Own Mini Vase in Under 30 Seconds. Quick! Can you guess what this tiny bud vase is made from? I'll give you one clue: with the right moves, it can be turned into an animal*. Now you're really curious, aren't you? Read on! This modern, ceramic-looking vase can be made in well under 30 seconds and only requires two materials: a 2" glass votive holder and a BALLOON. Crazy, right?? I love that you can make it in just about any color, not to mention the fact that it has the appearance of matte glazed porcelain (my fave). Camilla Fabbri from Family Chic created these clever little vases by snipping off the mouth of a balloon, leaving about an inch of the neck, and then slipping the balloon over the votive holder.

[via Family Chic] *Well, not a living, breathing animal. Tagged : Craft, Inspiration, vases, balloons, flowers, DIY. DIY: Vintage Tin Candles. June 7th, 2012 If you’re looking for an excuse to start collecting those adorable vintage jello molds, I’ve got one for you. They are ridiculously easy to turn into candles. Once you’ve gathered all your supplies, you can make these in 15 minutes or less! Supplies: microwavable soy candle wax (available here) lavender essential oil (available here) candle wicks (wicks with the metal anchors work best—available here) vintage tin jello molds How to: Clean and dry your tins. Did You Know... Chic Masquerade – DIY Mask & Template | Sprinkles in Springs.