
Geometric Place Card Holders. I really love all of the geometric shapes that are popular right now, but I wanted a way to use them that isn’t totally over done.

Initially I thought of making geo planters, but somehow I settled on place card holders (I think it was sheer laziness, but don’t tell). I’m also still into the whole dipped trend too, I don’t know if that qualifies me as obsessive or not, but I combined the two anyways! Here’s how you can make your own with oven-bake clay and a little paint (or if you’re feeling lazy too, you can just buy mine)– Materials: Oven-bake clayClay knife/exacto knifeWax paperPaint color of choiceWet/dry sandpaper (optional) 1 | Form the clay into smooth equally sized balls for the number of holders you need. 2 | Use a smooth edged knife to randomly cut sections/facets from the ball of clay. 3 | Bake the geos according to your specific clay instructions. Hand Drawn Frame Illustrations At Ace Hotel New York. Taking the marker straight to one of your walls has become an interestingly growing trend in D.I.Y. wall art, and even popular artists are practicing this method in places like retail shops and boutique hotels around the world.

The Ace Hotel in New York is home to Timothy Goodman’s line drawings on the walls of special guest rooms. 99 hand sketches in this room, to be exact. With carefully laid out and perfectly executed sketches depicting the various aspects to the concrete jungle, Goodman’s photos tell a story (or 10) of life in the Big Apple. Easy to make Polymer Clay Geo Wall Hooks. These decorative hooks are easy to make with Polymer clay.

DIY Pegboard Wall. If you're new here, you may want to follow me on Bloglovin' or subscribe to my rss feed.

Thanks for stopping by! ~Crafte Diem (seize the craft!) Is a bi-weekly feature showcasing a craft tutorial~ Best DIY Projects For Home Decorating. DIY Oversized Peg Wall. Alright.

I know, I know. This post isn't a typical DIY Friday because there's no tutorial attached- But I'm sharing this because I believe it's some really fabulous DIY inspiration. I came across this image on Apartment Therapy yesterday, and it really got my design-wheels turning. Think of all the possibilities! First of all, it would be ideal for a kid's bedroom- all those clothes that normally end up on the ground- now they have the perfect (easy) place to hang! And to make the deal even sweeter, this could totally be a weekend DIY project. Somebody, anybody, please go hop in your car and head to the hardware store. Read more from HOMESLICE here. Photo Credit: Apartment Therapy.
How to hang a pegboard - Hip Girl's Guide to Homemaking - Living thoughtfully in the modern world. Our new kitchen pretty much trumps all kitchens in my checkered past of rental kitchens.
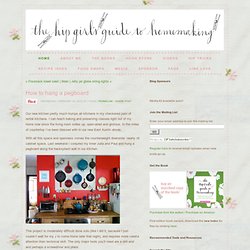
I can teach baking and preserving classes right out of my home now since the living room sidles up, open-aired and glorious, to the miles of countertop I’ve been blessed with in our new East Austin abode. With all this space and openness comes the counterweight downside: nearly nil cabinet space. Last weekend I conjured my inner Julia and Paul and hung a pegboard along the backsplash wall in our kitchen. This project is moderately difficult done solo (like I did it, because I just couldn’t wait for my J to come home later that night), and requires more careful attention than technical skill. The only major tools you’ll need are a drill and and perhaps a screwdriver and pliers. Tips for Hanging a Pegboard in the Kitchen 1. 2. What to buy: 3/16” x 4’ x 4’ sheet of tempered hardboard, brown or white (I got a brown one and paid $8.27.)
Mason Jar Sunday {DIY Mason Storage from Liz Marie!} Today’s Mason Jar Sunday comes in the form of a DIY guest post from one of my favorite fellow bloggers, Liz Marie!
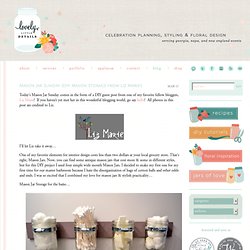
If you haven’t yet met her in this wonderful blogging world, go say hello! All photos in this post are credited to Liz. I’ll let Liz take it away… One of my favorite elements for interior design costs less than two dollars at your local grocery store. That’s right, Mason Jars. Mason Jar Storage for the baño… 1 Supply 3 Projects: Wood Veneer - Part 3. We're wrapping up this 3-part series with a ridiculously easy veneer pendant!

Be sure to check out parts 1 and 2! Materials: 12" Threaded Metal Rod, 2 Washers, 2 End Caps, Hole Punch, String, 14 - 15" Veneer Strips You can find the metal rods and washers/end caps at the hardware store. These rods are about $1 a piece, so you can easily and cheaply make lots of these for a big impact. Directions: Punch a hole just large enough for the rods in each end of each veneer strip. On the end of the rod, place the washer, all the veneer strips, and the end cap.
Spread the strips out evenly around the rod. At the opposite end of the rod, place the other washer, the opposite end of each of the veneer strips, and the other end cap.