
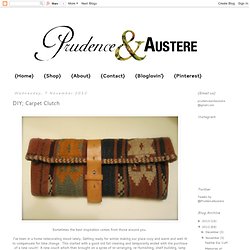
DIY; Carpet Clutch. Sometimes the best inspiration comes from those around you.
I've been in a home redecorating mood lately. Getting ready for winter making our place cozy and warm and well lit to compensate for time change. This started with a good old fall cleaning and temporarily ended with the purchase of a new couch! A new couch which then brought on a spree of re-arranging, re-furnishing, shelf building, lamp hanging and so on. All of which has occupied the majority of my free time and creativity. Since then I've been in a bit of a creative lull, could be that all I want to do is hang out on my new couch but I've spent hours upon hours searching my favourite blogs (and new ones) for a good DIY idea and nothing has come to me.
Materials needed: Piece of Carpet 1ft x 1ft' 3 inches Piece of material for lining Old belt or inch wide strip of leather 2 inches longer then carpet Jewellery making head pin, with decorative top Pins Thread Scissors Needle Nose pliers Speed-Sew glue, or other strong adhesive Xo Austere. 01 Striped Crossbody Clutch Tutorial by Fabric Paper Glue. Plastidipped Tote Bag Tutorial. Try This: Plastidipped Tote Bag So...Plasti-Dip.
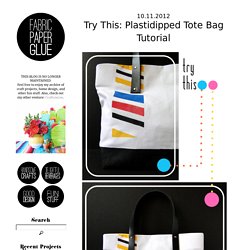
It's a rubberized coating -- generally for tool handles -- to make surfaces slip resistant and waterproof. If you've been on the DIY circuit long, there's no doubt that you've seen people finding clever and crafty uses for this stuff. Some of my favorites including dipping flatware, stool legs, toothbrushes, and an assortment of random things. I ordered myself some quite a while ago, sitting on it, waiting for the perfect idea to strike . Read on for the full tutorial. One: Begin by taping off the two cuts of white canvas. Two: Mix up the colors that you want to use in a set of disposable bowls. Three: Paint the sections in using a sponge brush. Four: After a few minutes, peel the tape away. Five: Now construct a basic tote bag with leather handles using the technique from this tutorial. Now, enjoy your new tote bag complete with waterproof bottom! Can you think of any clever uses for Plasti-Dip?
Find me elsewhere. Renske’s minimalist tote bag. A talented seamstress with a mission, Renske Solkesz decided to create her own wardrobe after finding herself frustrated with high fashion prices.
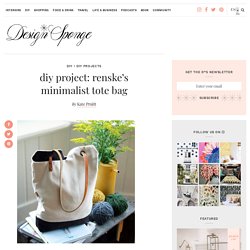
When we saw her chic and modern wardrobe creations, we asked if she’d be willing to create and share a fun accessory tutorial with us. I’m super excited about what she’s come up with: an amazing self-closing utilitarian tote! I’m a huge fan of the graphic contrast and the leather and rivet details. Like her fashion designs, this tote is made from inexpensive materials, yet looks totally luxe.
I’m halfway out the door to the fabric store already! CLICK HERE for the full how-to after the jump! When I designed this bag, I wanted to integrate the grip/straps in a more functional way with the rest of the bag. A friend of mine called it a “yin yang bag,” which is pretty accurate, I think. Materials Tools HammerSewing machineScissorsPinsChalkMeasuring tapeIronPattern template Instructions 1. 2. 3. 4. 5. 6.