
Decorating a frame with broken glass. When Rob and I were first married and had a brand new house that we were so excited to fix up, one of the first things that Rob did was to add an extra lock to the sliding glass door.

It was one of those locks where you drill a hole in the door frame and slide the pin in so the door can't move... Well when Rob drilled into the frame the drill hit the glass and shattered it. I heard a loud cracking sound and turned around just in time to see all the glass explode out of the door and hit the ground. Neither of us said anything for a minute, and then I started laughing and Rob started cussing. We ended up with a brand new door and a {now} funny story. Soda Can Crafts. Are you a beer drinker or a soda addict?

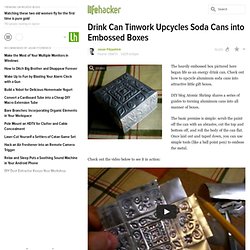
If you're a regular reader here, chances are you toss those empty cans into the recycle bin instead of the trash. High five! Recycling metal is a pretty efficient process, and recycling your empties definitely lightens your beverage footprint a bit. Of course, recycling still takes energy, and reusing before recycling is always the best way to go. Luckily, there are all sorts of fun, crafty ways to reuse empty soda cans! 1. 2. 3. Drink Can Tinwork Upcycles Soda Cans into Embossed Boxes. SExpand Am I doing it right?
Protips:
Pallets. Kid craft. Tiny Bubbles (Beach Crafts) 100 Amazing Upcycling Ideas Anyone Can Do - Top Online Engineering Degree. One does not have to be an environmentalist to enjoy the benefits of upcycling projects.

Anyone who derives enjoyment from DIY projects and other creative endeavors will love looking at the following instructions for ideas and inspiration for undertakings of their very own. Or, of course, they can follow along at home as a means of learning new techniques and nurturing their innovation. 1. Bike Innertube Wallet : Learn how to transform the innertube of a bike tire into a durable, waterproof wallet that only requires a bit of simple cutting and sewing. Scarfy/necklace thing. Hi!

I made this after finding this tutorial on instructables- *EDIT* - but...... then they took the instructions down because there is a patent pending for the idea (!?) I dont get it. how can you patent cutting up an old t-shirt and wrapping it around your neck?
UpCycled mini-journals. New Life for Old CDs. This is a guest post by Becky Haas, who is an amateur crafter/environmentalist who also tries to make a living as a professional musician.

You can also find her at the craft blog Sew and So. I have a confession to make…I’m addicted to music. I guess it comes naturally, since that’s what I spend a lot of my time doing. So I always love it when I stumble across a craft project that uses music-related materials, like Kelly Rand’s recent article on things to do with old cassette tapes. By this point, I don’t have too many old tapes lying around, but what I do have is a lot of CDs–most of which I still listen to. My first thought was jewelry, and it turns out that it’s pretty easy to transform an old CD into that. The first step is to cut the CD into the desired shape. Next, you’ll want to file the edges down, especially the corners, so they don’t scratch you up when you wear them.
The variations on this are endless. There’s some great pre-crafted CD jewelry out there as well. Pillow Mattress Tutorial. Several friends have sent me some amazing project ideas - they're all in a file and at some point I'll get to them (I swear!).

Two days ago, however, my friend Tatiana posted this on my Facebook wall: She found it on pinterest and thought I would like it. Welllll....she was right. Not only do I like it, but I could see an immediate need for one (why is it that you don't know you need something until you see it?). Since the one in the photo above is somewhere in England right now retailing for approximately $145 plus shipping...you know the rest, right?
If you'd like to pay $145 for it, you can get it here. First, I went to IKEA - here's my entire haul...one twin size duvet cover and five pillows. The duvet cover was $9.99 and the pillows were $0.99 each (yes, you read that correctly). Step 1: Measure. Here's how I measured: Yep... " Step 2: Cut the duvet cover to the desired width. I ended up cutting the duvet cover exactly in half. Step 3: Step 4: Hem all raw edges. Step 5: Make the pocket. Hemp pendant lamps. Inspired by West Elm’s gorgeous Abaca pendant lamps Super talented Heika DeHart strikes again.
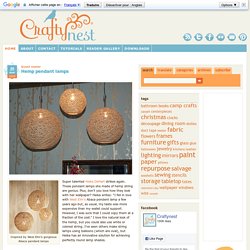
These pendant lamps she made of hemp string are genius. Shiny cans.