Make ribbon barrettes. Have you seen 80s ribbon barrettes around?
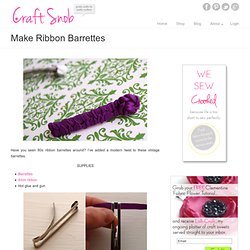
I’ve added a modern twist to these vintage barrettes. Start with a basic metal barrette. Cut a 24 inch length of 4mm ribbon. Open the barrette. Place the middle of the ribbon under the opening end of the barrette. Make Fabric Flowers. Let’s just jump right into making this flower… Start with a piece of fabric 3 inches wide by 24 inches long. Twist it really tight. Fold it in half and it will twist together on its own. Hot glue the unfolded end under to create the center of the flower. Continue wrapping around until you get to the folded end, gluing periodically.
The real deal: It cost less than $0.30 to make one flower. Are you addicted to making fabric flowers yet? Felt Pencil Case - Martha Stewart Kids' Crafts. D.I.Y FRIDAY Flower Crown. Giant Paper Rose Flower. If you loved the beautiful DIY wedding this morning and Nata’s gorgeous paper flower bouquets, you are in luck as Nata is sharing how she crafted them with us!

She was inspired by a template created by Morgan Levine on Martha Stewart (as was I in the flowers I created for this styled shoot). I just love that this basic idea has inspired different brides to create their own version of giant paper flowers – you might remember these equally awesome giant paper flowers from this wedding I shared last year. :) Thanks so much Nata for sharing how you created your giant pink paper rose + special thanks to Studio Castillero for the photos of the DIY + her wedding! Materials (to make one giant rose) Step 1: Cut the petals Cut 5-6 teardrop petals and 15-6 heart-shaped petals from the petal colored crepe paper. IMPORTANT: Crepe paper is directional so it matters which way you’re cutting the paper.
Repeat until all of your petals are cut Step 2: Cut the leaves + calyx. DIY: Gift Card Snow Globe. I know that people like receiving gift cards for the holidays, but I feel that they can be a little impersonal.
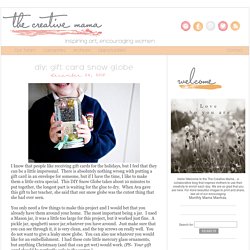
There is absolutely nothing wrong with putting a gift card in an envelope for someone, but if I have the time, I like to make them a little extra special. This DIY Snow Globe takes about 10 minutes to put together, the longest part is waiting for the glue to dry. D.I.Y. MAKEUP FIXER UPPER. Photos + post by amy nadine, graphic design by eunice chun.
Black & white striped tray. Decorative trays can easily become vibrant statement pieces in your home and are a fabulous way to contain clutter.
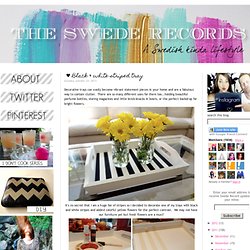
There are so many different uses for them too...holding beautiful perfume bottles, storing magazines and little knick-knacks in bowls, or the perfect backdrop for bright flowers. It's no secret that I am a huge fan of stripes so I decided to decorate one of my trays with black and white stripes and added colorful yellow flowers for the perfect contrast. We may not have our furniture yet but fresh flowers are a must! Start off by measuring and marking where you’d like your stripes, then apply painter's tape across the tray to outline the straight lines that will be painted black. To prevent paint from seeping underneath the tape, I generously painted white all around the corners and sides of the tape. I then applied two coats of black paint to achieve vivid, opaque coverage. KITCHEN BEAUTICIAN Lemon Salt Scrub. DIY Marbled Glassware. When graphic designer and artist Joanna Bean Martin shared with us her technique for marbling the bottoms of glassware with nail polish, we couldn’t wait to try it ourselves.
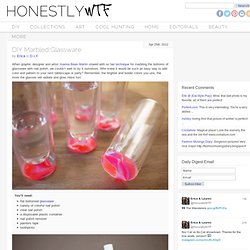
Who knew it would be such an easy way to add color and pattern to your next tablescape or party? Remember, the brighter and bolder colors you use, the more the glasses will radiate and glow. Have fun! You’ll need:flat bottomed glasswarevariety of colorful nail polishclear nail polisha disposable plastic containernail polish removerpainters tapetoothpicks Mask off the bottom of the glass with painters tape. Fill a disposable, plastic container with water. Layer the colors one on top of the other. Submerge the bottom of the glass into the polish. Allow to dry completely before applying a layer of clear polish. Once everything has dried, remove the painters tape and touch up with nail polish remover and a cotton swab. DIY: Lemon and Sugar Body & Face Scrub - Beauty Banter. I am having such a moment with concocting beauty products from the contents of my kitchen.
Make that a normal person’s kitchen as my kitchen is quite bare save for the bottled water, reese’s peanut butter cups, and beauty creams and serums that take up residence in my refrigerator. Full disclosure: I don’t cook. Anything. Not because I don’t know how – although my recipe catalogue is quite limited – but because I’m just not patient enough to take the time needed to prepare the food.
And I’m rather uninterested in seeing or touching raw meats, poultry or fish. But I have found another use for my kitchen space and it’s rather similar to cooking (without every having to look at raw animal) yet it benefits my skin… I’ve decided to use my kitchen to make beauty products and, besides being a rather fun activity, it saves a ton of money and the finished product is quite rewarding. This DIY lemon and sugar scrub beauty obsession can be used on both the body and face.
String Heart.