
How to Make a Ruffly Felt Rosette Wreath. Have you ever started a project thinking, “This is going to be so cool!

I’m totally going to finish it in a few hours, and I’ll probably end up making half a dozen more because I like it so much,” only to find yourself, weeks later, still working on the same project with not much of an end in sight? Yeah, this was one of those projects. However, I did finish, and I love, love, love the result, so it’s a very happy ending. My ruffly wreath was inspired by a felt rosette pillow tutorial that I spotted back in September over at Etsy’s The Storque blog. It’s a beautiful felt project by Anne Kyrrö Quinn, and I was in love the moment I saw it. I was going for an ultra modern, neutral look that will match any décor year ’round, which is why I made mine completely white, but you can add holiday flair with red or green felt, or you can use a rainbow of felt for something bright and whimsical. What you’ll need for the wreath: This is what my wreath looked like on the back when I was finished. Yarn Wrapped Fall Wreath. Let me start by saying I'm a very picky wreath person.
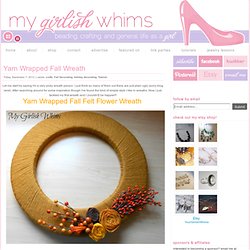
I just think so many of them out there are just plain ugly (sorry blog land). After searching around for some inspiration though I've found the kind of simple style I like in wreaths. Now I just tackled my first wreath and I {couldn't} be happier!! Yarn Wrapped Fall Felt Flower Wreath Swoon! I started out with a Styrofoam wreath form and some yarn. Then I wrapped and wrapped and wrapped and wrapped some more. For embellishments I got these little faux berries and orange things from Michaels. And then just trimmed down the stems and used some hot glue to attach to the wreath.
Next I made three rolled flowers out of felt. I then used hot glue to wrap the felt squiggle (yes, that is the technical term) into a flower, After burning my fingers oh, three too many times I figured I should actually use these little finger covers I have so you DON'T get burned. Whee! Lastly I just hot glued the flowers in between my berries. All done! Thrifty NinjaThrifty Ninja. A pretty autumn wreath. Today I have a tutorial of sorts to share.

It is not a full tutorial because 1. I learned to make the flowers from an already pretty amazing tutorial and 2. I left my camera in Ryan’s truck and was too impatient to wait to put it together until he came home so I don’t have photos of the actual attaching to the wreath phase of the project. Sometimes you just have to go with it when the crafting bug gets you. This wreath is a combination of a regular grape vine wreath you can purchase at the craft store, lots of coffee filter flowers and a few acorn and berry sprigs.
Okay, so on with the tutorial. I wanted fall-ish colors for my flowers, so I used yellow, pink, red and orange paint. Mix your paint with water, stir well, scrunch in a stack of coffee filters and let them soak up the paint. I dried some flat on paper towels, but then ran out of room and made a clothes line to dry the rest. Okay, now on to the flower making part. Open up the filters and cut the outer ring open.