
Sensor Shield V7 for Arduino [SH_SEN_V7] - $9.00 : Elechouse, Arduino Play House. Sale: $0.00 Model: SH_SEN_V7 Units in Stock: 0 Date Added: Tuesday 18 December, 2012 Sold Out Product Description: This product has been upgraded to Sensor Shield V08 for Arduino We've upgrade the Sensor Shield to Version 7 (V7) from Sensor Shield V6. It is compatible with Arduino UNO, Arduino Leonardo, Arduino DUE, Arduino Mega and Arduino Duemilanove. Why uprading? Arduino now has I2C interface besides the AREF pin. What improved? Compared with Arduino Sensor Shield V6, Make I2C interface compatible with more Arduino boards. The switch in the blue box could change voltage output (5V or 3V3) of those pins in the purple box above. Since 5V TTL and 3V3 TTL are compatible with each other, it is no problem if you connect them together, only if the 3V3 pin could be 5V-tolerant.
This soldering pads is to connect the I2C interface to Arduino A4 and A5 pins. Product List. Découvertes des sondes DS18B20 et DS18B20PAR. L’astuce de demande d’échantillons chez MAXIM ne date pas d’hier, ça marche bien, très bien même.
Il faut tout de même veiller à respecter un certain délai entre les demandes, paraît-il entre 2 et 3 mois. Un DS18B20 coûte 3€ pièce, mais si on cherche bien, on en trouve à moins d’un euro pièce. Mes derniers expériences en soudure date d’il y’a 10 ans, c’est comme le vélo, ça ne s’oublie pas, sauf que je fais de gros pâtés dégueulasses. J’utilise mon injecteur 5Volts pour interconnecter mon bus ; j’ai toujours mes 3 câbles : Brun : 5 Volts Blanc bleu : GND Bleu : DATA Le but étant de souder une sonde de température ou bout d’un RJ45 rigide et de lui enfiler une gaine thermorétractable.
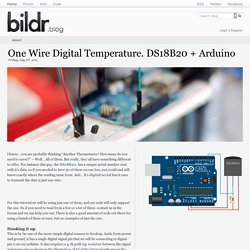
DS18B20+PAR la sonde de température en mode parasite par Dallas Schéma DS18B20+PAR Une installation très simple ! C’est fou de se dire qu’un petit truc comme ça, peut nous apporter les informations de température, avec un identifiant unique, un protocole embarqué… La patte 3 du DS18B20+PAR ne sert à rien. One Wire Digital Temperature. DS18B20. /*Copyright (c) 2007, Jim Studt Updated to work with arduino-0008 and to include skip() as of2007/07/06.
--RJL20 Permission is hereby granted, free of charge, to any person obtaininga copy of this software and associated documentation files (the"Software"), to deal in the Software without restriction, includingwithout limitation the rights to use, copy, modify, merge, publish,distribute, sublicense, and/or sell copies of the Software, and topermit persons to whom the Software is furnished to do so, subject tothe following conditions: The above copyright notice and this permission notice shall beincluded in all copies or substantial portions of the Software.
Much of the code was inspired by Derek Yerger's code, though I don'tthink much of that remains. #include "OneWire.h" extern "C" { #if (ARDUINO >= 100)#include <Arduino.h>#else#include <WProgram.h>#endif #include <avr/io.h>#include "pins_arduino.h"} //// Perform the onewire reset function. //// Write a bit. //// Read a bit. Return r;} if ( !
Arduino - One Wire Digital Temperature Sensor - DS18B20. The one wire Digital Temperature Sensor - DS18B20 from Maxim (formerly Dallas) is a great chip for measuring temperature in your projects.
Luckily, there is a Dallas Temperature library for the arduino which makes using this sensor very easy. The most recent version of this library can be found at We used version 3.6.0 for this tutorial which can also be downloaded here Download a copy of the library. In it you will find two folders Drag and drop the DallasTemperture folder into your arduino/libraries folder If you dont already have the OneWire library then you will need to copy that folder into the libraries folder also. Now, before we get to the programming part, lets wire up our temperature sensor. So we will use the 2 wire method. A 4K7 ohm pullup resistor is required on the DQ pin to pull it up to 5V Here is our sensor setup on a breadboard Here's a closeup. Next, load up the sketch below and upload it to your Arduino board. Index Thématique. JeremyBlum.com.