
Facebook. Untitled. Furniture Flip: DIY Chalk Paint Dresser. You may remember that a few weeks ago I introduced you to some fabulous new site contributors.

You’ve since heard from Holly (events and party design), Kendra (Blogger tutorials) and Emilie (Photography). Today, I am excited to introduce you another amazing woman. Meet Ann Marie! Ann Marie is an Arizona based blogger with a furniture refinishing business and an ETSY shop on the side. Her DIY furniture flips have been featured on some of the biggest sites online.
Amazingly, she is able to fit all this in whilst raising four children with her husband and blogging at Twice Lovely. Ann Marie’s posts will be filled with all the details she puts in to each “Furniture Flip.” I picked up this sturdy old dresser from the local Craigslist. Homemade Microwave Puffy Paint. DIY paint that puffs up in the microwave?
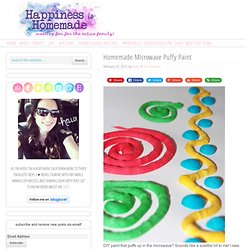
Sounds like a surefire hit to me! I saw this idea on Mommy Labs awhile ago and filed away for a rainy day. Today just happened to be the perfect combination of rain and bored kiddos, so I whipped up a batch – quick, easy, and SUPER fun! We started with one cup of flour and mixed in 3 teaspoons of baking powder, 1 teaspoon of salt and enough water to make it the consistency of pancake batter. We divided our mix into four parts and put them into snack size Ziploc baggies along with some food coloring. Rubber band the baggies like you would if you were icing a cake and snip off the teeniest little bit of the tip. How To Make Chalk Paint. Have you heard of Chalk Paint?
It’s quickly becoming the newest rage in the DIY circle, especially after a blogging conference this summer when a ton of bloggers were given little jars of very expensive Annie Sloan chalk paint. Crafts. Puffy Paint. I can't believe I've never tried this project before.
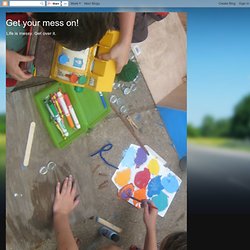
It was so easy and fun that I ended up doing it three times this week... first with my own kids, then as a project at my son's school, and then with our music class. I have a little bit of PTSD after working with lots and lots of squirrelly little 4 and 5 year olds. In particular my own kids, who tend to just dump out all the paint, smear it all over their bodies, and then run away screaming. They can engage with art projects sometimes, but it's a delicate trick... figuring out what will draw them in. This project was perfect because the bottles are just so irresistible to squeeze that no one could deny their hypnotic powers.
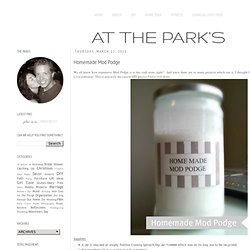
Puffy Paint 1 c. salt. Lana's Podge DIY. I have seen many tutorials on making your own version of Mod Podge that I just had to try it myself. For those of you that don't know what Mod Podge is: It's a glue that is normally used for decoupaging, but a lot of crafters also use it for pretty much everything else, because it attaches on almost every surface giving a sheer finish.The down part of Mod Podge is, is that it's kinda expensive. It's not as expensive to not make me buy it, but for some projects I could use a cheaper version. There are a lot of discussions going around saying that the homemade version is not the same thing as the 'real deal'. And let me just be clear by saying that this is not the same as Mod Podge. Homemade Mod Podge. We all know how expensive Mod Podge is at the craft store, right?
Attempting Aloha: How to Make Your Own Chalkboard Paint - DIY. Aloha!
Today I'm going to teach you how to make your very own chalkboard paint. FROM SCRATCH! Yep, I first learned the secret ingredient from the craft queen herself via her Martha Stewart Living Magazine. Make It: Chalkboard Paint. Yes you can.
Do it yourself. Wednes-DIY: Making Natural Dyes. Pin It I have been wanting to experiment with natural dyes for a while now, and with all the great new fall colors that have been popping up on our website (and featured in our monochromatic trend) I decided that it was time.

This is such a fun, environmentally friendly project that takes a little time, but very little cash. For today’s DIY I’ll tell you about what natural ingredients you can use to make natural dyes, and what shades of color they will yield. What I got: red cabbage, lemons, oranges, beets, yellow onions, blackberries, blueberries, spinach. For bluish/purple dyes: Blackberries and red cabbage can be used to make bluish/purple dyes. Natural Non-Toxic Wood Stain with Coffee, Berries and More. How to Make Elmer's Glue Spray. Homemade Glue Recipe. During their childhood, kids use a large amount of glue.
Most of them are chemical mixtures with no ingredients listed on the packaging. You can only imagine what’s in there. Preschoolers love pasting and collage, as well as tasting anything that comes close to their mouths. Besides the awful taste, shop bought glue might not be the perfect substance for their tummies. School kids have (hopefully) learned not to lick the glue, but having it on their skin and, occasionally, all over them, isn’t good either as we know that our skin absorbs anything that’s put on it. Whether you would like to avoid a chance of your kids digesting chemical glues, make your house greener and as chemical free as possible or just want to avoid buying stuff and reducing wasteful packaging, the recipe above is a sure winner. Packing Tape Image Transfers. I love image transfers.
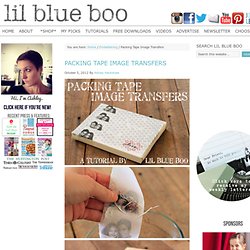
It’s something I’m always using in my journals but there are so many other fun uses for them. All you need to make a transfer is a photocopy of an image or words and packing tape. You can also use printouts from a laser printer or magazine pages. Inkjets will not work because they are not heat based toner. So take some photos to the copy machine or tear some pages out of your favorite magazine to get started. First, take a strip of packing tape and place it over the images you want to transfer: Then use the back of your scissors or the side of your fingernail to make sure the tape is adhered firmly: Next, dip the tape and paper into a bowl of water to wet the back: Using your fingers, start to rub off the paper from the back of the tape: