
iCandy Handmade. Hi friends! I can't tell you how excited I am to be a creative guest on Ucreate today! I've been bubbling with excitement for weeks and have been scheming over what project would be Ucreate-worthy. I hope this one fits the bill...! First of all, I'm Autie and my friend Jen and I blog over at iCandy handmade.
Random Tutorial Generator. Plywood to plank flooring tutorial. When recently redoing the room above our garage, we decided that we were DONE with the carpet.
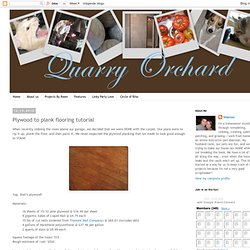
Our plans were to rip it up, plank the floor, and then paint it. We never expected the plywood planking that we made to look good enough to STAIN! Yup, that’s plywood! Materials: 16 sheets of 15/32 pine plywood @ $16.49 per sheet 9 gigantic tubes of Liquid Nail @ $4.75 each 10 lbs of cut nails (ordered from Tremont Nail Company) @ $69.63 (includes s&h) 4 gallons of Varathane polyurethane @ $37.46 per gallon 2 quarts of stain @ $9.99 each Square footage of the room: 533 Rough estimate of cost: $520 We started the project with sheets of plywood.
It, surprisingly, only took us an hour and 45 minutes to cut the sheets into the planks. With the materials purchased and gathered, Dustin cleaned up the room with the shop vac. Then the fun started. Before we began, we made sure to figure out our pattern so that each row of flooring would alternate where the nails were. We hand stained the whole floor. Smart. Free Woodworking Plans - Alphabetized. DIY Outdoor Chaise Lounge. Hello summer!

I’m sure most of you are also experiencing the heat wave in your area! It’s down right hot in the Lone Star State:) I couldn’t get this project started fast enough! Ahhh!!! Swoon! Love this set of chaise lounges from Pottery Barn….but I don’t love the $600 price tag (and yes that is the “marked-down” price;) I’m sure they are worth every penny but my wallet will never know! Nope, I saved some dough and built my own for $25 thanks to the free plans I got from Ana’s site! Trip to Home Depot for supplies (no kids;) Thank you hubby! I used my battery-powered drill and nailer to assemble the chairs…. oh and Gorilla Glue Wood Glue of course;) Here are some pictures of the steps I took as I went… I used the base of the chaise to assemble the back by aligning each board on top of the other to ensure a good match when the back was attached.
Use narrow utility hinges to attach the back to the base. This is the prop for the back rest:) Before & After: Crazy Beautiful Toy Kitchen. 23.2K Flares23.2K Flares × LOOKING for more DIY play kitchens?
Click here for a roundup with lots more projects, photos and ideas, including a DIY toy workbench for a little boy! And if you like this post, Subscribe to Green Your Decor for more DIY projects and green ideas! I like to think of myself as pretty crafty. I often see items in a store and think of a way (or find a tutorial) so I can make it myself.
I usually post the “after” picture first, with a before picture later. Gorgeous! Read the details at Giggleberry Creations. Looking for more DIY projects? >How-To: Newsprint Manicure « A Pretty Penny. I saw this newsprint manicure over on The Daily Nail and thought it was adorable (especially for bookworms and word lovers like myself).

I did a little Google detective work to see how to recreate it, and was surprised at how easy it is! All of the tutorials I found called for vodka or other clear distilled spirits, but we were fresh out. I used isopropyl alcohol instead, and it seemed to get the job done. I tried a quick and dirty version this afternoon to share it with you: Like this: Like Loading...