
Digital painting tutorial illustration step by step. Digital painting tutorial illustration step by step.
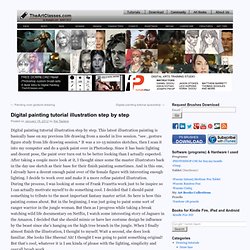
This latest illustration painting is basically base on my previous life drawing from a model in live session. *see , gesture figure study from life drawing session.* It was a 10-15 minutes sketches, then I scan it into my computer and do a quick paint over in Photoshop. Since it has basic lighting and decent pose, the paint over turn out to be better looking than I actually expected.
After taking a couple more look at it, I thought since some the master illustrators back in the day use sketch as their base for their finish painting sometimes. And in this one, I already have a decent enough paint over of the female figure with interesting enough lighting. Here is a Huntress of the Amazon. tribute to frank frazetta by xia taptara Below is a similar Premium tutorial Below are step by step digital painting of the Huntress of Amazon. Digital illustration tutorial. Draw realistic liquids in vector art - Tutorials. Making of Yuka. Introduction After receiving some positive feedback to my last work “yuka” I decided to write a detailed tutorial about creating process.

My main goal was to create a painting which was really detailed. I knew that I wouldn’t be able to do it without a real photograph so I started to look for something that would interest me and make me want to spent a lot of hours painting it in photoshop. And I found a perfect picture on . I received a lot of e-mails saying that it's not a big deal to just paint something like this using a real photograph. Tools For this work I used Adobe Photoshop CS2 and Wacom Intuos 3 tablet. Preparation I had to decide with what resolution I want to work. Sketch I start with creating a sketch in order to define the shapes, which will be later filled in with colours . I like keeping everything simple so I will use these brush settings through the whole creating process. A Roundup of 20 Great Photo Manipulative Tutorials with Curious Effect. Digital Painting Steps - Adobe Photoshop Tutorial. Let's take a walkthrough of one of my digital paintings done in adobe photoshop.
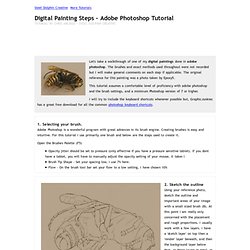
The brushes and exact methods used throughout were not recorded but I will make general comments on each step if applicable. The original reference for this painting was a photo taken by Epoxy5. This tutorial assumes a comfortable level of proficiency with adobe photoshop and the brush settings, and a minimum Photoshop version of 7 or higher. I will try to include the keyboard shortcuts whenever possible but, GraphicJunkies has a great free download for all the common photoshop keyboard shortcuts. 1.
Adobe Photoshop is a wonderful program with great advances in its brush engine. Open the Brushes Palette (F5) Opacity jitter should be set to pressure (only effective if you have a pressure sensitive tablet). 2. Using your reference photo, sketch the outline and important areas of your image with a small sized brush (B). 3. I like to block in color areas, getting a rough idea of the hues I want to use. 4. 5. Making of the Rest. This is a picture made only for fun and without references, using only my imagination, except in the flag on the jacket.
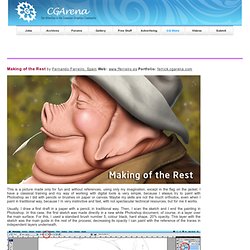
I have a classical training and my way of working with digital tools is very simple, because I always try to paint with Photoshop as I did with pencils or brushes on paper or canvas. Maybe my skills are not the much orthodox, even when I paint in traditional way, because I´m very instinctive and fast, with not spectacular technical resources, but for me it works.
Usually, I draw a first draft in a paper with a pencil, in traditional way. Then, I scan the sketch and I end the painting in Photoshop. In this case, the first sketch was made directly in a new white Photoshop document, of course, in a layer over the main surface. For to determine the different surfaces of the composition, first I create layers with those parts painted only with plain colours. Colouring in Photoshop by =Gold-Seven on deviantART.