
Crochet. How to Make Cherry Blossom Lights. Crayon Hearts. Photo Wood Blocks. Autumn leaf bouquet. I don’t know what it’s like in your neighborhood, but when I step outside here in Oakland, I sense it right away: Fall is in the air!

I’m lucky enough to have a few turning trees on my street, so I don’t miss out entirely on the brilliant autumn colors I remember from growing up in NH. Speaking of brilliant autumn colors, I’m thrilled to share this stunning maple leaf rose bouquet DIY from a fellow Kate — clay, fiber and paper artist Kate Hust. Kate first learned how to make these a few years ago from a retired art teacher in her community, and now they’ve become an annual tradition when fall rolls around.
Her instructor taught her to wrap the leaves really tight, so they looked like rose buds, but Kate has modified the technique a bit to suit her own tastes: She likes to find the really big leaves and make them with large open “petals.” She’s clearly perfected the craft, and I’m so happy that she’s decided to pass the tradition on to us. Read the full how-to after the jump! Materials 1.
Chinese Lucky Stars Rainbow Christmas Tree Garland. Jewelry. Wall-E Art. Making a Stencil. UPDATE: If you are here at All Things Thrifty for the first time, WELCOME!!
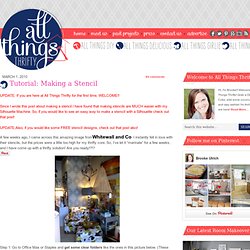
Since I wrote this post about making a stencil I have found that making stencils are MUCH easier with my Silhouette Machine. So, if you would like to see an easy way to make a stencil with a Silhouette check out that post! UPDATE:Also, if you would like some FREE stencil designs, check out that post also! A few weeks ago, I came across this amazing image fromWhitewall and Co. I instantly fell in love with their stencils, but the prices were a little too high for my thrifty core. Step 1: Go to Office Max or Staples and get some clear folders like the ones in this picture below. Step 2: Cut the folders and tape them together.
Tape the two folders together to create a large enough area for your stencil. Step 3: Find an image that you like for your stencil and have it printed large enough to trace. Step 4: Trace your image on to your plastic folders with your narrow sharpie. Here is when the FUN begins! Book Making. Here's another DIY project from our sweet friend, Sasha - from the The Gilded Bee.
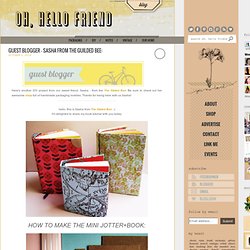
Be sure to check out her awesome shop full of handmade packaging lovelies. Thanks for being here with us Sasha! I'm delighted to share my book tutorial with you today: Supplies you’ll need to make this project: • One—8.5 x 5.5 sheet of cardstock • One---1/2 x 3 inch piece of cardstock or paper • Two---2 5/8 x 3 1/8 inch pieces of cardboard, chipboard or matboard (not corrugated) • Hot glue gun and glue sticks • 25---3 x 5 inch ruled or blank index cards • Two---3 x 5 inch sheets cardstock • 2 rubber bands • Pencil • ¼ inch wide Ribbon: One-6 inch piece, plus two-1 inch pieces To make the page block: * 1.
. * 2. . * 3. . * 4. . * 5. . * 6. To make the cover: * 1. Make a little mark at the center of each side of your paper (4.25 inches on center). On each side of those center marks, draw three lines paralleling each other (6 lines total):