
Hair Brooch. 29 May 2010 These elegant fabric flowers are very simple to make . . . and only take a few basic supplies.
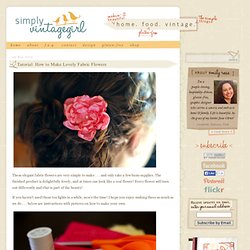
The finished product is delightfully lovely, and at times can look like a real flower! Every flower will turn out differently and that is part of the beauty! If you haven’t used those tea lights in a while, now’s the time! I hope you enjoy making these as much as we do . . . below are instructions with pictures on how to make your own. Supplies: · Synthetic Silky Fabric · Scissors · Candle (preferably a tea light) Additional supplies: · Needle and Thread, Glue Dots or Glue Gun · Buttons and/or Beads Directions: 1.
Make the largest one’s diameter about half an inch larger than you want the diameter of the flower, as the petals will end up shrinking a bit. 2. You can also cut around the pattern and skip the drawing part, it just might not be as uniform . . . but with these, uniform isn’t necessary. 3. Cut just inside the drawn lines to make a circle out of the fabric. 4. 5. Hair Bow. Posted September 28, 2012 | 24 Comments Hi, loves, and Happy Friday!

Today we’re showing you a fun hairstyle you can do at home thanks to the lovely Stephanie of Hair and Makeup By Steph. This fantastic blog has everything you need to inspire your wedding day hair and makeup, including fun DIY tutorials that are easy to tackle yourself. With just a little patience and know-how, you can tackle today’s DIY hair bow tutorial, the perfect go-to hairstyle for dress shopping, bridal shower, rehearsal dinner – even the big day itself! Read on to see how this DIY hair bow is done… photo: hair and makeup by steph To get this look, you’ll need to start by taking two sections of hair from either side of your head. Pull into a half ponytail… Split the loop in half… Use your fingers to create a bow shape on one side, securing with bobby pins… Repeat the bow shape on the opposite side… Use the remaining ends to cover the pins and secure the bow… Braided Headband Tutorial. It's chilly outside here today and I'm loving it!
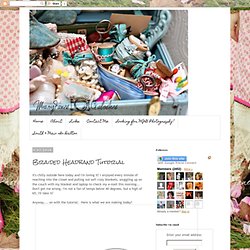
I enjoyed every minute of reaching into the closet and pulling out soft cozy blankets, snuggling up on the couch with my blanket and laptop to check my e-mail this morning... Don't get me wrong, I'm not a fan of temps below 40 degrees, but a high of 65, I'll take it! Anyway.... on with the tutorial. Here is what we are making today! What you need- Thick hair tie Six 1" strips of fabric Bulldog clip or safety pin Sewing machine (or needle and thread) Fabric tac I ripped my fabric strips so they were a bit frayed on the edges, personal choice. Tack each end of the braid just enough that it doesn't come undone .
Then tack both braids together on each end, be careful not to twist the braids. Cut your hair tie so it's one strip of elastic. Sandwich your elastic ends between the ends of your braids on each end, again, careful not to twist the braids. Sew over the elastic so that it's secure. The Knotted Headband Tutorial. My husband came home one day with a headband he had found in a parking lot (I know...sooo sanitary) and said "I bet you could make one of these" so I did...because I'm all for stealing awesome ideas.

Difficulty: Medium Time: 30 minutes Cost: Under $10 Fun-ness: Why would I do a boring project? Materials: Yarn (100% cotton for a crisp look, acrylic for a softer look) Size H or J hook Ribbon (approximately 1/2 inch wide) Hot Glue Gun Directions Step 1: Creating the Chains And that's it! So wear your headband with pride!
Love the headband, but don't want to make it yourself?