
21 Ways to Create Your Own Bookends. Make A Journal. Make a hand bound journal with elaborate side stitching for yourself or as a gift.
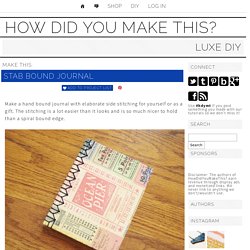
The stitching is a lot easier than it looks and is so much nicer to hold than a spiral bound edge. Supplies and Equipment – sharp utility knife and cutting surface BE VERY CAREFUL WITH THE SHARP BLADE – rulers – drill with 1/16th inch bit OR a small paper punch BE VERY CAREFUL WITH POWER TOOLS – fancy cover paper – I used Cavallini Vintage Tickets Wrapping Paper – 20″ x 28″ – 1 sheet of 8.5×11 for endpapers (this can be fancy or the same paper as your pages) – 10 sheets of 8.5×11 paper for pages – 3 yards of embroidery floss – mat board – I used Crescent No. 33 White & Cream Smooth Mat Board – Yes Stikflat Glue or other archival glue that leaves paper flat – heavy object to use as a weight – waxed paper – cutting/hole punch template – click here to download – thin cotton or linen fabric (optional) – needle with an eye large enough to fit embroidery floss – brush for glue Stitch down through the next hole.
Creating Colorful Bookcovers. BySusan MyersonAugust 2, 2012 With school time just around the corner, I came up with a school craft project that incorporates brightly colored paper.
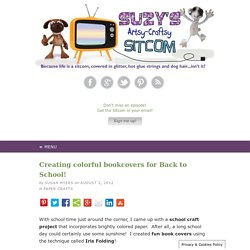
After all, a long school day could certainly use some sunshine! I created fun book covers using the technique called Iris Folding! The plan was to revamp the old version of the book cover. You know, the one that is made from a grocery bag? For this project I used: Several sheets of different colors of bright colored cardstock A paper grocery bagGlue StickTacky GlueScissors Begin by cutting your paper bag open as shown, and then cut off the bottom flap, so that you have one large sheet of paper. With printed side of the grocery bag up, place the book on top and fold down the top and bottom edges of the paper to match the top and bottom of the book.
Fold one end of the paper and slide the front cover of the book into the open end until the edge of the cover meets your fold. Now lets create some beautiful Iris Paper Folds! Button book. Book Page Necklace. I introduced this necklace a while back and sold a couple at the facebook sale, but since my shop is going in a different direction, I've decided to share the tutorial for this necklace.

MATERIALS NEEDED: 30" of chain 2 pages from an old book 1 piece of poster board Glue 1 quarter Scissors Varnish Matches Pearls Jump rings Lobster Claps [1] Cut two pieces of chain, 15 1/2, and 18 inches long. [2] Attach the two chains at both ends with small jump rings: [Should look like this] [3] Rip out 2 pages from an old book. . [4] Trace a quarter on the book page: [5] Cut out the tracing: [6] Paint cut-out with varnish: [7] Use a match to burn the edges of the cut-out: [8] Use a hammer and nail to punch a hole into the cut-out: [9] Attach a jump ring through the hole: [Repeat steps 4-9 to make 7 of these book page pendants] [10] Attach 7 pearls to jump rings: [11] Plan out where all the pendants and pearls are going to be on the necklace:
Patchwork Book. Projeto elaborado para a revista Mãos que Criam.
