
DIY Woven Chain Bracelet. Chain link bracelets, with colorful threads woven through them, have been popping up here and there.
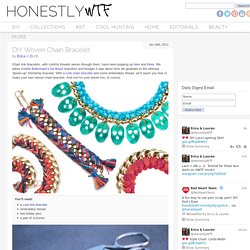
We adore Aurèlie Bidermann‘s Do Brazil bracelets and thought it was about time we graduate to the ultimate “grown-up” friendship bracelet. With a curb chain bracelet and some embroidery thread, we’ll teach you how to make your own woven chain bracelet. And one for your bestie too, of course. You’ll need:a curb link braceletembroidery threadtwo bobby pinsa pair of scissors Cut 2 sets of 15 strands of embroidery thread, with each strand measuring four times the length of the bracelet. Lay the second color (blue) over the first color (coral). Repeat the steps until you reach the end of the bracelet. (top images from here and here, rest of images by Honestly…WTF) DIY Basic T-SHIRT QUILT Tutorial- Part 1 - Totally Stitchin. How to Make a T-shirt Quilt – Part 1 In Part 1, we’ll discuss making a very basic t-shirt quilt with no sashing between t-shirts, no batting, a microfleece (or other fabric) backing, and no binding.
In Part 2, we’ll discuss other options and creative touches. Supplies: Baby Lock Sewing Machine. DIY Woven Chain Bracelet. Hogyan legyek jó nő? Kendős trükkök. Macaron Coin Purse. Just can’t help for not sewing these sweet little macaron coin purses when one of Craft Passion’s Facebook fans showed them to me.
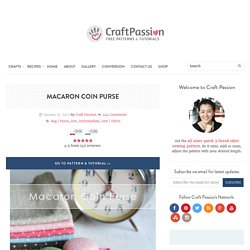
Thanks to XYZZhandmade for her inspiring handmade and some tutorial links in Japanese, this, this, this and this. No, I can’t read Japanese but I can guess from the pictures on how to sew it. Here is the English version of tutorial on how to sew this macaron coin purse where I have added more details in the sewing. The space inside the coin purse is quite limited but good enough to place some small jewelries like ear rings, rings; may be to keep some small coins, folded money; a place to keep small piece of note that wrote your shopping list and reminder etc.
Or, simply use it as a key chain or hanging ornament. I have tried both nylon and metal zipper, each gave different feel and effect on the macaron coin purse. Bigin. Photos de Színes Ötletek - a kézügyes blog. DIY Wrap Bracelet. You should all know by now that we are all about stacking bracelets on our wrists.

The more, the better. In fact . . . the most, the best! With that being said, we’ll show you how to master a version of the ever so popular wrap bracelet. It’s so simple and addicting, you’ll soon be churning out these wristlets with your eyes closed. Clearly this arm party train isn’t stopping and it’s about time you get on board! You’ll need (for a double wrapped bracelet) :* Lengths will vary depending on the size of your wrist (see comments for suggestions). Fold the length of leather cording in half to form a loop. Place the ball chain along the leather cording with the end of the chain meeting the end of the wrap. Continue wrapping while checking it for fit around the wrist.
When you have reached the end of the ball chain wrap the linen cording around the leather strands 2-3 more times. Thread the hex nut through the strands and tie a second knot. Fonott karkötő kelta motívummal - Színes Ötletek Blog. Egy látványos, ugyanakkor egyszerű csomózási technikával készült karkötőt hoztam a hétvégére, aki még nem csomózott eddig, ettől megjöhet a kedve.

Maga a minta kelta hangulatú, szép íves, tekergős. Erőteljes nyári színekből, de akár tengerész-stílusban natúr madzagból is jól fog kinézni. Anyagok: Ékszerzsinór (pl. bőrszál, velúrszál, pamutszál stb.) 2 mm átmérővel, 3x3 méter (ITT kapható)Ékszerragasztó (esetleg pillanatragasztó) (ITT kapható)Kapocs bőrszálhoz (ITTkapható) Photos de Színes Ötletek - a kézügyes blog. Hand Dyed Crochet Tube Color block Knot Bracelet par NikalaJayne. Photos de Színes Ötletek - a kézügyes blog. 5 Ways to Turn Zippers into Awesome Arm Candy. UPDATE: By popular demand, Zipper Bracelet Kits ($15) and readymade Zipper Bracelets ($20) are now available in the Brit + Co. shop!
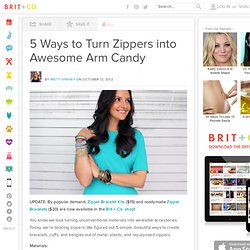
You know we love turning unconventional materials into wearable accessories. Today, we’re tackling zippers! We figured out 5 simple, beautiful ways to create bracelets, cuffs, and bangles out of metal, plastic, and repurposed zippers. Materials: - zippers - E-6000 quick hold contact adhesive - velcro or snap buttons - leather crimps + clasps - Tools: needle nose pliers, sharp scissors First thing to do is get your zippers! 1. These bangles are sweet, and have a definite friendship bracelet vibe. Use colored zippers for these, in whatever colors you like. Attach cord ends so that you can add a clasp and loop.
Tote Bags « KlassDSign. Két vászontáska kollekció után egy bőrrel kombinált farmertáskávál köszöntöttük az őszt.
Az új kiegészítők az előzőkhöz hasonlóan a viselő személyiségéhez és ruhatárához választhatóak. A kétféle farmertáska két különböző bőrfüllel készült el és négy különböző felirattal kapható. Híres emberek idézetei helyett most pozitív gondolatok közvetítik az új darabok üzenetét.