
great minds discuss ideas, average minds discuss events and small minds discuss people... ✿Love always and deeply... Im a kind hearted person with goals of becoming great...
DIY- Neon Jewelry + Shoulder Cut Out Shirt. DIY Wrap Bracelet. You should all know by now that we are all about stacking bracelets on our wrists.

The more, the better. In fact . . . the most, the best! With that being said, we’ll show you how to master a version of the ever so popular wrap bracelet. It’s so simple and addicting, you’ll soon be churning out these wristlets with your eyes closed. Clearly this arm party train isn’t stopping and it’s about time you get on board! You’ll need (for a double wrapped bracelet) :* Lengths will vary depending on the size of your wrist (see comments for suggestions).
Fold the length of leather cording in half to form a loop. Place the ball chain along the leather cording with the end of the chain meeting the end of the wrap. DIY Braided Bead Bracelet. DIY Studded Sneakers. Studding sneakers has been on our DIY to-do list for awhile now.
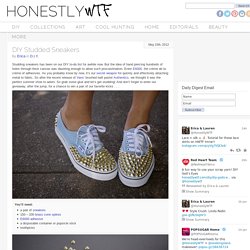
But the idea of hand piercing hundreds of holes through thick canvas was daunting enough to allow such procrastination. Enter E6000, the crème de la crème of adhesives. As you probably know by now, it’s our secret weapon for quickly and effectively attaching metal to fabric. So after the recent release of Vans‘ brushed twill pastel Authentics, we thought it was the perfect summer shoe to adorn. So grab some glue and let’s get studding! You’ll need:a pair of sneakers150 – 200 brass cone spikesE6000 adhesivea disposable container or popsicle sticktoothpicks Start by squeezing a small amount of E6000 into a disposable container or onto a wooden popsicle stick.
Press the spike into the sneaker, holding it in place for a few seconds. Continue adding spikes along the shoe’s baseline and working upwards in horizontal lines. Arrange the spikes, without glue, into awkward spaces before attaching them. DIY Chainmail Necklace. You’ll need: Start by separating the jump rings into two halves: 175 open and 175 closed.

Thread three closed jump rings onto an open jump ring. V and Co how to: jersey knit bracelet. I don't know what it is about this time of year that makes me just want to have my bare feet in the sand, be watching the sun setting into the ocean, and breathing in the warm salty air of the beach...as i get older, more and more i find myself missing that place i used to go to almost every.single.day. as a teen.

(my skin doesn't miss it. as a matter of fact, i now wish i listened more and DID put SPF on my face...hindsight is 20/20). my mom calls me from her walk on the beach almost every morning... *sigh*yeah, i get a little homesick around this time of the year. heck on my pinterest my "dreaming of summer" has the most pictures in it. ah yes. i miss my ocean. case in point. this bracelet, brought a flood of memories, not because i used to have one like it but because i can totally see me wearing it by the beach, not caring that it's gotten salty and wet, because i can totally make another one in like less than 5 minutes flat when i get home.
*sigh* okay... *cut off excess tails! DIY Braided Hex Nut Bracelet. We’re nuts for nuts.

Is there a more versatile and inexpensive DIY component than a hex nut from the hardware store? You can imagine our excitement when we first discovered Philip Crangi’s Giles & Brother Hex Collection. Honestly, nuts braided into jewelry is WTF genius! With a few items that we always seem to have lying around, we tackled the technique and made our own spine-like braided hex nut wrap bracelet. You’ll need:3 strands of cotton butcher’s twine cut into one yard pieces18 small brass hex nutsa bit of dexterity! Gather the 3 strands of twine and tie a knot at the top, leaving about 2 inches of slack. Keep your thumb at the base of the braid, holding the nut in its place. Repeat the steps, by threading the rest of the nuts to the outer pieces of twine before they are crossed over. The bracelet should wrap around your wrist at least two or three times.
Good luck!! (top image from here, rest of images by Honestly…WTF) DIY Wrap Bracelet. DIY Lace Earrings. Dolce & Gabbana‘s Spring ’11 collection undoubtedly furthered our already fanatical obsession with lace.

Honestly, how dreamy is the collection?! We thought we’d make good use of some vintage lace trim we had laying around and turn them into earrings similar to the ones we saw on the runway. And thanks to some tips from a DIY previously featured on Poppytalk, making lace earrings proved be a cinch! Mix equal parts glue to water in a bowl. Cut your shapes from your lace trim or doily, making sure both pieces are symmetrical.