
DIY: Tutorial - Framed Vertical Succulent Garden... ...or as I like to call it, Living Art!
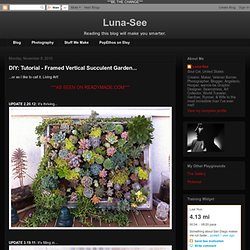
UPDATE 3.19.11: It's filling in... I have a small pile of vintage frames collecting dust so I thought I'd use one to make a hanging succulent garden. I didn't have much luck finding one particular tutorial that best suited my needs so I gathered mental notes from a few sites, measured my frame and went off to the hardware store with little more than a concept of how it was all going to come together. Miniature Greenhouse. Follow I have always wanted a greenhouse of my own.

Until that day comes, this miniature greenhouse is keeping me pretty happy. Wednes-DIY Home Décor: The Light Bulb Vase. This week we’re sharing some of the blog’s greatest hits!
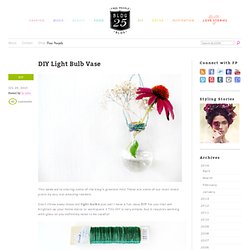
These are some of our most loved posts by you, our amazing readers. Don’t throw away those old light bulbs just yet! I have a fun, easy DIY for you that will brighten up your home decor or workspace :) This DIY is very simple, but it requires working with glass so you definitely need to be careful! What you need: A light bulb (any shape or size will work!) , pliers and gardening wire. Step One: First you need to remove the little silver layer on the bottom of the light bulb. Step Two: Now you have to remove the black cap from the bottom of the light bulb. Step Three: Once the black glass was removed it was really easy to get the little glass tube and wiring on the inside of the bulb out – I simply tapped it with the pliers and it broke right off.
DIY Stamped Silverware Garden Markers « My so called crafty life. This DIY is really fun to make, and if you have a relative or friend with a workshop and plethora of tools to help you, it’s a breeze. Stamp your silverware to mark your herbs, veggies, or even stamp your names as a fun idea for garden art. Hanging plant. Plants in tea cups. If I've made a good enough impression on you to pop in now and then recurrently you will soon notice that everything about me, from my mood to what I do, even what kind of foods I eat, is predicted by the weather.

Check the forecast and you'll know what I'll be having for dinner. Something along those lines. ;) And so now that it's gray and rainy, but still a pleasant temperature, a weather perfect for growth and life, I want to bring some of all that wonderful greenness into the house. But to do it from the dry, warm side of the window. Having seen people grow herbs in cute little teacups, I've been going to markets and charity shops and buying porcelain items like I was about to have a small country over for tea.
Inspiration: And my attempt: A selection of china and a few cheap, but cute little plants. While the plastic pots the plants come in are ugly (and most likely won't fit in your average tea cup), they are really useful for water drainage. Shaped plant paper. Plantable Paper. Paper making is a craft that dates back about 2000 years.

Modern paper making has is roots in China. In 105 AD the technique for turning tree bark, rope remnants, rags and old fishing nets into pulp and then sheets of paper was developed. In our modern world we no longer have an appreciation for the art of handmade paper. Machines have taken over the work of skilled artisans and the demand for cheap paper has taken it's toll on the environment by diminishing forests and generating unbelievable amounts of garbage. In the United States less than 5% of our nations indigenous forests remain and Americans generate 160 million tons of garbage annually! Today we are going to learn the basics of handmade paper making. Traditionally, handmade paper has always used recycled materials. Newspaper, old printer paper, tissue paper or construction paperWildflower or herb seedsWindow screen2 wooden frames or picture framesBlenderPlastic basinOld towelsBaking sheetsRolling pin The Frame: The Pulp: Food Jar Terrariums. Science in a jar is something that scores me some serious cool points in the scientist in training universe.

That’s especially true when it means that we can head out for a walk around our local park – or even the backyard – with express permission to pick up, handle, pack away and take home anything cool and natural found along the way. I woke up the other morning to a countertop full of empty food jars with lids – which completely stumped me since it seems practically impossible to amass such a collection without realizing it. Luckily, I got to my e-mail and found the daily dose of Design Sponge before running off to the return center because there it was – my cool points for at least a week. The tiny person just about lost her mind when she saw some awesome food jar terrariums up on the screen. “Now we know what to do with mossy!” And, so began our terrarium home-building adventure – mossy in tow. Here’s what you need: - Some moss - Glass jars of all sizes with lids Directions: 1. 2. 3. 4.