
Leg Vise (Threadless) - 8. Homemade Woodworking Vise, Page 3. Homemade Quick Release Vise, continued I decided to use 3/4" steel pipe for the guide bars and use floor flanges to attach these to the moving jaw.
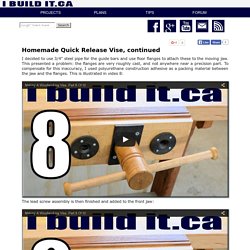
This presented a problem: the flanges are very roughly cast, and not anywhere near a precision part. To compensate for this inaccuracy, I used polyurethane construction adhesive as a packing material between the jaw and the flanges. This is illustrated in video 8: The lead screw assembly is then finished and added to the front jaw: With the major parts fabricated, it was time to mount the vise on my workbench.
These allow the bolts to move slightly, to compensate for the tops seasonal expansion / contraction. The fixed jaw is screwed to the bench with seven 2-1/2" screws. Here's a good view of the quick release jaws. The open / close lever pivots on a 3/8" bolt, and double-nutted to the under carriage. The 1/2" pivot bolts get lock nuts. Here's the unit fully assembled: Complete and ready for use. How To Make A Wooden Kant Twist Clamp. Homemade Clamps And VisesMarch 8, 2014 Wooden Kant Twist Clamp I believe I first saw this type of clamp while watching Frank Howarth's excellent woodworking videos, and immediately thought that these could be made from wood.
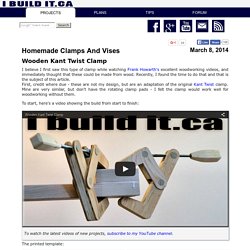
Recently, I found the time to do that and that is the subject of this article. First, credit where due - these are not my design, but are an adaptation of the original Kant Twist clamp. Mine are very similar, but don't have the rotating clamp pads - I felt the clamp would work well for woodworking without them. To start, here's a video showing the build from start to finish: The printed template: After printing, confirm the template is correct by measuring between the points shown above, right. Next, I cut out all of the parts from the paper template and pasted them to the plywood: I then cut them out roughly on the band saw. Horizontal Tilt-top Router Table Project.
A tilting router table can provide more options than a standard table for shaping parts, cutting joinery and more.

Sure, a regular router table that mounts a portable router vertically is great for all kinds of shaping jobs. But a router table that mounts the router horizontally is even better for tasks such as panel raising, joinery cutting and other shaping jobs where you’d rather have the work flat on a table than run it vertically against a fence. Laying flat, the table works like a regular router table, perfect for raising panels and other jobs, but tilted it opens it up to cut interesting angled joinery. But this horizontal table has a versatile twist: its table tilts, allowing you to do a variety of work that’s difficult or impossible on a regular flat router table. For example, you can shape angled tenons on the ends of aprons or stretchers that join the splayed legs of a stool or chair. Versatile Design Kicking Off the Construction Process Getting to Tilt. Multifuntion tool cart. The MF-TC is a homemade tool cart, in my workshop i have my sysport workbench and for small job site work i designed the MFTB tool box.
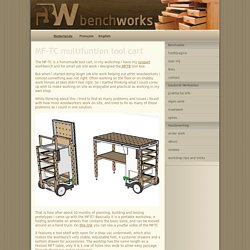
But when i started doing larger job site work helping out other woodworkers i noticed something was not right. Often working on the floor or on shabby work horses at best didn't feel right. So i started thinking what i could come up with to make working on site as enjoyable and practical as working in my own shop. While thinking about this i tried to find as many problems and issues i found with how most woodworkers work on site, and tried to fix as many of those problems as i could in one solution. That is how after about 10 months of planning, building and testing prototypes i came up with the MFTC!
It features a tool shelf with room for a shop vac underneath, which also makes the workbench very stable. Here you can see the bottom drawer which contains all the necessary accessories and more. They are also available in French and in German. A Bandsaw box KIDS can make. I've tried all sorts of box projects with kids.
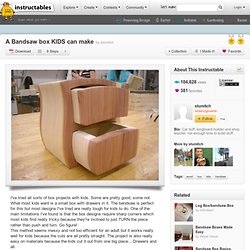
Some are pretty good, some not. What most kids want is a small box with drawers in it. The bandsaw is perfect for this but most designs I've tried are really tough for kids to do. One of the main limitations I've found is that the box designs require sharp corners which most kids find really tricky because they're inclined to just TURN the piece rather than push and turn. Go figure! Learning Objectives: -The student will learn to creatively solve a design problem...
Materials: -Light softwood (pine, poplar) approx 1" thick, 6" wide and 30" long. Tools: -Paper, carbon paper for layout. Submitted by HD Stafford Middle School for the Instructables Sponsorship Program. Résultats Google Recherche d'images correspondant à. DIY: Réalisation d'un séparateur cyclonique (cyclone dust separator) pour aspirateur d'atelier et CNC.
L'usinage à commande numérique, c'est bien mais selon les matières usinées, cela peut faire pas mal de déchets et de poussière.
Disposant d'un aspirateur eau et poussières Kascher WD3300, j'ai vite vu que le sac se colmate assez rapidement lors de l'utilisation en environnement CNC, notamment lors de l'aspiration de copeaux de MDF. J'ai donc cherché une solution et trouvé les séparateurs de poussière de type 'cyclone'. Malheureusement, ces solutions sont soit très chères et de grande taille, soit pas disponibles en France. Workbench Design Home Page. Roubo-Project201.jpg (Image JPEG, 900x600 pixels) 9,932 Free Woodworking Plans, Free Wood working Projects & Scrollsaw Patterns.