Arts-and-crafts-14. {Valentines day} pixelated popup card. I‘ve been scratching my head trying to come up with a card for my hubby {AKA the non-romantic type}.
I finally decided to make this pixely popup heart card! They are really minimal (which I love) and take about 20 minutes to make (that includes the card, insert and envelope). You can even make some pixely confetti to put inside the card (if you are a big kid like me!). Full instructions and printable templates below! (BTW I remember seeing something similar in a popup book years ago. How to 1. (If you have a cutting machine then see note at end of post!) Cut along the black lines and score the grey lines. 3. 5. 7. Edited to add: The lovely Kayla from saynotsweetanne has send me a .dfx file of the card which you can use if you have a cutting machine. 7710_32da.jpeg (imagen JPEG, 435 × 3307 píxeles) Arts-and-crafts-26. Arts And Crafts Photo Gallery. 45 Awesome Free Bag Making Tutorials. How to Make A Decorative Chrysanthemum Mirror. Chrysanthemums are some of my favorite flowers.
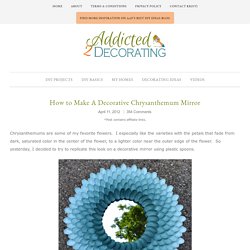
I especially like the varieties with the petals that fade from dark, saturated color in the center of the flower, to a lighter color near the outer edge of the flower. So yesterday, I decided to try to replicate this look on a decorative mirror using plastic spoons. So obviously it doesn’t look exactly like a chrysanthemum, but I think it’s pretty good! What do you think? I had fun with this project! First, I bought six packages of 48 plastic spoons, and I cut the handles off of all of them. Next, I was in the mood to craft…not to use power tools. But here’s what I did. Then I flipped it over, with the spoon handles on the bottom, and I covered the gap with thick paper (almost like cardstock) using hot glue to attach it. Then I started attaching the spoons with hot glue. I just kept adding and layering the spoons… For some reason, I didn’t take a picture after I attached the final row of spoon “petals”.
DIY Macrame Bracelet. Growing up by the beach in Southern California, the ability to knot a macrame bracelet was practically a right of passage.

Although those days are long behind us, we’ve never forgotten the ever-so-simple square knot technique. This time, however, we’re replacing hemp and wooden beads for more updated elements like colorful nylon cord and glossy metal charms. Happy knotting! You’ll need: Start by cutting the knotting cord into two 30 inch, two 20 inch and one 10 inch lengths. Center the 30 inch cord under the two middle strands. Pull tightly and slide the knot up to the top. Finish the 2nd half of the square knot by folding the left cord over the middle strands and under the right cord.
Pull tightly and repeat the steps – left, right, left, right . . . To finish the knots, thread one of the cords onto a needle and sew up the center of 3-4 knots along the backside. Winter 2009. Approximately 4.5 inches in diameter Foamies can be made with small amounts of any sport weight cotton yarn.
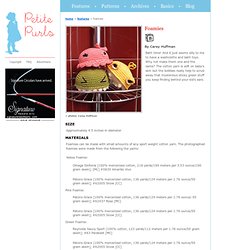
The photographed foamies were made from the following the yarns: Yellow Foamie: Omega Sinfonia [100% mercerized cotton, 218 yards/199 meters per 3.53 ounce/100 gram skein]; [MC] #0830 Amarillo Vivo Patons Grace [100% mercerized cotton, 136 yards/124 meters per 1.76 ounce/50 gram skein]; #62005 Snow [CC] Pink Foamie: Patons Grace [100% mercerized cotton, 136 yards/124 meters per 1.76 ounce/ 50 gram skein]; #62437 Rose [MC] Patons Grace [100% mercerized cotton, 136 yards/124 meters per 1.76 ounce/50 gram skein]; #62005 Snow [CC]
Crochet School - Table of Contents - Craftyminx. Crochet School - Table of Contents Posted by Craftyminx on November 23, 2011 at 01:26 PM in Crochet, Crochet School, Tutorials | Permalink Technorati Tags: "crochet school", "learn to crochet", crochet Reblog (0) | | | |Digg This|Save to del.icio.us.