
My Girls' Storybook Princess Party. Just so you know...This is a LONGG post LOADED with DIY ideasand Fun Party Details.

You've been warned. :)My Girls recently turned 1 and 3! (ahh! Still in shock.) I love putting together their birthday parties and making it a special day full of fun memories.One of the best parts of being a mommy has got to beseeing their faces when I put together fun things like this. They are so sweet! Sophia wanted a princess party but was also in love with anything mermaids! It started with the invite..I made fun DIY Pop-Up invites! "To get to their Castle you must travel through the butterfly garden, past the mermaid candy cove and the pirate ship of captain bubbles.
Each place on the map matched up with a station at the party! Supplies & Cost of Castle Boxes...FREE Paint...FREE (mixed white and pink leftovers) Banner Garlands...FREE (Designed/Printed on Cardstock and Sewn together.) Drawbridge(working!)... Zip Ties...Target (Home Depot has a 100 Pack - $4...LOTS leftover.) Little origami elephant. You know how sometimes you need to take a break from work and fold an elephant?
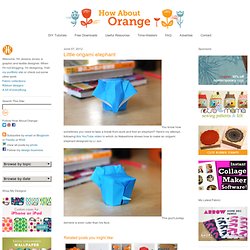
Here's my attempt, following this YouTube video in which Jo Nakashima shows how to make an origami elephant designed by Li Jun. This guy's pudgy derriere is even cuter than his face. DIY Faux Snow Cone Party Garland & Gift Embellishment. As soon as the snow cone shack in our neighborhood opens up, we know that Summer is officially here!

The bright candy colors and the sparkle of glittery ice makes the eyes light up of both young and young-at-heart! What better way to capture the essence of summertime fun and bring it indoors, than with this sweet DIY Faux Snow Cone Garland and Gift Embellishment. Bonus: these ones won’t melt everywhere! Follow below for the simple steps. This would also be a fun project to do with kids…they will have a blast mixing up the paint and pouring on the glitter (just be sure to give little ones a hand with the glue gun). This DIY post was sponsored and made possible by Method…”Clean Happy.” This month Method is hosting a fun contest and asking fans (like you) to guess how many bottles of Method hand soap it took to build the spectacular rainbow light installation in this month’s video. Visit Method’s guessing contest page on Facebook to enter. DIY Garland – Supplies needed: Steps 1 and 2 1. 2. 3.
A wall of confetti is my fave. You better believe that is the half wall looking more festive than ever.

This installation required a boatload of confetti, a sheet of plastic, spray adhesive and a couple runs with the vacuum. It has definitely added some happy to our apartment. Mini Marquee Sign with Lights. Nov 5 We made this giant marquee sign last summer and I loved making it so when I saw these Mini Globe Lights I knew had to make a mini version.
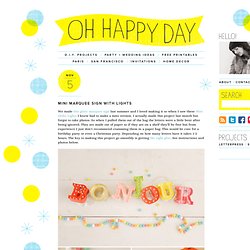
I actually made this project last month but forgot to take photos. So when I pulled them out of the bag the letters were a little bent after being ignored. They are made out of paper so if they are on a shelf they’ll be fine but from experience I just don’t recommend cramming them in a paper bag. . Click through for full instructions and photos! (p.s.: The letters don’t light up separately, it’s just a photoshop trick.
Materials Needed: Scissors, Quick Dry Tacky Glue , X-acto Knife, Whole Punch, Cardstock, Free Template, Ruler, Mini Globe Lights Step 1: Download and Print the free template onto cardstock. Credits + Contributors: All photography by Heather Zweig for Oh Happy Day Art Directed by Jordan Ferney Produced by Ashley Rose Kirschling Sorry, the comment form is closed at this time. Fruit Balloons DIY. May 3 by Brittany Watson Jepsen We’ve been planning a “fruit party” for a few years now, the gist is that everyone brings an exotic fruit and we, the hosts, provide a batch of the more common kinds.
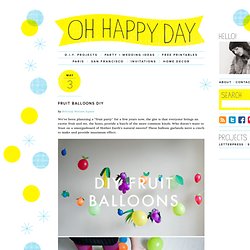
Who doesn’t want to feast on a smorgasboard of Mother Earth’s natural sweets? These balloon garlands were a cinch to make and provide maximum effect. You will need: balloons (make sure to get some long ones for bananas), green paper for leaves, twine, scissors, tape Step 1: Blow up your balloons. Step 4: Crease the leaf to provide the 3D effect. Photography by Hilda Grahnat Sorry, the comment form is closed at this time. Birthday party ideas and diy party packages.