
Honestly WTF. DIY Friendship Necklace. As soon as Lauren and I saw this editorial in Flare Magazine, we knew we had to recreate these awesome, friendship bracelet-like necklaces.

We promise they are super easy to make and the perfect way to pass the time during those long summer roadtrips. To make a 2-tone necklace, cut a long piece of rope and wrap two different colors of embroidery thread around its own bobbin. Tie a starter knot along with the two colored threads you are using, leaving at least 3 inches of slack, Tape down the slack to a flat surface or safety pin it something that will help keep it in place (feeling nostalgic yet?). Lay the color that isn’t being used (shown here in purple) in your left hand, along with the rope, and hold them taut. Take the active color (shown here in red) in your right hand, pass it over the rope, loop it under and back through the opening. To alternate colors, simply put the inactive color (red) in your left hand and the new active color (purple) in your right. Your home for all things Design. Home Tours, DIY Project, City Guides, Shopping Guides, Before & Afters and much more.
Kate’s tin travel candle. I can’t get enough of these altoids tins!

They are so useful. this week, there was a small earthquake in my area and it got me motivated to start getting prepared for emergencies. i covered this tin with pretty paper to make a nice travel candle (mint scented…get it??) , but you could make a bunch of these quickly for emergency kits, camping, etc. enjoy! – kate CLICK HERE for the full project instructions after the jump! What You’ll Need: 1. altoids tins 2. candle wicks 3. wax (i used microwaveable soy wax from a craft store) 4. mod podge (a glue/sealant available at craft stores. it is non-toxic and non-flammable 5. decorative paper 6. pencil 7. scissors 8. paint brush 9. wax coloring or scents (optional) Instructions: 1. clean the altoids tin thoroughly. 2. trace the top and bottom on your paper and carefully cut out shapes. 3. measure the width of the sides for the top and bottom. for the bottom, measure to the bumps on the front side where the top and bottom connect.
Tripod camping stool. In honor of this month’s outdoor theme, why don’t we build an old-fashioned camping stool?
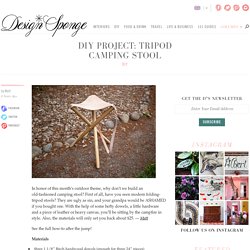
First of all, have you seen modern folding-tripod stools? They are ugly as sin, and your grandpa would be ASHAMED if you bought one. With the help of some hefty dowels, a little hardware and a piece of leather or heavy canvas, you’ll be sitting by the campfire in style. Also, the materials will only set you back about $25. — Matt See the full how-to after the jump!
Materials three 1 1/8” Birch hardwood dowels (enough for three 24” pieces)one brass 2.75” boltone 1.5” eye-hole bolttwo brass acorn nutsthree brass washersthree brass finishing washersthree brass 1” wood screws (big enough not to slip through the finishing washer)finish (I used Osmo PolyX-Oil)leather or other heavy material for the seat Tools. Chunky finger-knit pillow. My knitting skills are pretty basic, but I’ve been wanting to expand them, especially for home projects.

After a failed attempt at a blanket last winter, I hung up my needles and haven’t really returned to knitting since. This simple knit pillow tutorial is just the kind of project to pull me back, even in the warmer months. Anne Weil of Flax and Twine created an easy-to-follow tutorial for finger knitting, but then decided to make this chunky striped knit pillow DIY as an example of how to use the finger knits. Finger knitting is a great craft for kids, but as you can see here, the simple knitted strands can be quite sophisticated when used for sewing projects. I love how textural and rich this pillow looks, and I’m picturing tons of great variations: fun color combos like navy and red, pink and coral, camel and bright yellow. Read the full how-to after the jump . . . Want to achieve that chunky knit-pillow look without actually knitting?
Materials Instructions. DIY Project: Stitched Wool Phone Case. Solid perfume pocket watch locket. Try as I might, I cannot seem to grasp even the most basic of feminine beauty rituals.
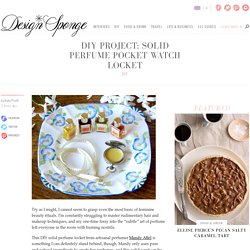
I’m constantly struggling to master rudimentary hair and makeup techniques, and my one-time foray into the “subtle” art of perfume left everyone in the room with burning nostrils. This DIY solid perfume locket from artisanal perfumer Mandy Aftel is something I can definitely stand behind, though. Mandy only uses pure and natural ingredients to create her perfumes, and this solid scent can be easily applied with no risk of over-dousing.
Before & after: bohemian chic nursery. One of the joys of working for D*S is our loyal readership.

We love seeing repeat submitters over the years because it means we get to follow their lives a little bit: first home, first office, first nursery, and so forth; it’s kind of like being part of the family. We’re longtime fans of designer Justina Blakeney’s style: it’s bohemian, feminine, earthy, effortless and so much fun. We’ve posted a few of her projects before, and now she’s sharing her brand new nursery with us.
Unsurprisingly, I love it! Utilizing some collected knick-knacks from around the house, a few gifted pieces and some fun DIY projects (including a pot rack for hanging clothes and an upholstered wall like Amanda’s — yay!) “Before” photograph by Jennifer Young Have a Before & After you’d like to share? Read the full post after the jump . . . Faux french windows. A couple weeks ago, Daniel submitted a living room redesign, and it was a huge hit, especially the work he did to transform the plain windows into this beautiful paned version.

Daniel was kind enough to offer a tutorial on how to recreate the wooden panes.