
Homemade Bath Salt {DIY Gift} Homemade bath salt is a great gift and it only takes a few minutes to make!
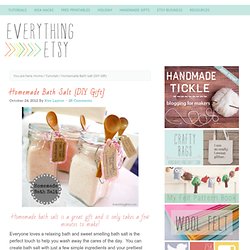
Everyone loves a relaxing bath and sweet smelling bath salt is the perfect touch to help you wash away the cares of the day. You can create bath salt with just a few simple ingredients and your prettiest jars. Choose you favorite color and essential oils to formulate a homemade bath salt all your own. Did you know that there’s tons of research about the wonderful health benefits of salt in your bath water? I read that it helps with muscle aches, stress relief, improving circulation, skin hydration, headache relief and more…just Google it! I don’t know about you, but I can use all the stress relief I can get!!! Homemade bath salt is super easy and inexpensive to create.
Supplies: 1 cup Epson Salt1 cup Sea SaltEssential OilFood Coloring Gather your supplies and start by mixing 1 cup Epson Salt and 1 cup of Sea Salt together in a large bowl. Add 3-6 drops of food coloring. Isn’t it pretty all pink and sparkly?!? ~Kim. Time for Tea Soap. Drinking tea is such a lovely ceremony, what with the dainty cups and small spoons and little dishes reserved only for steeped tea bags.
The aroma is such a huge part of that experience. Sadly, I’m finding that one can only drink so much tea in a day. So why not pull those luscious scents into our lives in other ways? Year Boxes. In keeping with my "documenting life" theme, I found this little craft over a year ago and I knew I had to recreate it.

I found it HERE... the blog needs no introduction because all know and love Design Sponge. The Year Box The premise of the year box is that you have a card for every day of the year and they are divided by month. On every card, each line is a different year, I just started mine so my first year is 2012. Kind of boring this year but each card holds 12+ years depending on your index cards. I have to admit that some days I have been bad and didn't write anything... but for the most part I'm keeping up with it. What you need: These cute berry boxes, I found mine online at an etsy shop. Date stamp and index cards (cut in half). Postcards (also cut in half) of course Design Sponge had real vintage postcards, I had to cheat and found this cute pack with a "vintage look" but were actually new.
Mini Marquee Sign with Lights. Nov 5 We made this giant marquee sign last summer and I loved making it so when I saw these Mini Globe Lights I knew had to make a mini version.
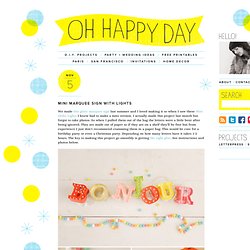
I actually made this project last month but forgot to take photos. So when I pulled them out of the bag the letters were a little bent after being ignored. They are made out of paper so if they are on a shelf they’ll be fine but from experience I just don’t recommend cramming them in a paper bag. . Click through for full instructions and photos! (p.s.: The letters don’t light up separately, it’s just a photoshop trick. Materials Needed: Scissors, Quick Dry Tacky Glue , X-acto Knife, Whole Punch, Cardstock, Free Template, Ruler, Mini Globe Lights Step 1: Download and Print the free template onto cardstock. Credits + Contributors: All photography by Heather Zweig for Oh Happy Day Art Directed by Jordan Ferney Produced by Ashley Rose Kirschling Sorry, the comment form is closed at this time. The Easiest Pillow Cover Ever. This is the easiest pillow cover ever.
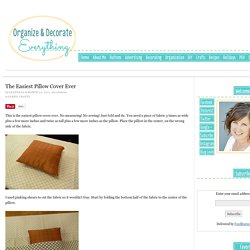
No measuring! No sewing! Just fold and tie. You need a piece of fabric 3 times as wide plus a few more inches and twice as tall plus a few more inches as the pillow. Place the pillow in the center, on the wrong side of the fabric. I used pinking shears to cut the fabric so it wouldn’t fray. Then fold the top down to the center. Fold both ends like the picture. Bring one side over the top of the pillow. Then the other side. Now tie the ends in a square knot. Handmade Clay Pots. This post is contributed by Claire of Fellow Fellow.
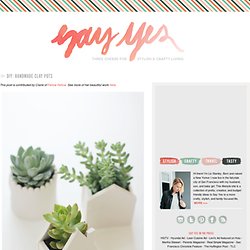
See more of her beautiful work here. With Mother’s Day coming up in a couple weeks, these handmade clay pots are the perfect vessel to house a mini plant as a pretty and thoughtful gift. Keep reading to see the full instructions, downloadable pdf, and step by step images Here are the instructions:You will need: - Knife - Oven-bake clay - Rolling pin - Non-stick baking paper - Ruler (optional) - House template printed and cut out (optional). Click here to download the templates I used. - Smoothing tool (or something with a long handle that can smooth the clay out) Step 1. Roll out your oven-bake clay on a piece of baking paper until it’s approximately approx. 1/8″ thick or a bit more.