
Leather Fold Over Clutch. I’ve been eying leather fold over clutches in bright colors like these beauties below for some time now and thought they would make a really great DIY project.
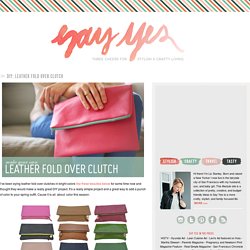
It’s a really simple project and a great way to add a punch of color to your spring outfit. Cause it is all. about. color this season. For these final product images, I teamed up with photographer Kate Skogen of JetKat Photo who specialized in weddings in the bay area. Check out her beautiful work here. I found this great looking faux leather in the most fabulous hot pink and knew we were meant to be together. You’re done! DIY Project: Stitched Wool Phone Case. I like perfect, but I’m a bigger fan of perfectly imperfect.

The blanket-stitch is one of those imperfect things I’m ok with. It’s like the whittling of hand sewing. No fancy tools, no expensive machines. Wool Camera Wrap. The Forty Minute Tote - Knitting Crochet Sewing Crafts Patterns and Ideas! I love straightforward, well-constructed projects that yield something practical.
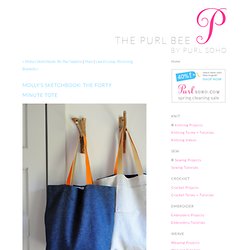
I know this might sound a bit boring, but the efficiency and elegance of simple design really gets me excited. So it’s no surprise that one of my favorite all time projects (if I do say so myself) is my Twenty Minute Tote. It’s something I go back to again and again, any time I want to highlight a special fabric. I love its streamlined engineering and the fact that it really does only take 20 minutes! And so, in this same spirit of economic design, I thought I’d expand the Purl Bee’s family of quick totes with a new roomier bag, the Forty Minute Tote.
The Forty Minute Tote comes together in a quick, clear way, and it features a new favorite fabric, Robert Kaufman’s Cotton Linen Denim. Ps- The lovely wooden hooks featured in these pictures can be found here: Materials To make one 15-inch tall, 14-inch wide, and 5-inch deep tote bag: Cutting From the outer fabric: Cut two rectangles 17-inches by 18-inches. Make your own fabric prints using the sun. The folks who make Inkodye sent over a sample the other day.
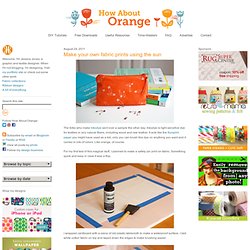
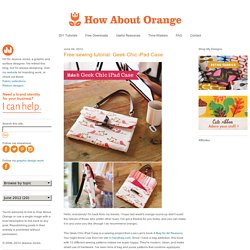
Inkodye is light-sensitive dye for textiles or any natural fibers, including wood and raw leather. It acts like the Sunprint paper you might have used as a kid, only you can brush this dye on anything you want and it comes in lots of colors. Geek Chic iPad Case. Hello, everybody!
How to make gift bags from newspaper. When I bought something at a store recently, the clerk handed me my purchase in a bag made from a newspaper.
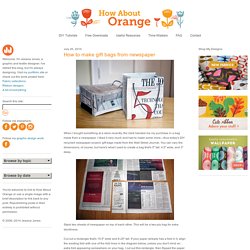
I liked it very much and had to make some more—thus today's DIY recycled newspaper project: gift bags made from the Wall Street Journal. You can vary the dimensions, of course, but here's what I used to create a bag that's 5" tall, 4.5" wide, and 3" deep. Stack two sheets of newspaper on top of each other. This will be a two-ply bag for extra sturdiness. Cut out a rectangle that's 15.5" wide and 8.25" tall. Fold a flap 1.25" down from the top. Cut two pieces of cardstock or chipboard to 4.25" x 1", then glue them on the widest two panels just under the top fold.
Put glue on the outside of the 0.5" tab and bring the left-most panel over to form the body of the bag, aligning the cut edge of the panel with the folded edge of the flap. DIY macaron coin purse. How to stencil with freezer paper. One of the projects at this Friday's Chicago Craft Social will be freezer paper stenciling.
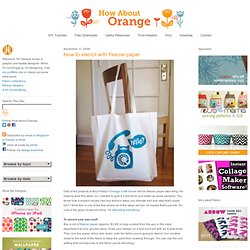
I'm helping lead this table, so I needed to give it a test drive and make up some samples. You know how a project usually has four tedious steps you tolerate and one step that's super fun? I think this is one of the few where all of the steps are fun. Or maybe that's just me. I'm now in the grips of stencil mania. To stencil your own stuff:Buy a roll of freezer paper (approx. $3.99) or beg a piece from the guy in the meat department at your grocery store. With a foam brush, stenciling brush, kitchen sponge, or other paint brush, apply fabric paint to the cut-away areas.
Let the paint dry (use a hairdryer if you're the impatient type, like me.) How to transfer an image to fabric with gel medium. I experimented with transferring an image onto fabric the other day.
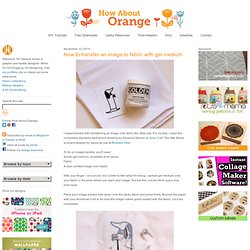
For my test, I used this completely adorable dachshund drawing by Kayanna Nelson of June Craft. The little fellow is downloadable for personal use at Bloesem Kids. To try an image transfer, you'll need: Acrylic gel medium, available at art storesFabricA laser printed image (not inkjet!) With your finger—or a brush, but I prefer to feel what I'm doing—spread gel medium onto your fabric in the area where you want your image. Not too thin, not too thick; just a nice even layer. Place your image printed side down onto the sticky fabric and press firmly. Dampen the paper with water, then gently rub the paper away from the image with your finger. The resulting fabric will be a bit stiffer where the gel medium was applied, and you'll be able to see it faintly.