background preloader

Sömnad

Facebook Twitter

Tutorial :: Fabric Scrap Basket. El blog de Georgina. Novedades en el sorteo Hola chicas, Vayan a ver el post del sorteo para poder enterarse de las novedades. Estoy super feliz de saber que son tantas las que se han inscripto, ya casi 700, me han sorprendido!!!!! Me gustaría pedirles que dejen UN solo mensaje por cada una.

Este es un sorteo muy democrático, ya saben, pueden inscribirse todas las que quieran, tengan blog o no, sean seguidoras o no. Por eso, por ser democrático, no borraré los mensajes "dobles" que han dejado algunas de ustedes porque entiendo que lo han hecho porque tienen muchas ganas de ganar los regalitos. Besos para todas, las espero en el otro post más abajo para contarles más..... Pincushion tutorial. This post has been re-worked, again, to perfection, and now including a new walnut shell stuffing option. 
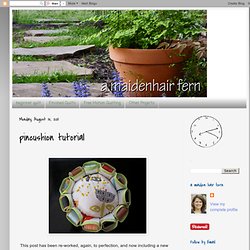
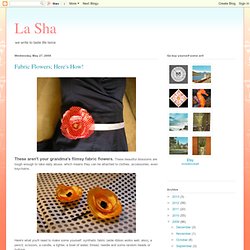
I finally found a great place for my grandmother's spools of thread from the 50's. 1.

FABRIC - Pick 2 fabrics that look good together. 2. BIAS TAPE - Joann fabrics is the best place to get your bias tape. Their online site has more colors available than at the store. When choosing bias tape, you have 2 options: DOUBLE FOLD 1/4", shown here in red. SINGLE FOLD 1/2", shown in blue and has lots more color options available. You will need 2 YARDS OF BIAS TAPE. 3. Cutting circle - 8" sewing circle - 5 1/2" 4. (Adjustments. 5. 5. Sew bias tape around both circles, using thread the same color as your bias tape. On the right side of one of your circles you just cut out, mark the smaller circle with chalk or erasable ink as shown below. Mark perpendicular 1/2" lines along outer edge, every 2 1/4" for vintage spools, and 1 3/4" for smaller spools.

Back stitch on both ends. Free New Big Betty pattern.pdf. Purse frames de-mystified (aka. Laundry Day clutch purse) Tutorial. **UPDATE** If you'd like this tutorial (and any of my others) in PDF format click here. 
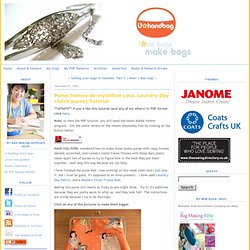
Note: to view the PDF tutorial, you will need the latest Adobe Viewer program. Get the latest version of the viewer absolutely free by clicking on the button below: HAVE YOU EVER: wondered how to make those lovely purses with clasp frames; dented, scratched, and ruined a metal frame/frames with those darn pliers; taken apart lots of purses to try to figure how in the heck they put them together...well step this way because we can help. I have finished the purse that I was working on this week (ohh! And I just love it, but I must be good, it's supposed to an Xmas present). Making this purse isn't nearly as tricky as you might think.

Click on any of the pictures to make them bigger. Front view Interior view Flat bottom & side view Here's how I put it together You will need: 1. Take your frame and draw around the outside (just the outside, not the inside) of it, also include the points where the hinges stop. Bedsheet to Ruffled Pillow Tutorial. Pillow With Rosette Clusters From Felt Furnishings. I haven’t crafted with felt since I was little, but since picking up a copy of Anne Kyrrö Quinn‘s book, Felt Furnishings, I have a whole new universe of respect for the material. Anne was encouraged to revisit felt by her tutor in her final year studying Textile Design at London Metropolitan University, and she hasn’t looked back since.

The techniques she explores in this vibrant craft book truly transform felt into modern, eye-catching home accents. For this week’s How-Tuesday project, we’re sharing her pillow with rosette clusters. The gathered felt creates a feast of color for the eye; don’t the pictures just make you want to reach out and caress the nestled folds? Purchase Felt Furnishings Sometimes an idea for a new design will come to me when I’m playing around with a piece of felt in my hand. To capture these forms, I have used the traditional techniques of gathering and ruching to create highly textural surface structures from felt and felted wool fabric. Materials and Tools 1. DIY Ruffled Ice Cream Cones. We are so excited to share this diy with you, if you are planning an ice cream party believe us these are just the sweetest things to let each child take home with them!

Our amazing diy correspondent, Katie came up with this project for us and we just fell in love! We ended up hanging pink, peach and mint green ones from a white chandelier and the looked so cute and really added to the decor of the party! The little girls just adored them and were so excited when we let them have one! Most of them put them around their necks and pretended they were ice cream necklaces, it was so cute! Materials: 2 1/2" styrofoam balls 1 1/2 yards of lightweight cotton fabric Sewing machine or needle and thread Hot glue gun/glue Glue Scrapbook paper Cone template Polyester stuffing Ribbon Pins Cut fabric into strips about 44" long x 1.5 " wide using pinking shears.

Trace cone template onto your paper and cut out. Cut a circle roughly 8" in diameter out of your fabric. Every Creative Endeavor: How to make a Ribbon Flower Clip/Headband. These little flower clips and headbands are so popular right now. 
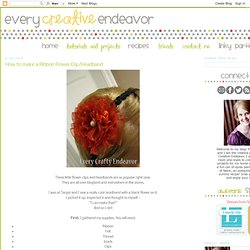
They are all over blogland and everywhere in the stores. I was at Target and I saw a really cute headband with a black flower on it. I picked it up, inspected it and thought to myself -"I can make that! " And so I did! First: I gathered my supplies. RibbonFeltThreadbradsClips Second: Cut two feet of ribbon.Third: Stitch a baste stitch all the way down one side of the ribbon. Fourth: Scrunch it up! Fifth: Cut a circle -the size you want your flower- out of the felt. Sixth: Pin your ribbon onto the outside of the circle.

Seventh: Stitch the first layer on. Eighth: Repeat again with a second layer and a third and a fourth until you are in the middle. Ninth: Cut off any extra ribbon and pull out the basting stitch. Tenth: Hot glue a brad or some sort of "bling" to the middle. Eleventh: Cover your clip with ribbon.You can see how to do that here. Twelfth: Hot glue the clip to the back.See my circle stitching - Then Enjoy! Cozy Slippers. Handmade Flowers. Phew! 
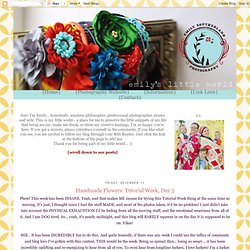
This week has been INSANE. Yeah, and that makes ME insane for trying this Tutorial Week thing at the same time as moving. It's just, I thought since I had the stuff MADE, and most of the photos taken, it'd be no problem! I just didn't take into account the PHYSICAL EXHAUSTION I'd be feeling from all the moving stuff, and the emotional weariness from all of it.

And I am DOG tired. So... yeah, it's nearly midnight, and this blog will BARELY squeeze in on the day it is supposed to be on. Still... So... Okay. These have been incredibly fun to make... to look at the finished product and feel like I have a little of the spirit of Anthro in me... a little vintage mojo... and a LOT of femininity. Love them so much, I kinda couldn't stop making them: Yeah. But CRAZY EASY, too. Okay, first, the inspiration. My Google quest led me to so many good, inspiring sites, like:EcoKaren: Fabric Flower TutorialLa-Sha: Fabric Flowers: Here's How! Step One: Select and cut your fabric Okay. Happy crafting! How to make a fabric flower. Maximum RABBIT designs: i've been crafting! My recent posts have been somewhat lacking in any actual craft projects so here is an update of what i've been making lately! This is made of several layers of tinted recycled dictionary pagesit is fairly thick and substantial i made it as a brooch but i'm not sure how long lasting it will be, i'm thinking of varnishing it but i really like to be able to feel the textures hmm next up is a rather girly brooch made of vintage lace and a truely gorgeous diamonte buttoni made these two about a week ago in a fleeting crafty moment i suddenly felt the "urge" to craft!

So my son is now in his new big boy bedroom with a brand new big boy high bed the tardis is no longer on the landing but the computer is which is good as i can keep an eye on my teen daughter during her MSN sessionsthere is still a huge ammount of sorting and tidying to do in my new workroom and we now have no spare room but it is all mine! I'll post photo's when it is finished! A brooch and a bobby pin. La Sha: Fabric Flowers; Here's How! These aren't your grandma's flimsy fabric flowers.

These beautiful blossoms are tough enough to take daily abuse, which means they can be attached to clothes, accessories, even keychains. Here's what you'll need to make some yourself: synthetic fabric (wide ribbon works well, also), a pencil, scissors, a candle, a lighter, a bowl of water, thread, needle and some random beads or buttons Here's how: First- Find some synthetic material. (Cheap Dollar Store scarves work great!) Next cut out some circles to make the petals. They don't have to be perfect- look at any real flower and you find that petals aren't perfect- they're all different shapes and sizes. When you've cut out as many petals as you'd like your flower to have, get out a bowl of water and light a candle.

Hold each petal just close enough to the flame to singe the edge. Go all the way around, until the petal is singed all the way around. Make sure to securely knot off the thread when you're finished sewing on the last bead on. A flower brooch for you favorite mom. Mother’s Day Felt Dahlia Corsage, a few notes. (Note added Feb. 2014: The website where this DIY originally appeared so I moved the full instructions to a page here on Not Martha and I also added the notes that appear below to that project page.

Go see it: Felt Dahlia Corsage.) Remember the Mother’s Day Felt Dahlia Corsage I created for Holidash? I made a bunch more to send out as Mother’s Day gifts and wanted to write down a few notes on what I learned. note on forming the petals Making a whole stack of these, I quickly discovered that clothespins work really well to hold petals as the glue sets, shown above. Notes on giving them I used matching thread for the backs. Then I wrapped them up all mysterious like. notes on various weights of felt Here are three flowers I made from different felts. Notes on where to find felt For those living in Seattle here is what I learned about buying felt locally, with huge thanks to @dancingsheepnw and @raintea for the source tips on Twitter.

If you’ve made one I want to see! 
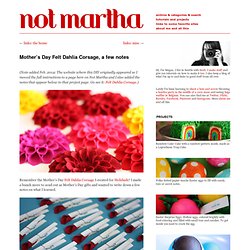
DIY Mother's Day Corsage: Felt Dahlia Flower Brooch - Holidash News.