
DIY Constellations Scarf. The home for green crafts and tutorials! My husband takes the train to work, and when the temperatures drop below freezing, that is not always the most pleasant walk.
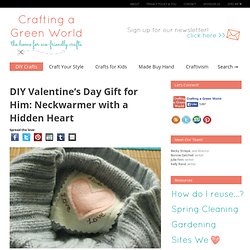
Not only is the cold tough on your body, but have you noticed that it’s hard to catch your breath when the air is chilly? Enter the neckwarmer! Polka Dot Cottage: Beginner Button Class. Posted February 7th, 2011 by Lisa Welcome to the Beginner Button Class!

For this first lesson, we will discuss how to prepare polymer clay for use, how to make a 1/2-inch solid-color button, and how to properly bake it. We’ll be making six buttons, two in each of three colors. Supplies + Tools 3 packages of Premo! Safety note: Any kitchen tool you repurpose for working with clay must then be dedicated to craft use, and not returned to the kitchen! Supply note: If you want to buy online, I recommend Polymer Clay Express for the clay and the blade (and for the lucite brayer or rod I will be recommending in a future lesson). Directions Premo comes in 2-oz blocks that are scored into four sections. Cut each of these three ¼ blocks into four smaller pieces. While your clay might feel soft and nice straight out of the package, it still needs to be conditioned.
Conditioning clay prepares it for use in any project. Use the knitting needle to poke two holes in the middle of the button. Faux Milk Glass Jewelry Pendants. Madigan made….
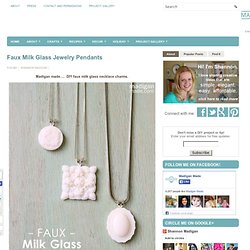
DIY faux milk glass necklace charms. - This easy craft is brought to by Plaid Crafts… all opinions are my own. - What I love about crafting is the freedom that time gives you to experiment. Make your own cabochon-like pieces without messy clay or resin? The Mod Melts come in two shades of plastic material… milk glass and sea glass. DIY: LIZZIE FORTUNATO INSPIRED TAOS BRACELET. I am a seriously huge fan of Lizzie Fortunato jewelry.

Every collection the Fortunato sisters put out, I am more in awe then I was the time before. I am definitely inspired by their jewelry. The Taos bracelet caught my eye recently. Misanthropy creations: 11 DIY Bracelets. (studs and pearls): diy: Elastic Hair Tie. This project was actually created by accident (somewhat!).

Recently, I was looking for a hair tie on my desk of crafty craziness, but instead found a roll of sewing elastic. It made me think of the Twistbands that I've received - and loved - in two of my past Birchbox subscriptions. DIY Painted Feathers. I’ve always loved the idea of painting fake feathers, and with festival season underway it seemed like the perfect time to do it.

I originally thought of these purely as decorations but then it occurred to me that they’d be a great finishing touch for a festival outfit. This is a great activity to do outside on a warm sunny day, and once you start it’s slightly addicting! What you need: fake feathers, paint (I used acrylic paint), and a paint brush. I got this paint from Utrecht and I love it. I added a little bit of water to the paint before applying to the feathers, and they absorbed the paint almost like watercolor. After the entire feather was covered I added some dots and lines with white paint. Get as creative and colorful as you want with the feathers! Perfume Locket. 15 Ways to Tie Scarves. DIY: Turn a Broken Necklace Into a Chic Chain Strap Tank Top.
Confession: deep down I am a bit of a fashion pack rat.
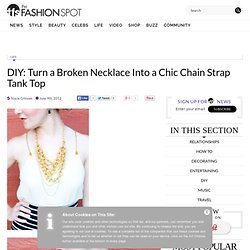
When it comes time to get rid of unworn wardrobe items, I usually have a tough time parting with some pieces because I never know what may come in handy later. The nude tank top in this project is a perfect example of my hoarding habits. Before I added the chain straps, this shirt hit just below my waist. DIY: How to Make a Galaxy Scarf. ☆☆☆How do you organize a party in space?
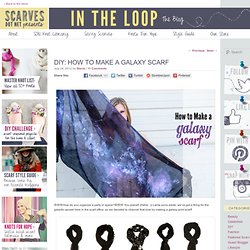
☆☆☆ You planet! (Hehe. ;)) Lame puns aside, we’ve got a thing for the galactic sprawl here in the scarf office, so we decided to channel that love by making a galaxy-print scarf! 3K+What you need: ☆A black scarf (We think cotton works best. Painting on linen leaves the fabric super stiff!) Ps. Step 1: First, spread out a thin layer of white fabric paint on a flat surface. Step 2: Once you’ve dipped various sections of your scarf into the paint, pat and massage the scarf so that the wet paint spreads out naturally (kind of like if you were to wad up a paper towel and squeeze/pat out excess water). 3K+Step 3: Rub the fabric of your scarf together to get rid of any large paint globs or spread out any choppy areas of thick paint. 3K+Step 4: After you’ve rubbed and spread out the paint on your scarf to your galactic taste, take the Simply Spray paint, and spray around the white paint sections on the scarf.
Temporary Tattoos Tutorial. How to Create the Ultimate Scarf Belt. We love figuring out ways to make old accessories new and exciting again.
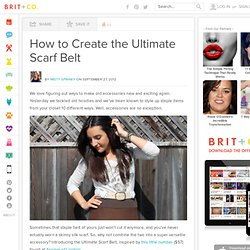
Yesterday we tackled old hoodies and we’ve been known to style up staple items from your closet 10 different ways. Well, accessories are no exception. Sometimes that staple belt of yours just won’t cut it anymore, and you’ve never actually worn a skinny silk scarf. So, why not combine the two into a super versatile accessory? Introducing the Ultimate Scarf Belt, inspired by this little number ($57) found at Aspinal of London. - StumbleUpon. When I was engaged, my sister gave me the best no-snag hair ties.
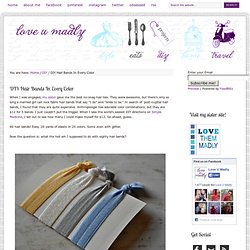
They were awesome, but there’s only so long a married girl can rock fabric hair bands that say “I do” and “bride to be.” In search of post-nuptial hair bands, I found that they are quite expensive. Anthropologie has adorable color combinations, but they are $12 for 5 bands. I just couldn’t pull the trigger. Zip-up Earbuds » LauPre. I love to have my music with me everywhere I go, but I hate the tangled mess my wires become when I toss them in my bag or pocket. Last night I whipped up a fun and functional solution by adding a zipper to my earbuds. This project took me around an hour to do (perfect for catching up on some t.v. from hulu.com). The supplies are few; basic sewing supplies, a pair of headphones, and a nice long zipper.
I happened to have this crazy purple and gold nike zipper I found thrifting a while ago, it seemed perfect for this project. The first step is to pull the earbuds apart, to separate the wires all the way down to the plug. Next, take one side of your headphones and one side of the zipper tape and start stitching the wire into the tape. It’s as easy as that!